
Answers to Frequently Asked Questions (FAQs) About Various Billiards and Pool Topics
Categories
Rail Cut Shots
See "English(side spin)" section
For more info, visit billiards.colostate.edu
Ratings
See "player ratings" section
For more info, visit billiards.colostate.edu
Rules
For more info, visit billiards.colostate.edu
Safeties
Safeties in Pool and Billiards
... how to plan and execute defensive safety shots in pool.
(external web-links) for more information:
see Chapter 5 (especially Section 5.06) in The Illustrated Principles of Pool and Billiards,
Disc III of the Video Encyclopedia of Pool Shots (VEPS) , and Disc III of the Video Encyclopedia of Pool Practice (VEPP)
30-degree rule examples
How can I use the 30-degree rule to help me plan safety and ball-in-hand shots?
This video from Disc III of the Video Encyclopedia of Pool Shots (external web-links) provides some examples:
For more information, see "VEPS GEMS - Part IV: Safety Play and Strategy" (Download) (BD, April, 2010)
"Big ball" effect
Where should I leave the object ball when hiding the cue ball?
This video from Disc III of the Video Encyclopedia of Pool Shots (external web-links) addresses this question:
"Big ball" effect
Where should I leave the object ball when hiding the cue ball?
This video from Disc III of the Video Encyclopedia of Pool Shots (external web-links) addresses this question:
For more information, see "VEPS GEMS - Part IV: Safety Play and Strategy" (Download) (BD, April, 2010).
General advice
What should I consider when planning a safety shot?
(external web-links):
Disc III of the Video Encyclopedia of Pool Shots and Disc III of the Video Encyclopedia of Pool Practice (VEPP) are dedicated to safety play and strategy.
Here's a useful safety challenge game and drill from VEPP-III: YouTube video here
For more information, see “VEPP - Part XIII: Safety and Carom Challenge Drills,” (Download) (BD, April, 2013).
Here's another useful drill for practicing safeties, from Disc III of the Billiard University (BU) Instructional DVD series: (external web-link)
YouTube video: Safety drills
from Neil:
- Look at controlling either the cue ball or the object ball. Trying to control both makes the safety much more difficult.
- It's generally easier to control the cue ball. So learn your tangent lines and speed control so you can put the cb where you need it.
- If possible, try and freeze the cb to another object ball. But, unless you are at an advanced level, or actually, your opponent is, you generally don't need to freeze the cb, just get it stuck behind another ball but too close to jump.
- When using the cb for the safe, see if you can hit the ob into a cluster to break them up. That way, you can run out when given the opportunity.
- Try and leave as much distance as possible between the cb and ob.
- Don't put the ob near a pocket, and try not to put it on a rail. If ob is within about 6" of the rail, it can become what is called a 'big ball' to hit. That means that you can hit it directly, or come off the rail and hit it. If it's farther off the rail, they pretty much have to hit it directly on their kick.
- If possible, try to plan it to where they will have to kick 2 or more rails to hit the ob.
- Don't put ob too near any money ball, they just might get lucky.
- If you can't break out a cluster with the ob, try and put the ob in a general area that you can break out the cluster if you get ball in hand.
- Sometimes your only safe or best safe is to just tie up several balls to make his run-out difficult. When doing this, don't tie up say the 6&7 if the 5 is right there to break them out. You can also put another ball on the same rail as a ball already on the rail, with the higher ball nearer the pocket.
- Don't take the safety shot for granted. Take the same amount of time you would to make a difficult shot. You are going for precision on one or both balls here. It's not a shot to be taken too lightly. Give it it's due respect.
For more info, visit billiards.colostate.edu
Side Spin
See "English" section
For more info, visit billiards.colostate.edu
Speed Control
Speed Control in Pool and Billiards
... how to judge and control speed in various types of pool shots.
(external web-links) for more information:
see Sections 3.03 and 5.02 in The Illustrated Principles of Pool and Billiards
and Disc I of the Video Encyclopedia of Pool Shots
Ball speeds and travel distances
How do cue ball and object ball speeds and travel distances vary with cut angle?
For stun shots, see the graph and summary statements on page 2 of: (Download)
TP 3.2 - Ball speeds and distances after stun-shot impact
For roll shots, see the graph and summary statements on page 3 of: (Download)
TP A.16 - Final ball speeds, distances, and directions for natural roll shots
and see: (Download)
TP B.5 - Rolling CB, direct-hit hop and ball travel distances
Here are some useful conclusion statements from the analyses:
What is tip height on the cue ball results in the best speed and distance consistency?
To help achieve the best speed and distance consistency, it is best to hit the CB at about 20% of the radius above the center (0.2R). For illustrations and explanations, see “How High or Low Should You Hit the Cue Ball?” (Download) (BD, September, 2011).
Drills and advice
Where can I find general advice and drills for improving speed control?
See "Fundamentals - Part VII: speed control" (Download) (BD, March, 2009).
Optimal tip height for speed control
Where is the best height to hit the cue ball for speed and distance control and consistency?
To help achieve the best speed and distance consistency, it is best to hit the CB at about 20% of the radius above the center (0.2R), which is about 60% of the total ball height. For illustrations and explanations, see "The Lag Shot" (Download) (BD, October, 2011). Hitting above center can also result in a more accuracy with CB direction (see follow accuracy in "follow" section).
Rail cushion speed change
How much speed does the CB lose when it rebounds off a rail cushion?
For steep angles into a rail, where the CB path is close to perpendicular to the rail (i.e., almost straight into the rail), the CB loses about half of its speed after rebound and skid. For more information and demonstrations, see: (YouTube)
HSV B.15 - straight-on kick shot rebound losses and spin changes for roll, stun, and draw shots
At very shallow angles to the rail, where the CB is moving almost parallel to the rail, very little speed is lost off the rebound.
Typical speeds for a range of shots
How fast does the CB travel for a range of shots?
Here are some typical values for various shot "speeds" in miles per hour (mph) and feet per second (fps):
soft touch: <1 mph = <1.5 fps
slow: 1-2 mph = 1.5-2.9 fps
medium: 2-4 mph = 2.9-5.9 fps
fast: 4-7 mph = 5.9-10.3 fps
power shot: 7-10 mph = 10.3-14.7 fps
powerful break: 25-30 mph = 36-44 fps
... how to judge and control speed in various types of pool shots.
(external web-links) for more information:
see Sections 3.03 and 5.02 in The Illustrated Principles of Pool and Billiards
and Disc I of the Video Encyclopedia of Pool Shots
Ball speeds and travel distances
How do cue ball and object ball speeds and travel distances vary with cut angle?
For stun shots, see the graph and summary statements on page 2 of: (Download)
TP 3.2 - Ball speeds and distances after stun-shot impact
For roll shots, see the graph and summary statements on page 3 of: (Download)
TP A.16 - Final ball speeds, distances, and directions for natural roll shots
and see: (Download)
TP B.5 - Rolling CB, direct-hit hop and ball travel distances
Here are some useful conclusion statements from the analyses:
- With a stun shot, the cue ball and object ball speeds and travel distances are the same for a 45-degree cut angle. The post-impact speeds are equal and about 70% of the initial cue ball speed. The distances are also equal and 50% of the distance the stunned cue ball would travel if there were no collision.
- With a rolling cue ball, the ball speeds and distances traveled are the same at a little less than a 1/2-ball hit,
which is slightly more than a 30-degree cut angle. - If a rolling cue ball hits an object ball squarely, the object ball will travel 6-7 times farther than the cue ball after impact.
- Distance vs. cut angle and ball-hit fraction plots, and approximate ball-distance proportions for various common angles can be found on pages 10 and 11 of TP A.16. (Download)
What is tip height on the cue ball results in the best speed and distance consistency?
To help achieve the best speed and distance consistency, it is best to hit the CB at about 20% of the radius above the center (0.2R). For illustrations and explanations, see “How High or Low Should You Hit the Cue Ball?” (Download) (BD, September, 2011).
Drills and advice
Where can I find general advice and drills for improving speed control?
See "Fundamentals - Part VII: speed control" (Download) (BD, March, 2009).
Optimal tip height for speed control
Where is the best height to hit the cue ball for speed and distance control and consistency?
To help achieve the best speed and distance consistency, it is best to hit the CB at about 20% of the radius above the center (0.2R), which is about 60% of the total ball height. For illustrations and explanations, see "The Lag Shot" (Download) (BD, October, 2011). Hitting above center can also result in a more accuracy with CB direction (see follow accuracy in "follow" section).
Rail cushion speed change
How much speed does the CB lose when it rebounds off a rail cushion?
For steep angles into a rail, where the CB path is close to perpendicular to the rail (i.e., almost straight into the rail), the CB loses about half of its speed after rebound and skid. For more information and demonstrations, see: (YouTube)
HSV B.15 - straight-on kick shot rebound losses and spin changes for roll, stun, and draw shots
At very shallow angles to the rail, where the CB is moving almost parallel to the rail, very little speed is lost off the rebound.
Typical speeds for a range of shots
How fast does the CB travel for a range of shots?
Here are some typical values for various shot "speeds" in miles per hour (mph) and feet per second (fps):
soft touch: <1 mph = <1.5 fps
slow: 1-2 mph = 1.5-2.9 fps
medium: 2-4 mph = 2.9-5.9 fps
fast: 4-7 mph = 5.9-10.3 fps
power shot: 7-10 mph = 10.3-14.7 fps
powerful break: 25-30 mph = 36-44 fps
For more info, visit billiards.colostate.edu
Spin Transfer
See "throw" section under spin transfer
For more info, visit billiards.colostate.edu
Squirt(Cue Ball Deflection)
Squirt (cue ball deflection) in Pool and Billiards
... how to judge and compensate for cue ball deflection (squirt) in pool shots with English.
(external web-links) for more information:
see Section 4.04 in The Illustrated Principles of Pool and Billiards
and Disc II of the Video Encyclopedia of Pool Shots
Aim compensation
How can I easily adjust my aim to account for squirt (cue-ball deflection)?
"Squirt - Part IV: BHE, FHE, and pivot-length calibration" (Download) (BD, November, 2007) and "Throw - Part X: the big picture" (Download) (BD, May, 2007) cover aim-and-pivot techniques, which can be used to adjust your aim for squirt.
For more information, see the aim compensation for squirt, swerve, and throw in "aiming" section.
Bridge length effects
Does the bridge length or tightness have any affect on squirt (cue-ball deflection)?
No, unless the bridge length is really short and the bridge fingers are very bony and have an extremely tight (i.e., non human) grip around the cue.
Even if the bridge were perfectly rigid, it would still have absolutely no effect for bridge lengths beyond about 6-8 inches. The following video shows and explains why visually (at the 2:32 point point in part 2):NV B.96 - Grip and bridge technique and advice (YouTube). Here's a direct link to the pertinent point in the video (YouTube).
And Diagram 4 in the following article gives some additional experimental proof related to end mass:
"Squirt - Part VII: cue test machine results" (Download) (BD, February, 2008)
Cue elevation effects
What effect does cue elevation have on squirt or cue ball deflection?
With more cue elevation, there is much more swerve. Also, some of the swerve occurs immediately as the CB bounces off the table with the downward hit. I like to call this "immediate swerve." This effectively reduces the amount of "effective squirt."
Squirt really isn't that important alone (except for near-level-cue shots at fast speed or short distance, where swerve is not a significant factor). What is really important, especially with increasing cue elevation, is squerve (the combined effect of squirt and swerve). And this varies a lot with speed and conditions. And with higher cue elevations, the swerve effect dominates the squirt effect to the point where the squirt can be realistically ignored.
The vertical tip position also makes a difference. For more info, see tip contact height (follow/draw) effects in this section.
End mass and stiffness
How does shaft end mass affect squirt (cue ball deflection) and how is end mass related to stiffness?
See Diagram 4 in "Squirt - Part VII: cue test machine results" (Download) (BD, February, 2008). People who think extra stiffness is required to produce more squirt are incorrect. Added end mass alone (without added stiffness) produces significant increases in squirt. This supports the theory in TP A.31 (Download). The squirt of a shaft can be lowered by reducing the weight of the last 5-8 inches. This can be done by reducing the shaft's diameter, drilling out the core of the end of the shaft, using a lighter and/or harder tip (for more info, see cue tip hardness effects in "cue tip" section), and/or using a lighter (or no) ferrule. As demonstrated with the experiment in the article, mass closer to the tip has a greater effect on "effective end mass" than mass farther from the tip because it is moving more during tip contact (see what causes squirt in this section), and beyond a certain distance, added mass has no effect at all.
End mass is also related to shaft stiffness. Firstly, a stiffer shaft will typically be thicker and heavier at the end, resulting in more weight at the end. Secondly, with a stiffer shaft, transverse elastic waves will travel faster and farther down the shaft (from the tip) during the brief contact time between the tip and ball. The farther the wave travels, the larger the effective "end mass" will be, because more mass is being involved during contact with the ball. This effect can be clear with carbon-fiber shafts, where you would expect the end of the shaft to be much lighter (which tends to reduce "end mass"); however, because the end of the shaft can also be very stiff (which tends to increase effective "end mass"), the amount of squirt can be comparable to a wood shaft that might be little heavier at the end. Another potential issue with carbon-fiber shafts is that they don't flex as much during and after a hit, so when you apply extreme spin (side, bottom or top), where the CB doesn't move away from the tip as quickly, there is a chance for a double-hit (which won't be directly noticeable, but the CB will appear to deflect or squirt more than expected). A wood shaft flexes more giving the CB room to clear away from the tip after the hit. If the end of the shaft is too stiff, this doesn't happen as well and a double hit can occur at large tip offsets. For related info, see:
"Coriolis was brilliant ... but he didn't have a high-speed camera - Part IV: maximum cue tip offset" (BD, October, 2005)
cue vibration in "cue" section
maximum side spin in "English" section
Tip hardness also has an effect on effective "end mass" because a harder tip will have a slightly shorter contact time. Because the transverse elastic wave won't travel down the shaft as far during contact with a harder tip, the effective "end mass" and squirt can be less.
For more information, see: (YouTube Videos)
NV B.32 - Squirt and the effects of end mass
NV B.1 - Mike Page's squirt and swerve video
"Return of the squirt robot" (Download) (BD, August, 2008)
HSV B.47 - effect of shaft end mass and squirt on miscue limit (for how the amount of squirt can affect the miscue limit) (YouTube)
what causes squirt? in this section
tip hardness effects in "cue tip" section
tip contact time in "cue tip" section
Here's a list of advantages and disadvantages of low-squirt shafts in "cue" section
from iusedtoberich:
The Meucci shaft over the years has had features to reduce the end mass:
1. The ferrule has always been thin walled relative to most other cues. (the plastics used in ferrules is usually of higher density than maple)
2. The ferrule has been made of a less dense material than most other ferrules on competing cues.
3. On recent shafts (black dot), the tenon has been tapered like the end of a pencil (not that extreme), yet the internal walls of the ferrule have remained cylindrical. This further reduces end mass by introducing a tapered hollow region right behind the tip.
How much of an effect does added or removed end mass have on the resulting squirt of a shaft?
Based on the theory in TP A.31 (Download) and the data in "Squirt - Part VII: cue test machine results" (Download) (BD, February, 2008), a typical cue might have a ball-to-end mass ratio of about 30, corresponding to an effective end mass of about 5 grams. Any end mass added to or taken away from this would affect the amount of squirt proportionally. For example, for the 0.3 gram and 1.3 gram added masses in Diagram 4 of the article, the total end mass would be 5.3 with 0.3 grams added close to the tip and would be 6.3 with 1.3 g added close to the tip. This comparison corresponds to an end mass ratio of 6.3/5.3=1.2. The robot measurements for squirt angle were 3.9 degrees with the larger added mass and 3.3 degrees with the smaller added mass. This is directly related to the end mass ratio: 3.9/3.3 = 6.3/5.3 = 1.2.
Miscue limit
Does the miscue limit depend on the shaft's squirt?
See: HSV B.47 - effect of shaft end mass and squirt on miscue limit (YouTube). It appears that a cue with more end mass (a lot more in the video) allows greater tip offset. With more tip offset, you would expect to get more English. You would also expect to get more squirt than you would get even with the same end mass. If you watch all of the shots in the video, you will see that the cue with the added end mass had much more squirt than the cue without the added end mass, much more than can be explained by a small difference in tip offset. Also, with more squirt comes less English (for a given tip offset), because the effective offset is less. If you look at the stripe on the ball in the super-slow-motion clips, you will see that the CB actually has slightly more English (spin per distance) with the low-squirt cue (due to a larger "effective tip offset"), even though the "actual tip offset" is slightly greater with the added-end mass cue!
For more info, see:
Can the type or brand of chalk affect the amount of squirt?
I personally think that all commercially available pool chalk, assuming the tip is holding it, grabs the CB without any slipping whatsoever. When the tip slips, a miscue results. Now, "partial" miscues are possible, where the tip mostly grabs and just slips a little. With any miscue (partial or full), there is significantly more squirt because the tip moves sideways more as it slides over the edge of the CB. With more tip sideways motion (which requires force), the CB will experience more equal-and-opposite-reaction sideways force, resulting in more CB squirt. Also, I would expect the amount of squirt would be very inconsistent if there were partial or full slip due to the complicated nature of impact-induced slip. That's why the tip probably doesn't slip with most shots, because with most shot (assuming the tip is well chalked), CB squirt is very consistent.
Published data
Where can I find published data on squirt values for various cues?
Platinum Billiards did some tests a while back and posted a collection of extensive data (see below). Meucci has also done some testing measuring the combined effects of squirt, swerve, and throw, so no reliable squirt data is available (videos and results are available here (external web-link)). Ron Shepard's squirt paper (Download) reports a squirt angle range of about .5 to 2.3 degrees for low- to high-squirt cues, corresponding to a pivot point range of about 50" to 10". Platinum's data (see below) ranges over 1.3 to 2.3 degrees of squirt angle and 7.6" to 14.1" for pivot points. Some other data is available on the cue natural pivot length in "cue" section, where the numbers seem to fall in between the ranges reported by Shepard and Platinum.
If you want to take your own squirt measurements, and you don't have access to a robotic cue-testing machine, the following video offers advice and a procedure for doing your own experiments:
... how to judge and compensate for cue ball deflection (squirt) in pool shots with English.
(external web-links) for more information:
see Section 4.04 in The Illustrated Principles of Pool and Billiards
and Disc II of the Video Encyclopedia of Pool Shots
Aim compensation
How can I easily adjust my aim to account for squirt (cue-ball deflection)?
"Squirt - Part IV: BHE, FHE, and pivot-length calibration" (Download) (BD, November, 2007) and "Throw - Part X: the big picture" (Download) (BD, May, 2007) cover aim-and-pivot techniques, which can be used to adjust your aim for squirt.
For more information, see the aim compensation for squirt, swerve, and throw in "aiming" section.
Bridge length effects
Does the bridge length or tightness have any affect on squirt (cue-ball deflection)?
No, unless the bridge length is really short and the bridge fingers are very bony and have an extremely tight (i.e., non human) grip around the cue.
Even if the bridge were perfectly rigid, it would still have absolutely no effect for bridge lengths beyond about 6-8 inches. The following video shows and explains why visually (at the 2:32 point point in part 2):NV B.96 - Grip and bridge technique and advice (YouTube). Here's a direct link to the pertinent point in the video (YouTube).
And Diagram 4 in the following article gives some additional experimental proof related to end mass:
"Squirt - Part VII: cue test machine results" (Download) (BD, February, 2008)
Cue elevation effects
What effect does cue elevation have on squirt or cue ball deflection?
With more cue elevation, there is much more swerve. Also, some of the swerve occurs immediately as the CB bounces off the table with the downward hit. I like to call this "immediate swerve." This effectively reduces the amount of "effective squirt."
Squirt really isn't that important alone (except for near-level-cue shots at fast speed or short distance, where swerve is not a significant factor). What is really important, especially with increasing cue elevation, is squerve (the combined effect of squirt and swerve). And this varies a lot with speed and conditions. And with higher cue elevations, the swerve effect dominates the squirt effect to the point where the squirt can be realistically ignored.
The vertical tip position also makes a difference. For more info, see tip contact height (follow/draw) effects in this section.
End mass and stiffness
How does shaft end mass affect squirt (cue ball deflection) and how is end mass related to stiffness?
See Diagram 4 in "Squirt - Part VII: cue test machine results" (Download) (BD, February, 2008). People who think extra stiffness is required to produce more squirt are incorrect. Added end mass alone (without added stiffness) produces significant increases in squirt. This supports the theory in TP A.31 (Download). The squirt of a shaft can be lowered by reducing the weight of the last 5-8 inches. This can be done by reducing the shaft's diameter, drilling out the core of the end of the shaft, using a lighter and/or harder tip (for more info, see cue tip hardness effects in "cue tip" section), and/or using a lighter (or no) ferrule. As demonstrated with the experiment in the article, mass closer to the tip has a greater effect on "effective end mass" than mass farther from the tip because it is moving more during tip contact (see what causes squirt in this section), and beyond a certain distance, added mass has no effect at all.
End mass is also related to shaft stiffness. Firstly, a stiffer shaft will typically be thicker and heavier at the end, resulting in more weight at the end. Secondly, with a stiffer shaft, transverse elastic waves will travel faster and farther down the shaft (from the tip) during the brief contact time between the tip and ball. The farther the wave travels, the larger the effective "end mass" will be, because more mass is being involved during contact with the ball. This effect can be clear with carbon-fiber shafts, where you would expect the end of the shaft to be much lighter (which tends to reduce "end mass"); however, because the end of the shaft can also be very stiff (which tends to increase effective "end mass"), the amount of squirt can be comparable to a wood shaft that might be little heavier at the end. Another potential issue with carbon-fiber shafts is that they don't flex as much during and after a hit, so when you apply extreme spin (side, bottom or top), where the CB doesn't move away from the tip as quickly, there is a chance for a double-hit (which won't be directly noticeable, but the CB will appear to deflect or squirt more than expected). A wood shaft flexes more giving the CB room to clear away from the tip after the hit. If the end of the shaft is too stiff, this doesn't happen as well and a double hit can occur at large tip offsets. For related info, see:
"Coriolis was brilliant ... but he didn't have a high-speed camera - Part IV: maximum cue tip offset" (BD, October, 2005)
cue vibration in "cue" section
maximum side spin in "English" section
Tip hardness also has an effect on effective "end mass" because a harder tip will have a slightly shorter contact time. Because the transverse elastic wave won't travel down the shaft as far during contact with a harder tip, the effective "end mass" and squirt can be less.
For more information, see: (YouTube Videos)
NV B.32 - Squirt and the effects of end mass
NV B.1 - Mike Page's squirt and swerve video
"Return of the squirt robot" (Download) (BD, August, 2008)
HSV B.47 - effect of shaft end mass and squirt on miscue limit (for how the amount of squirt can affect the miscue limit) (YouTube)
what causes squirt? in this section
tip hardness effects in "cue tip" section
tip contact time in "cue tip" section
Here's a list of advantages and disadvantages of low-squirt shafts in "cue" section
from iusedtoberich:
The Meucci shaft over the years has had features to reduce the end mass:
1. The ferrule has always been thin walled relative to most other cues. (the plastics used in ferrules is usually of higher density than maple)
2. The ferrule has been made of a less dense material than most other ferrules on competing cues.
3. On recent shafts (black dot), the tenon has been tapered like the end of a pencil (not that extreme), yet the internal walls of the ferrule have remained cylindrical. This further reduces end mass by introducing a tapered hollow region right behind the tip.
How much of an effect does added or removed end mass have on the resulting squirt of a shaft?
Based on the theory in TP A.31 (Download) and the data in "Squirt - Part VII: cue test machine results" (Download) (BD, February, 2008), a typical cue might have a ball-to-end mass ratio of about 30, corresponding to an effective end mass of about 5 grams. Any end mass added to or taken away from this would affect the amount of squirt proportionally. For example, for the 0.3 gram and 1.3 gram added masses in Diagram 4 of the article, the total end mass would be 5.3 with 0.3 grams added close to the tip and would be 6.3 with 1.3 g added close to the tip. This comparison corresponds to an end mass ratio of 6.3/5.3=1.2. The robot measurements for squirt angle were 3.9 degrees with the larger added mass and 3.3 degrees with the smaller added mass. This is directly related to the end mass ratio: 3.9/3.3 = 6.3/5.3 = 1.2.
Miscue limit
Does the miscue limit depend on the shaft's squirt?
See: HSV B.47 - effect of shaft end mass and squirt on miscue limit (YouTube). It appears that a cue with more end mass (a lot more in the video) allows greater tip offset. With more tip offset, you would expect to get more English. You would also expect to get more squirt than you would get even with the same end mass. If you watch all of the shots in the video, you will see that the cue with the added end mass had much more squirt than the cue without the added end mass, much more than can be explained by a small difference in tip offset. Also, with more squirt comes less English (for a given tip offset), because the effective offset is less. If you look at the stripe on the ball in the super-slow-motion clips, you will see that the CB actually has slightly more English (spin per distance) with the low-squirt cue (due to a larger "effective tip offset"), even though the "actual tip offset" is slightly greater with the added-end mass cue!
For more info, see:
- getting more spin with low-squirt cue in "cue" section
- maximum English in "English" section
Can the type or brand of chalk affect the amount of squirt?
I personally think that all commercially available pool chalk, assuming the tip is holding it, grabs the CB without any slipping whatsoever. When the tip slips, a miscue results. Now, "partial" miscues are possible, where the tip mostly grabs and just slips a little. With any miscue (partial or full), there is significantly more squirt because the tip moves sideways more as it slides over the edge of the CB. With more tip sideways motion (which requires force), the CB will experience more equal-and-opposite-reaction sideways force, resulting in more CB squirt. Also, I would expect the amount of squirt would be very inconsistent if there were partial or full slip due to the complicated nature of impact-induced slip. That's why the tip probably doesn't slip with most shots, because with most shot (assuming the tip is well chalked), CB squirt is very consistent.
Published data
Where can I find published data on squirt values for various cues?
Platinum Billiards did some tests a while back and posted a collection of extensive data (see below). Meucci has also done some testing measuring the combined effects of squirt, swerve, and throw, so no reliable squirt data is available (videos and results are available here (external web-link)). Ron Shepard's squirt paper (Download) reports a squirt angle range of about .5 to 2.3 degrees for low- to high-squirt cues, corresponding to a pivot point range of about 50" to 10". Platinum's data (see below) ranges over 1.3 to 2.3 degrees of squirt angle and 7.6" to 14.1" for pivot points. Some other data is available on the cue natural pivot length in "cue" section, where the numbers seem to fall in between the ranges reported by Shepard and Platinum.
If you want to take your own squirt measurements, and you don't have access to a robotic cue-testing machine, the following video offers advice and a procedure for doing your own experiments:
from Platinum Billiards (results from tests on a cue-testing robot called "Iron Willie"):
HOW AND WHAT WE TEST
We ask the question “which shaft deflects least?” because the butt of the cue has little effect on cue ball deflection. However, shafts are generally tested on the same brand of butt and the test weight for all is kept close to 19 ounces. All shafts are tested as sold by the manufacturer including tip type and tip curvature as noted. All tests are performed using a robot which makes precisely the same stroke with each cue, and for this test the machine is set to produce cue ball speeds of around 15 mph. A series of four shots is made with each cue and the resulting cue ball deflection is recorded on a target 50” away which is exactly the distance between the foot string and the head spot on a 4 ½ x 9 pool table. The four shots are 6 mm (about ¼”) and 12 mm left of center, and 6 mm and 12 mm right of center, and these offsets are measured from the center of the cue ball to the center of the shaft. The actual cue ball deflection produced by each shot is measured and the average for the series is given in the chart below in millimeters and inches.
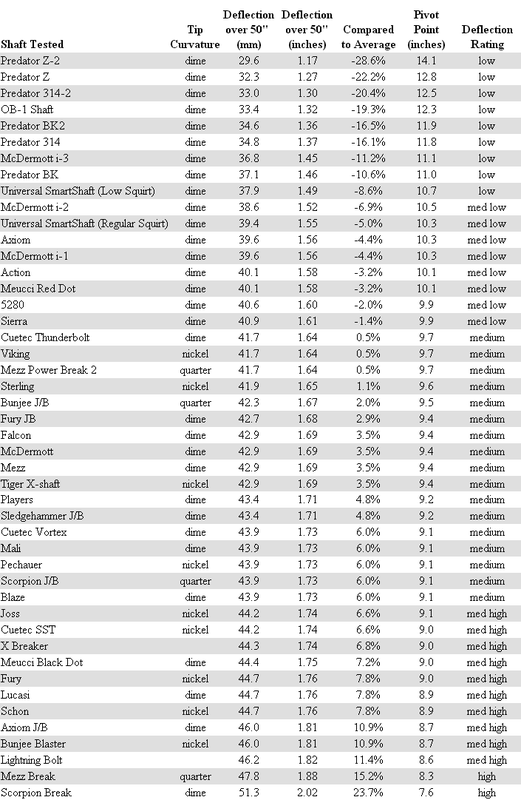
Platinum Billiards is an independent company and has no affiliation with any billiard product manufacturer. The performance information we provide is based on careful scientific testing and observation. We are highly experienced at testing the performance of cues and we believe that our methods are sound and accurate. However, we do not claim that our findings are absolute. We are aware that cues of a same model vary slightly and as we test more samples of each, the numbers will become more refined. If any manufacturer is unhappy with our results and/or feels that the ratings are unfair, we encourage them to contact us and we will be happy to answer questions about our methodology and/or arrange for the testing of any cues they would like to send us, and if warranted, we will adjust the numbers accordingly. We can only offer testing of cues, shafts, products that are currently on the market. We do not offer testing for prototypes or products that have yet to be made available to the general public.
Robot test results
Where can I find information on experimental results from squirt-testing robots?
See published data in this section for some cue-comparison results from Platinum Billiards resulting from cue tests with "Iron Willie" (a cue-testing machine). The Jacksonville Project in "videos" section also did some work with "Iron Willie."
Alexander Sorokin has also developed a cue-testing machine. More info can be found here: Cue Testing Unit. (external web-link)
The following articles document work with a cue-testing machine developed at Colorado State University:
"Squirt - Part VII: cue test machine results" (Download) (BD, February, 2008)
"Return of the squirt robot" (Download) (BD, August, 2008)
NOTE - when using a machine to test cues, the "grip" needs to be flexible, like the flesh in a human hand (e.g., by lining the mechanical "grip: with silicone rubber).
The problem with a non-human, extremely-firm robot grip is that it can add significant effective weight to the cue. If the grip is totally rigid, the weight of the machine's "hand" and "arm" completely add to the weight of the cue. For example, if you put an 18 oz cue in a rigid machine grip, and the weight of the machine's "grip" is 20 oz, the cue will act like a 38 oz cue! The result of this is that the CB will not leave fast enough to clear the tip with an off-center hit. The tip will either remain in contact with the CB or catch up after initial contact, creating either a push or double hit. The hit will look and sound normal, but the CB will have more squirt (CB deflection) ... sometimes a lot more (as if there where a miscue). Lot's of care must be taken when using a machine to test and characterize cues that will be used by non-machine humans.
If you don't have access to a robotic squirt-testing machine, decent results can be obtained with careful experiments with human shooters. The following video recommends a procedure for how to do this: YouTube video
For more info, see: “Cue Tip Squirt Testing” (Download) (BD, June, 2014).
Things one must be aware of when testing a shaft or tip for cue ball deflection (squirt), using either a robot or a person, include the following:
Pneumatic cue-stick tester prototype
Spring-loaded cue-stick tester prototype
Motorized cue-stick tester prototype
The final machine built and used for testing was of much better quality than the prototypes. Results from lots of testing done with the final machine are available in the BD instructional article links above.
Speed effects
Does squirt change with speed?
"Cue ball deflection" or "squirt" refers to the angular deflection of the CB immediately off the tip. Squirt does not vary with speed. Proof, from careful experiments with cue-testing robots, can be found here: (Downloads)
"Squirt - Part VII: cue test machine results" (Billiards Digest, February, 2008)
"Squirt - Part II: experimental results" (Billiards Digest, September, 2007)
Now, for most shots at a pool table (where the cue must be elevated some to clear the rails), with English comes both squirt and swerve (CB curving). And swerve does vary with speed (and with conditions and cue elevation). So the combined effects of squirt and swerve (AKA "squerve" or "effective deflection" or "effective squirt") does vary with speed. With a slow shot, the swerve happens quickly over a short distance, and this reduces the squerve of the shot. With a faster shot, the swerve is delayed and the squerve is larger. Here's a good demo of this effect:
Robot test results
Where can I find information on experimental results from squirt-testing robots?
See published data in this section for some cue-comparison results from Platinum Billiards resulting from cue tests with "Iron Willie" (a cue-testing machine). The Jacksonville Project in "videos" section also did some work with "Iron Willie."
Alexander Sorokin has also developed a cue-testing machine. More info can be found here: Cue Testing Unit. (external web-link)
The following articles document work with a cue-testing machine developed at Colorado State University:
"Squirt - Part VII: cue test machine results" (Download) (BD, February, 2008)
"Return of the squirt robot" (Download) (BD, August, 2008)
NOTE - when using a machine to test cues, the "grip" needs to be flexible, like the flesh in a human hand (e.g., by lining the mechanical "grip: with silicone rubber).
The problem with a non-human, extremely-firm robot grip is that it can add significant effective weight to the cue. If the grip is totally rigid, the weight of the machine's "hand" and "arm" completely add to the weight of the cue. For example, if you put an 18 oz cue in a rigid machine grip, and the weight of the machine's "grip" is 20 oz, the cue will act like a 38 oz cue! The result of this is that the CB will not leave fast enough to clear the tip with an off-center hit. The tip will either remain in contact with the CB or catch up after initial contact, creating either a push or double hit. The hit will look and sound normal, but the CB will have more squirt (CB deflection) ... sometimes a lot more (as if there where a miscue). Lot's of care must be taken when using a machine to test and characterize cues that will be used by non-machine humans.
If you don't have access to a robotic squirt-testing machine, decent results can be obtained with careful experiments with human shooters. The following video recommends a procedure for how to do this: YouTube video
For more info, see: “Cue Tip Squirt Testing” (Download) (BD, June, 2014).
Things one must be aware of when testing a shaft or tip for cue ball deflection (squirt), using either a robot or a person, include the following:
- Tip size, shape, hardness, and weight should be the same for all shafts tests; otherwise results will be affected (for more info, see tip hardness effects, tip size and shape effects in "cue tip" section).
- The cue should be perfectly level during the tests; otherwise, swerve will be a factor, and it will vary with cue elevation and shot speed, which varies with cue weight and tip efficiency. Swerve also varies with cloth conditions, which can change over time with dirtiness, temperature, and humidity.
- The cue ball squirt angle should be measured directly. Measurements should not be made based on the motion of an object ball that the cue ball hits. The use of an object ball introduces the variable of throw, which can vary with ball surface conditions at the point of contact and with ball speed, which can vary with cue weight and tip efficiency.
- The tip should be consistently on the horizontal center line of the cue ball; if not tip contact height effects will come into play.
- Robot testing should be done by an independent "laboratory," not a cue manufacturer, because the manufacturer might not be impartial if the tests involve the manufacturer's cues or shafts.
Pneumatic cue-stick tester prototype
Spring-loaded cue-stick tester prototype
Motorized cue-stick tester prototype
The final machine built and used for testing was of much better quality than the prototypes. Results from lots of testing done with the final machine are available in the BD instructional article links above.
Speed effects
Does squirt change with speed?
"Cue ball deflection" or "squirt" refers to the angular deflection of the CB immediately off the tip. Squirt does not vary with speed. Proof, from careful experiments with cue-testing robots, can be found here: (Downloads)
"Squirt - Part VII: cue test machine results" (Billiards Digest, February, 2008)
"Squirt - Part II: experimental results" (Billiards Digest, September, 2007)
Now, for most shots at a pool table (where the cue must be elevated some to clear the rails), with English comes both squirt and swerve (CB curving). And swerve does vary with speed (and with conditions and cue elevation). So the combined effects of squirt and swerve (AKA "squerve" or "effective deflection" or "effective squirt") does vary with speed. With a slow shot, the swerve happens quickly over a short distance, and this reduces the squerve of the shot. With a faster shot, the swerve is delayed and the squerve is larger. Here's a good demo of this effect:
And here's another from Disc II of the Video Encyclopedia of Pool Shots (external web-links) demonstrating the combined effects of squirt and swerve:
YouTube video
Again, squirt doesn't vary with speed, but swerve and squerve do.
Squirt, swerve, and throw confusion
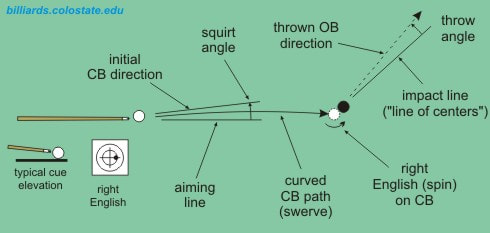
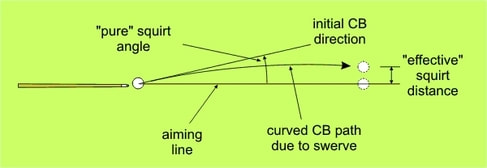
What is squirt (CB deflection) and how is it different from swerve (CB curve)?
From the online glossary (Download):
squirt (same as "cue ball deflection"): angular displacement of the cue ball path away from the cue stroking direction caused by the use of English. Squirt increases with the amount of English.
effective squirt: (same as "squerve"): the net effect of squirt and swerve (i.e., the cue ball deflection off the aiming line at object ball impact).
swerve: curve of the cue ball’s path due to cue elevation and English.
Here are some video demonstrations and explanations of squirt, swerve, and throw: (Videos)
How can you predict the directions and amounts of squirt, swerve, and throw with various types of shots?
I’ve gotten several e-mail questions concerning Diagram 3 in "Squirt - Part I: introduction" (Download) (BD, August, 2007). Here's the diagram:
YouTube video
Again, squirt doesn't vary with speed, but swerve and squerve do.
Squirt, swerve, and throw confusion
What is squirt (CB deflection) and how is it different from swerve (CB curve)?
From the online glossary (Download):
squirt (same as "cue ball deflection"): angular displacement of the cue ball path away from the cue stroking direction caused by the use of English. Squirt increases with the amount of English.
effective squirt: (same as "squerve"): the net effect of squirt and swerve (i.e., the cue ball deflection off the aiming line at object ball impact).
swerve: curve of the cue ball’s path due to cue elevation and English.
Here are some video demonstrations and explanations of squirt, swerve, and throw: (Videos)
- NV B.1 - Mike Page's squirt and swerve video
- NV B.70 - Squirt, swerve, and throw, from VEPS II
- NV B.86 - Cut-induced throw (CIT) and spin-induced throw (SIT), from VEPS IV
How can you predict the directions and amounts of squirt, swerve, and throw with various types of shots?
I’ve gotten several e-mail questions concerning Diagram 3 in "Squirt - Part I: introduction" (Download) (BD, August, 2007). Here's the diagram:
Several people have suggested the throw direction is wrong due to collision- or cut-induced throw (CIT). Think about it yourself and decide if you think the diagram is correct or not. Many people seem to be confused by the real effects of squirt and swerve. Diagram 4 from the article (see below) helps clarify things.
The phrase "effective squirt" is used for the net effect of squirt and swerve. The term "squerve" (SQUirt + swERVE) means the same thing. The following series of instructional articles dealing with squirt covers all of the details of squirt and swerve: (Downloads)
"Squirt - Part I: introduction" (BD, August, 2007).
"Squirt - Part II: experimental results" (BD, September, 2007).
"Squirt - Part III: follow/draw squirt and swerve" (BD, October, 2007).
"Squirt - Part IV: BHE, FHE, and pivot-length calibration" (BD, November, 2007).
"Squirt - Part V: low-squirt cues" (BD, December, 2007).
"Squirt - Part VI: tip shape" (BD, January, 2008).
"Squirt - Part VII: cue test machine results" (BD, February, 2008).
"Squirt - Part VIII: squerve effects" (BD, March, 2008).
"Squirt, swerve, and throw wrap-up" (BD, April, 2008).
Also, here's a video excerpt from Disc II of the Video Encyclopedia of Pool Shots (external web-links) that explains and demonstrates things: YouTube video
Now back to Diagram 3. Throw direction depends on the direction of the relative motion of the surface of the cue ball in contact with the object ball. This direction is affected by both cut angle and spin. "Throw - Part VI: inside/outside English" (Download) (BD, January, 2007) and "Throw - Part VII: CIT/SIT combo" (Download) (BD, February, 2007) illustrate the different possibilities quite well. The throw direction shown in Diagram 3 of "Squirt - Part I: introduction" (Download) (BD, August, 2007) is appropriate given the amount of english.
Object ball throw depends on cut angle, shot speed, type and amount of english, and the amount of vertical plane spin (draw, follow, stun). The following series of instructional articles elaborate on all of these factors: (Downloads)
"Throw - Part I: introduction" (BD, August, 2006).
"Throw - Part II: results" (BD, September, 2006).
"Throw - Part III: follow and draw effects" (BD, October, 2006).
"Throw - Part IV: spin-induced throw" (BD, November, 2006).
"Throw - Part V: SIT speed effects" (BD, December, 2006).
"Throw - Part VI: inside/outside english" (BD, January, 2007).
"Throw - Part VII: CIT/SIT combo" (BD, February, 2007).
"Throw - Part VIII: spin transfer" (BD, March, 2007).
"Throw - Part IX: spin transfer follow-up" (BD, April, 2007).
"Throw - Part X: the big picture" (BD, May, 2007).
"Throw - Part XI: everything you ever wanted to know about throw" (BD, June, 2007).
"Throw - Part XII: calibration, and hold shots" (BD, July, 2007).
Collision-induced throw (CIT) and spin-induced throw (SIT) are just different names for throw, depending upon the primary cause of the throw, but the effects don't really combine as separate factors.
Straight-in shot with unintentional side spin
What effects do squirt, swerve, and throw have with a straight-in shot hit with unintentional side spin?
There are two possible cases here:
1.) The cue is aligned in the proper aiming line direction but shifted to the left a little, creating unintentionally left side spin, but the stroke is straight. In this case, the CB will squirt to the right (the amount depends on the cue and the amount of tip offset), the CB will swerve back some to the left (the amount depends on shot speed, cue elevation and ball/cloth conditions), the contact point might be to the left or right of the initial target depending on the relative amounts of squirt and swerve, then the side spin will throw the OB a little to the right of what the contact point suggests.
2.) The cue is aligned in the proper aiming line direction and the cue tip is aligned with the center of the CB, but the stroke is not perfectly straight, resulting in slight unintentional left sidespin. In this case, the aiming line is now pivoted to the left a little, so the CB will tend to head to the left a little (the amount will depend on bridge distance). Everything else is the same as with "1," but now relative to this new aiming line direction.
Tip contact height (follow/draw) effects
What effect does tip contact height (for draw and follow) have on squirt or cue ball deflection?
Hitting higher on the CB can do two important things related to net CB deflection (AKA squerve or the combined effects of squirt and swerve). Hitting higher can result in the cue being more level if the butt is lowered to help raise the tip. This would actually create less swerve, which would tend to exaggerate the effect of squirt (since less of the squirt is being cancelled by swerve). See squirt cue elevation effects for more info in this section. However, with a higher hit on the ball, squirt actually has two components ... one sideways which causes CB deflection (what we normally call "squirt"), and one downward (into the table). The downward component will cause swerve to occur sooner (even before the CB moves forward very much at all). This is sometimes called "immediate swerve." This effect is more noticeable with highly-elevated-cue shots like masse shots and jump shots with off-center hits (intentional or not) that create a lot more swerve (CB curve) than with typical low-elevation pool shots. The immediate swerve associated with follow shots lessens the effect of sideways squirt (since more of the sideways squirt is being cancelled by the sooner swerve).
A draw shot, on the other hand, has less downward force into the table (from cue elevation) due to an upward component of squirt which reduces the "immediate swerve." Also, as illustrated in Diagram 1 of Squirt - Part VIII: squerve effects" (Download) (BD, March, 2008), swerve takes longer to complete with a draw shot since the CB slides over a longer distance while the curving takes place, so the net CB deflection will be more with draw shots at most distances, speeds, and cue elevations.
What causes squirt?
What causes cue ball deflection (AKA "squirt")?
Check out the following article: "Squirt - Part I: introduction" (Download) (BD, August, 2007). It explains and illustrates what causes squirt in a very easy-to-understand way. Here's a diagram (still images from a 2000 frame/sec high-speed video (YouTube)) and an explanation from the article:
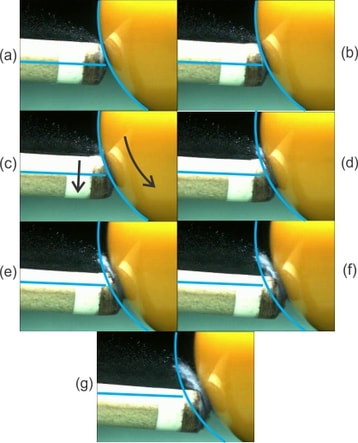
Still “a” is just before contact. Stills “b” through “e” represent a little less than 0.001 second (one thousandth of a second) during which the tip is in contact with the ball. In still “f” the tip hasn’t fully recovered from the compression yet as the CB is separating. Still “g” is after separation. The line and arc appearing in each still mark the initial cue stick and CB positions. Notice how much the cue tip deflects away (down in the diagram) from its original line of action. Also notice how much the cue tip deforms (e.g., see still “d”).
The black arrows in still “c” in the diagram illustrate the effect that causes squirt. While the tip is in contact with the ball, the ball starts rotating. This rotation (counterclockwise in the diagram) pushes the cup tip down a little during contact. Because the end of the shaft has mass, it takes force to move the end of the shaft down as the ball rotates. Isaac Newton said: “for every action, there is an equal and opposite reaction;” therefore, if the tip is being pushed down by the ball, the tip will push back with an equal and opposite force on the ball. This force is what causes squirt.
The amount of squirt (cue ball deflection) depends on the effective mass ("endmass") being deflected in the shaft. The "effective mass" depends on how far the tip deflection is "felt" down the length of the shaft as a sideways "wave" travels down the shaft toward the butt. Because the tip is in contact with the CB for such a short time, the wave does not travel very far (only about 5-10 inches). The distance it travels varies with shaft stiffness some. It travels faster (and longer) in a stiffer shaft involving more "effective mass" in the sideways deflection, which causes more squirt.
The cue tip continues to move sideways and eventually springs back and vibrates back and forth, but the CB is long gone by then, so the stiffness and spring-back of the shaft has no significant or direct influence on squirt.
Does cue tip compression, tip hardness, and shaft flex affect CB deflection (squirt)?
Here are two example super-slow-motion videos showing how the tip deforms and how the shaft flexes during tip contact:
YouTube video
YouTube video
I know that when one looks at these videos, it is tempting to think that squirt (CB deflection) is caused completely by tip compression and shaft flex. However, IMO, it is best to ignore these effects when trying to understand the basics of squirt. Tip compression and shaft flex are really just side effects of the off-center-hit forces required to keep the tip from slipping on the CB.
Now, the more the tip compresses and flexes sideways, the longer the tip will tend to stay in contact with the CB. This would certainly result in more squirt (CB deflection) because effective "end mass" is larger with a longer contact time. Also, the more the tip flexes sideways, the more the end mass of the shaft moves sideways, which would also tend to create more squirt. A harder tip compresses and flexes less and results in a shorter tip contact time. Therefore, a harder would be expected to produce less squirt, assuming it is not heavier than the tip to which it is being compared (for more info, see cue tip hardness effects in "cue" section). However, the experiments documented in the Cue and Tip Testing for Cue Ball Deflection (Squirt) video (YouTube) seem to imply that tip type, hardness, and height have very little effect on squirt.
Shaft flex can also have an effect because it might cause some of the "end mass" to move faster than it would otherwise. This could contribute to more squirt, but I wouldn't expect this effect to be very significant.
Again, the main effect that causes squirt is: During the very brief moment while the cue tip is in contact with the CB during an off-center hit, the CB starts to turn. This pushes the cue tip sideways ways from the CB giving the end of the shaft some sideways speed. It takes force to do this since the end of the shaft has mass. For every action (sideways force pushing on the tip), there is an equal and opposite reaction (sideways force pushing back on the CB), causing the CB to squirt sideways with "deflection" off its expected path (i.e., the CB doesn't go straight).
The most effective way to reduce squirt is to reduce the effective "end mass" of the shaft. Keeping the tip contact time as short as possible (e.g., by using a harder tip) can also help.
For more info, visit billiards.colostate.edu
Stance
Stance in Pool and Billiards
... advice for proper technique for a pool stance.
(external web-link) for more information:
see Sections 2.04, 7.05, and 7.09 in The Illustrated Principles of Pool and Billiards
General advice
What are the recommended "best practices" for the stance?
Generally recommended "best practices" for the stance can be found here:
fundamentals "best practices" check-sheet (Download)
The stance can be a very individual thing. You need to do what works best for you. The important aspects are stability, good and consistent alignment, stroke clearance, and comfort. The ideal feet placement, body position, knee bend, head height, and other stance mechanics issues can vary a lot from one person to the next based on the person's height, flexibility, body shape and anatomy, comfort level, and any physical issues. As with most stance, grip, and bridge related issues, individual comfort is a primary consideration. The main purpose for the stance is to create a consistent and comfortable body position and visual alignment that allows accurate aim and a consistent and repeatable stroke. If your stance does this, then it is a good stance.
A good pre-shot routine can also be an important consideration involving stance and visual alignment.
For a good demonstration of general stance recommendations, see the following video from Disc I of the Billiard University (BU) Instructional DVD series: (external web-link) YouTube video
And here's another (starting at 2:05) (YouTube):
NV B.59 - Mike Pages's "Learn to Play Pool in Ten Minutes"
from av84fun:
There is no such thing as an "ideal stance" for everyone. There is what I would call a "classic" stance...that which is recommended in most texts dealing with the subject which are, in turn, based on the stances used by a large number of top players.
That "classic stance" might be described as:
1. Placing the back foot on the extended line on which the CB will be directed toward the OB.
2. Place the front foot at about a 45 degree angle to that line.
3. Bend forward with a RELATIVELY straight back leg onto a bent forward leg.
4. Place the cue directly under the chin.
5. In the SET position, with the tip very close to the OB, the forearm should be at a right angle to the CUE.
The variations from "classic" are nearly endless but frequently would include:
1. Instead of a nearly straight rear leg, both legs are bent in a partial "squat" type of stance...watch Strickland who does this.
2. The Brits tend to adopt more of a snooker stance where the forward leg is placed at a wider than 45 degree angle which, in turn, "squares up" the chest toward a more perpendicular orientation to the line toward the OB.
3. The chin is moved to various positions to the outside (away from the body) of centered under the chin.
Finally, various chin heights (above the cue) are used. Back in the day, the chin was help several inches above the cue but today, many pros have moved the chin much lower...Allison's cue rubs back and forth ON her chin.
from av84fun:
from Fran Crimi:
If you are tall and are having trouble getting comfortable at the table, you can try spreading your legs farther apart. This will help alleviate having to bend so much at the waist, which can cause fatigue, and possibly back pain over time.
Yes, if the stance is right, it will feel comfortable, but in some cases, such as when you're making a stance adjustment, the comfort feeling isn't there immediately. It may take a little while to get used to something new. The thing you should never be feeling is pain.
Many people don't realize how fatiguing a bad stance can be. When you start to force your body into positions that work against it's natural anatomy, you are putting a constant strain on your body. Imagine yourself turned sideways towards your cue stick, and then having to twist your neck so you can look over your shoulder to set up for your shot, and then to hold that position while you try to swing your arm as you stroke. Now imagine being in that twisted position for hours and hours. That's what many players do to themselves --- and they wonder why they can't stay down on their shots or why they lose their focus after playing awhile.
Low stance
Why do so many pro pool players, and virtual all pro snooker players, have such a low stance, with the chin very close to or touching the cue?
A low stance, with the chin just over the cue, offers many advantages:
Snooker stance
Why is snooker player's stance different from a pool player's stance?
A classical snooker stance is described and demonstrated here: snooker stance (YouTube). A pool stance is described and demonstrated here: pool stance (YouTube).
A snooker stance is more "open" than a pool stance, and more weight is placed on the planted foot closest to the grip hand (e.g., the right foot for a right-handed player). An open stance can allow your head to be more square to the shot with less neck twisting. This can make it easier to get the head lower with the chin directly over the cue, which can make aiming and sighting more consistent and accurate. This is especially important on a snooker table, which is large with small pockets. The open stance also allows you to use your standard stance when your body is up against the table, which can happen a lot on large snooker tables. The open stance also allows one to use the chest and chin to help constrain and guide the cue, possibly helping to keep the cue straight during the stroke.
The more-closed stance of pool can create more clearance between the stroking arm and the hip and chest. This allows more stroke freedom, especially with power shots where the elbow might drop during the follow through. A closed stance also allows a more-even weight distribution between the two feet. A closed bridge can also be more natural and comfortable for some people.
Snooker players also prefer an open bridge.
... advice for proper technique for a pool stance.
(external web-link) for more information:
see Sections 2.04, 7.05, and 7.09 in The Illustrated Principles of Pool and Billiards
General advice
What are the recommended "best practices" for the stance?
Generally recommended "best practices" for the stance can be found here:
fundamentals "best practices" check-sheet (Download)
The stance can be a very individual thing. You need to do what works best for you. The important aspects are stability, good and consistent alignment, stroke clearance, and comfort. The ideal feet placement, body position, knee bend, head height, and other stance mechanics issues can vary a lot from one person to the next based on the person's height, flexibility, body shape and anatomy, comfort level, and any physical issues. As with most stance, grip, and bridge related issues, individual comfort is a primary consideration. The main purpose for the stance is to create a consistent and comfortable body position and visual alignment that allows accurate aim and a consistent and repeatable stroke. If your stance does this, then it is a good stance.
A good pre-shot routine can also be an important consideration involving stance and visual alignment.
For a good demonstration of general stance recommendations, see the following video from Disc I of the Billiard University (BU) Instructional DVD series: (external web-link) YouTube video
And here's another (starting at 2:05) (YouTube):
NV B.59 - Mike Pages's "Learn to Play Pool in Ten Minutes"
from av84fun:
There is no such thing as an "ideal stance" for everyone. There is what I would call a "classic" stance...that which is recommended in most texts dealing with the subject which are, in turn, based on the stances used by a large number of top players.
That "classic stance" might be described as:
1. Placing the back foot on the extended line on which the CB will be directed toward the OB.
2. Place the front foot at about a 45 degree angle to that line.
3. Bend forward with a RELATIVELY straight back leg onto a bent forward leg.
4. Place the cue directly under the chin.
5. In the SET position, with the tip very close to the OB, the forearm should be at a right angle to the CUE.
The variations from "classic" are nearly endless but frequently would include:
1. Instead of a nearly straight rear leg, both legs are bent in a partial "squat" type of stance...watch Strickland who does this.
2. The Brits tend to adopt more of a snooker stance where the forward leg is placed at a wider than 45 degree angle which, in turn, "squares up" the chest toward a more perpendicular orientation to the line toward the OB.
3. The chin is moved to various positions to the outside (away from the body) of centered under the chin.
Finally, various chin heights (above the cue) are used. Back in the day, the chin was help several inches above the cue but today, many pros have moved the chin much lower...Allison's cue rubs back and forth ON her chin.
from av84fun:
- Pointing to the technique that any particular championship player utilizes for ANYTHING...including the stance is a prescription for disaster.Trying to emulate Bustamante's "loopy" stroke and his technique of practice stroking with the cue tip literally dragging on the cloth...and then striking the CB with...say...high left would ruin most player's games.
Keith McCready's side arm stroke is another example among many.
In attempting to learn from watching top pros, the student should focus on how MOST players play not any ONE player. - Regarding stance while body size, type and flexibility are certainly major issues, there are a few important matters that are NEARLY universal.
- The back foot should be positioned on a line extended from the aim line out to where the player is standing. Most top players "walk into the shot" being CERTAIN to have their back foot "step on the line."
- The forearm and upper arm (grip arm) should form a 90 degree angle with the forearm perpendicular TO THE CUE....NOT TO THE FLOOR.
- The "traditional" front leg position is at about a 45 degree angle from the aim line but the snooker converts open that angle up somewhat which, among other things, makes the shoulders more square to the shot. Either method is fine and is a matter of personal choice based on extensive experimentation. HOWEVER, avoid at all costs placing your front leg much narrower to the shot line...i.e. placing the front leg much less than 45 degrees to the line. Doing so is a VERY unbalanced position that risks overall body movement during the stroke...especially harder strokes.
from Fran Crimi:
If you are tall and are having trouble getting comfortable at the table, you can try spreading your legs farther apart. This will help alleviate having to bend so much at the waist, which can cause fatigue, and possibly back pain over time.
Yes, if the stance is right, it will feel comfortable, but in some cases, such as when you're making a stance adjustment, the comfort feeling isn't there immediately. It may take a little while to get used to something new. The thing you should never be feeling is pain.
Many people don't realize how fatiguing a bad stance can be. When you start to force your body into positions that work against it's natural anatomy, you are putting a constant strain on your body. Imagine yourself turned sideways towards your cue stick, and then having to twist your neck so you can look over your shoulder to set up for your shot, and then to hold that position while you try to swing your arm as you stroke. Now imagine being in that twisted position for hours and hours. That's what many players do to themselves --- and they wonder why they can't stay down on their shots or why they lose their focus after playing awhile.
Low stance
Why do so many pro pool players, and virtual all pro snooker players, have such a low stance, with the chin very close to or touching the cue?
A low stance, with the chin just over the cue, offers many advantages:
- It makes it easier to be consistent with your visual alignment. With the chin so close to the cue, it is easier to see (or even feel) whether or not you are off to one side or the other.
- Being closer to the cue allows you to sight more along the cue, similar to a marksman looking down the barrel of a gun. This can help you better visualize the line of the shot. Note that with a low stance, it helps to use an open bridge or longer bridge length to allow you to see more of the cue.
- There is less eye movement between the CB and the OB while checking the tip position and aiming line in the set position.
- It is easier to visualize and create the exact tip position desired.
Snooker stance
Why is snooker player's stance different from a pool player's stance?
A classical snooker stance is described and demonstrated here: snooker stance (YouTube). A pool stance is described and demonstrated here: pool stance (YouTube).
A snooker stance is more "open" than a pool stance, and more weight is placed on the planted foot closest to the grip hand (e.g., the right foot for a right-handed player). An open stance can allow your head to be more square to the shot with less neck twisting. This can make it easier to get the head lower with the chin directly over the cue, which can make aiming and sighting more consistent and accurate. This is especially important on a snooker table, which is large with small pockets. The open stance also allows you to use your standard stance when your body is up against the table, which can happen a lot on large snooker tables. The open stance also allows one to use the chest and chin to help constrain and guide the cue, possibly helping to keep the cue straight during the stroke.
The more-closed stance of pool can create more clearance between the stroking arm and the hip and chest. This allows more stroke freedom, especially with power shots where the elbow might drop during the follow through. A closed stance also allows a more-even weight distribution between the two feet. A closed bridge can also be more natural and comfortable for some people.
Snooker players also prefer an open bridge.
For more info, visit billiards.colostate.edu
Strategy
Billiards and Pool Strategy
... how to and when to use strategy at the pool table in different types of games.
(external web-links) for more information:
see Chapter 5 in The Illustrated Principles of Pool and Billiards,
Disc III of the Video Encyclopedia of Pool Shots (VEPS) , and Disc III of the Video Encyclopedia of Pool Practice (VEPP)
Bar box vs. 9-foot table
What are some differences between play on a small "bar-box" table and a full-size regulation table?
The biggest difference are:
A good book dealing with playing 8-ball on a bar box is: "The Eight Ball Bible" by R. Givens. Disc III of the Video Encyclopedia of Pool Shots (external web-link) also has lots of good strategy info related to both 8-ball and 9-ball.
from Neil:
1. If the cb is heavier, but basically same diameter- just hit stun and draw shots a little lower. You should be able to adjust to this easily.
2. If playing on a Valley table- the pocket shelf is much shorter, so the pocket acts much bigger than it is. If the rails are in decent shape, you can still make balls that would not be make-able on a 9' or on a diamond. Essentially, forget the point of the pocket is there, and if you can make the ball in the back of the pocket, it will go rail first in the front of the pocket. Sometimes you can really cheat the pockets hitting rail first at a slower speed.
3. BB's like a pure stroke. And, a pure stroke is the easiest way to try and adjust to the speed of the table. The speed can be the toughest part to overcome. One BB may play slow, the one next to it might make you think the cb is jet propelled! On the fast ones, use as little english as possible because the english will really make the cb seem to speed up off the rails.
4. If on a Valley, don't act like they are easier because the pocket is essentially bigger. Still aim to a specific part of the pocket.
5. Bank shots are easier, and a part of the game on a BB. Utilize them when you need to.
6. DO NOT underestimate any shot just because you don't have a lot of distance to the pocket. MAKE SURE your properly aim EVERY shot.
7. Really pay attention to how the balls are racked. And, where others are breaking from and at what speed. Sometimes a much slower speed works wonders, and sometimes just changing sides to break from works wonders.
8. Make sure you hit the one ball very square on the break. If you don't, you have a good chance of scratching in the side pocket, and that spells doom.
9. Run out as often as possible. However, safes can give you the game too. When kicking at a ball on a bar box, especially later in the rack, you seldom will win the game unless you kick it in or leave it hooked. Most of the time, if you can see it, you can make it. Even if you have to bank it.
10. Don't shy away from going around the table at times. The shorter distance makes around the world position very feasible. Just pay attention to the route so you don't scratch. Come through the middle of the table when possible when traveling a long distance.
from JoeyA (in summarizing a thread on AZB): (external forum-link)
1. Control the cue ball on the break.
2. Pay attention to how the balls are racked.
3. Pay attention to how other breakers are making balls on the break. It could be the only difference between winning and losing.
4. Avoid the side pockets whenever possible as they are smaller pockets.
5. Shoot for the corner pockets as they are large and generous to most shots.
6. That being said, ‘Just because the corner pockets are large and the table is small, “DON’T take any shot for granted”.
7. If you do use the side pockets, MASTER shooting into the smaller pockets before you start the tournament.
8. If you use side spin, MASTER the use of Side Spin, before you start the tournament. Remember, the heavy “ROCK WILL ROLL”. MASTER the art of spinning the heavy rock and use it prudently.
9. Play minimal shape. Most shots are close and do not require pinpoint shape.
10. Avoid accidentally running into balls while playing the run out, unless that is the plan. Accidentally bumped balls have a way of creating new problems for running out.
11. Do not slow roll the cue ball or the object balls as smaller tables can often times have serious leans at slow speeds.
12. Practice cheating the pockets, at different speeds, because on occasion, you can achieve even better shape than you normally would.
13. Avoid force follow on the bar table as the outcome is hard to determine with any consistency.
14. Bar box banking is full of hazards. Test the rails early and often. That being said, instead of playing a weak safety (and most are when there are only a couple of balls left on the table), take make-able bank shots and be sure and hit them at the proper speed.
15. Less cue ball movement is key to success on a bar box. Select patterns that minimize cue ball movement. For example, settle for a longer shot where you can shoot a stop shot rather than a short cut shot where you have to move the cue ball a foot or two and bounce off one cushion.
16. Stop shots and stun shots are your friend.
17. Break out clusters early, especially if you are going to try and run out.
18. OK, I just remembered, I did shorten up my bridge and moved my back hand forward just a bit and it did seem to help on some shots.
19. Be more aware of your cue ball speed. These smaller tables require that as you have less distance that you need to travel than on a larger table.
20. THINK, THINK, THINK! Because this is a smaller table and you don't regularly play on them, you have to constantly think about all of the above. Playing on a smaller table requires that you pay more attention, not less.
8-ball
What are some examples of good 8-ball strategy?
The most important strategic decision made in 8-ball is choosing between "solids" and "stripes" after the break. Here are some good examples from Disc III of the Video Encyclopedia of Pool Shots (external web-link) of things to consider:
YouTube video
Another important decision is in selecting "key" balls. Here are some examples from Disc III of the Video Encyclopedia of Pool Shots: (external web-link)
YouTube video
And here are some run-out examples from Disc V of the Video Encyclopedia of Pool Shots (external web-link) (VEPS):
YouTube video
Here are some useful drills from Disc III of the Video Encyclopedia of Pool Practice (VEPP) (Download) to practice patterns common in 8-ball:
YouTube video
For more information, see “VEPP – Part VIII: 8-Ball Pattern Drills” (Download) (BD, November, 2012) and “Billiard University (BU) - Part VII: 8-Ball Drills,” (Download) (BD, February, 2014).
Here's a summary of important 8-ball strategy:
from CreeDo (in AZB post): (external forum-link)
• Get the stripes-or-solids group where the problems are all solvable
(meaning a tricky tied-up ball has another ball nearby that naturally breaks it up).
I'd rather have a group with 2 solvable problems than a group with 1 problem and no natural way to deal with it.
• Don't ever risk getting hooked while trying to play aggressive position, unless you have a "plan B" shot available.
"Too long" you can deal with. "Too thin" you can deal with. Even on the rail can be dealt with. Hooked = game over.
Especially on a barbox, don't be afraid to settle a bit on shape, if it means you have the right angle and 0 risk of hook.
• Just because a ball is near the side, doesn't mean you have to play it there. In fact thats where a lot of players
get into trouble. Getting funny on a side pocket shot means moving the cue ball up and down the whole table
weaving through traffic. That's the kind of risky stuff that ends runs. Plan for mostly corner pocket shots.
This goes double on the barbox. Move the cue ball less.
• If you start with ball in hand, solve your biggest problem with it. Don't play position to solve the problem later.
Solve it right now. With your ball in hand. Many runouts are blown by people getting too cute,
trying to sink a ball or two before dealing with their problem.
• Don't miss. 9-ball gets people used to 2-way shots where missing is sometimes safe,
the opponent is left long or even hooked. In 8-ball a miss is much worse. If you're gonna risk a missable shot,
do it early in the rack.
from Cornerman (in AZB post): (external forum-link)
Leaving your balls in the center of the table as your last or nearly last balls isn't a good idea for two reasons:
1) It limits your pathways for your cueball
2) positionally speaking, it is more challenging to get the proper angle on a ball in the center of the table.
It's easy to see why number 2 is true when the table is full of balls; it's tougher to see why it's a challenge when you only have your balls left.
Ways to screw up a ball-in-hand runout in 8-ball (barbox or otherwise):
from 8onthebreak (in AZB post): (external forum-link)
A great 8 ball player is great because he finds the easiest pattern, not because he's a better executor. 8 ball is chess, running out isn't as important as moving the pieces into position. it is a game of patience. Some suggestions...
1. Never break out a cluster if you don't have to. Usually the balls will go into A pocket, you need precision cue ball control to get the position, but breaking them out leads to scratches, and many times, no shot after.
2. Find a pattern that is easy to run out, involving NO draw. Top is much more predictable. Start with the 8 ball, and work your way backwards to find the best pattern...your last shot before the eight should be an easy stop shot, with easy shot on the eight. The shot before that should be an easy stop shot with position for an easy shot on the setup ball...etc. work backwards thru the rack and if you pick the pattern out correctly, a b player should be able to run it out almost every time.
3. Clear your trouble balls early, this includes any balls on the rail or in a cluster.
4. Never shoot your ducks in. They are like soldiers fighting for you. Theres 4 reasons for this. They are an easy shot from anywhere and give you easy position for almost any shot on the table. Also, It will be difficult for anyone to play a safe on you if you have hangers on the table, and they block pockets so your opponent can't use the pocket.
5. Look at clusters as a golden opportunity. A cluster is absolutely THE BEST environment to play a safe into. Always look at the cluster, and determine how u can hit a ball in the cluster, freeing that ball, and stop the cue ball inside the cluster or behind it, acquiring an easy ball in hand. Plan, get position for the safe, and take the safety shot, wait for ball in hand or an easy runout with the cluster now being makeable since u removed the tough ball. Clusters are your friend.
6. Don't move the cue ball, settle for short side shape, nice, easy...there's no long shots on the table, so any shot is an easy shot if you are even remotely in shape.
7. If you are less than 70% sure you'll make the shot...start looking for a safety. If you can't find a safe with significantly better odds of success, take the shot.
8. Gently bump opponents balls to the rail, and especcially away from the side pocket when possible. A hanger in the side pocket can win you a game cuz its guaranteed position to anywhere on the table...however, a ball on the rail next to the side pocket has about a 30% chance of costing a good player the game. If the opportunity presents itself to make one of your hangers in the side pocket, off of his duck, and move his duck to the rail...you've just put the odds in your favor to return to the table if you should make a mistake.
9. Don't shoot hard...it's an unnecessary risk.
10. Don't shoot soft...it's an unnecessary table roll risk.
11 Patience, patience, patience.
from Billy_Bob:
1. Don't pocket ANY of your balls if any are tied up. LEAVE THEM! Instead hit clusters where your balls are tied up and re-arrange the table so every one of your balls can be made into a pocket. THEN run out. You CAN'T win if one of your balls is tied up and can't be made into a pocket. You can't win if the 8-ball is tied up and can't be made into a pocket. Leaving your balls on the table will get in the way of your opponent. What will frequently happen if you do this is your opponent will shoot in most of his balls except two or three (as you are busy unblocking your clusters and turning the table back over to him). Then you wind up with a wide open table, very easy to run-out at this point. You have cleared up your cluster problems first thing and your opponent has been kind enough to get his balls out of your way! RUNOUT!
2. If you can't run-out because you still have one or more trouble balls, and you have a ball blocking a pocket and this is blocking the 8 or one of your opponent's balls, LEAVE IT! Shoot at a cluster and fix trouble balls first. Your opponent can't win if his ball or the 8 is blocked.
3. If you are left with a difficult shot and it is VERY LIKELY you will wind up giving your opponent ball-in-hand, might as well do something constructive instead of missing your shot. Something which will make winning for you easier or will make winning for your opponent more difficult. Shoot an intentional foul! Shoot one of your opponent's balls into a nasty spot. Create a cluster for your opponent by shooting at his balls. Shoot at one of your opponent's balls so it hits one of your balls which is in a cluster and tied up and this frees up your cluster. You were going to give him ball-in-hand anyway, but this way you have given him one more cluster/trouble ball, or given yourself one less cluster/trouble ball. This tips the scale so you will have more of an advantage to win.
4. Who is going to win? Look at clustered balls/trouble balls. How many balls does your opponent have which can't be made into a pocket? How many balls do you have which can't be made into a pocket? THIS is the "score board" as to who is going to win! You want to ALWAYS and FIRST THING adjust this scale so all of your balls can be made into a pocket and many of your opponent's balls can't be made into a pocket. If your opponent has balls tied up, he can't win. If all of your balls can be made into a pocket as well as the 8, then it is possible for you to run-out I feel this is the MOST important thing to winning. Work from the get go toward tipping the scale to your advantage and to the disadvantage of your opponent.
Example: It is your shot and you have 2 balls which can easily be pocketed. Instead you shoot at a cluster and move those balls so they can be pocketed and turn the table over to your opponent. (Your opponent has two clusters.) Your opponent shoots in a few balls, but does nothing with the clusters. Then your turn and you move your last trouble ball to a spot where it can be made into a pocket. Your opponent shoots in a few more balls and is left with his two clusters which he has left for last. He shoots at one and it does not go into a pocket. Now your turn. Wide open table, no trouble balls, your opponent has pocketed most of his balls so they are not blocking your shots, every one of your balls can be made into a pocket, easy run-out and win!
9-ball
What are some examples of good 9-ball strategy?
Besides deciding whether or not to play safe, the next most common strategic decision is deciding when to break out a cluster. Here is a good example from Disc III of the Video Encyclopedia of Pool Shots: (external web-link)
YouTube video
Here are some run-out examples from Disc V of the Video Encyclopedia of Pool Shots (external web-link) (VEPS):
YouTube video
Here are some useful drills from Disc III of the Video Encyclopedia of Pool Practice (VEPP) (Download) to practice patterns common in 9-ball:
YouTube video
For more information, see “VEPP – Part VII: 9-Ball Pattern Drills” (Download) (BD, October, 2012) and “Billiard University (BU) - Part VI: 9-Ball Drills,” (Download) (BD, January, 2014).
from KellyStick:
1. Missing very close to the pocket in 8 ball is good. In 9 ball this is bad. My slow roll preference I have used in 8 ball for years is not a good idea in 9 ball unless I make the ball for sure.
2. In 9 ball it is not good enough to leave your opponent a tough defense like it can be in 8 ball but rather you really need to bury the next numbered ball and/or CB in a defense. Otherwise you just get "defensed" back. Somehow this is more critical it seems it nine ball with only one OB available on each shot.
3. The break is much more critical. With only one OB each shot you gotta get good at leaving the CB in the middle. With multiple OB options in 8 ball this is not as critical.
I have some bad habits and abilities that need work here.
General
What are important strategic decisions that come up in all games?
This is the topic of Disc III of the Video Encyclopedia of Pool Shots. (external web-link)
One-pocket
What are some examples of basic strategy in the game of one-pocket?
Here's a good resource on this topic: here (external web-link)
... how to and when to use strategy at the pool table in different types of games.
(external web-links) for more information:
see Chapter 5 in The Illustrated Principles of Pool and Billiards,
Disc III of the Video Encyclopedia of Pool Shots (VEPS) , and Disc III of the Video Encyclopedia of Pool Practice (VEPP)
Bar box vs. 9-foot table
What are some differences between play on a small "bar-box" table and a full-size regulation table?
The biggest difference are:
- There is more "traffic" and "clusters" requiring precise CB control and break-out shots.
- There is less "shot making" on a bar box since no shot is very long.
- In general, bar box play involves more finesse and less power.
- The CB is often heavier on a "bar box" making draw more difficult and follow easier.
- The corner pockets are usually more forgiving on a bar box, and the side pockets can be trouble (very tight in comparison).
- The balls will often be dirtier and older in bar boxes, so you will get more throw and more frequent cling. Therefore, in general, use more speed to limit throw (for cuts greater than about 20 degrees). Also, be very careful with stun shots, especially at slow speed, because they result in the most throw (especially for cuts close to a 1/2-ball hit). If the balls are really clingy, you might also consider using outside English on cut shots.
A good book dealing with playing 8-ball on a bar box is: "The Eight Ball Bible" by R. Givens. Disc III of the Video Encyclopedia of Pool Shots (external web-link) also has lots of good strategy info related to both 8-ball and 9-ball.
from Neil:
1. If the cb is heavier, but basically same diameter- just hit stun and draw shots a little lower. You should be able to adjust to this easily.
2. If playing on a Valley table- the pocket shelf is much shorter, so the pocket acts much bigger than it is. If the rails are in decent shape, you can still make balls that would not be make-able on a 9' or on a diamond. Essentially, forget the point of the pocket is there, and if you can make the ball in the back of the pocket, it will go rail first in the front of the pocket. Sometimes you can really cheat the pockets hitting rail first at a slower speed.
3. BB's like a pure stroke. And, a pure stroke is the easiest way to try and adjust to the speed of the table. The speed can be the toughest part to overcome. One BB may play slow, the one next to it might make you think the cb is jet propelled! On the fast ones, use as little english as possible because the english will really make the cb seem to speed up off the rails.
4. If on a Valley, don't act like they are easier because the pocket is essentially bigger. Still aim to a specific part of the pocket.
5. Bank shots are easier, and a part of the game on a BB. Utilize them when you need to.
6. DO NOT underestimate any shot just because you don't have a lot of distance to the pocket. MAKE SURE your properly aim EVERY shot.
7. Really pay attention to how the balls are racked. And, where others are breaking from and at what speed. Sometimes a much slower speed works wonders, and sometimes just changing sides to break from works wonders.
8. Make sure you hit the one ball very square on the break. If you don't, you have a good chance of scratching in the side pocket, and that spells doom.
9. Run out as often as possible. However, safes can give you the game too. When kicking at a ball on a bar box, especially later in the rack, you seldom will win the game unless you kick it in or leave it hooked. Most of the time, if you can see it, you can make it. Even if you have to bank it.
10. Don't shy away from going around the table at times. The shorter distance makes around the world position very feasible. Just pay attention to the route so you don't scratch. Come through the middle of the table when possible when traveling a long distance.
from JoeyA (in summarizing a thread on AZB): (external forum-link)
1. Control the cue ball on the break.
2. Pay attention to how the balls are racked.
3. Pay attention to how other breakers are making balls on the break. It could be the only difference between winning and losing.
4. Avoid the side pockets whenever possible as they are smaller pockets.
5. Shoot for the corner pockets as they are large and generous to most shots.
6. That being said, ‘Just because the corner pockets are large and the table is small, “DON’T take any shot for granted”.
7. If you do use the side pockets, MASTER shooting into the smaller pockets before you start the tournament.
8. If you use side spin, MASTER the use of Side Spin, before you start the tournament. Remember, the heavy “ROCK WILL ROLL”. MASTER the art of spinning the heavy rock and use it prudently.
9. Play minimal shape. Most shots are close and do not require pinpoint shape.
10. Avoid accidentally running into balls while playing the run out, unless that is the plan. Accidentally bumped balls have a way of creating new problems for running out.
11. Do not slow roll the cue ball or the object balls as smaller tables can often times have serious leans at slow speeds.
12. Practice cheating the pockets, at different speeds, because on occasion, you can achieve even better shape than you normally would.
13. Avoid force follow on the bar table as the outcome is hard to determine with any consistency.
14. Bar box banking is full of hazards. Test the rails early and often. That being said, instead of playing a weak safety (and most are when there are only a couple of balls left on the table), take make-able bank shots and be sure and hit them at the proper speed.
15. Less cue ball movement is key to success on a bar box. Select patterns that minimize cue ball movement. For example, settle for a longer shot where you can shoot a stop shot rather than a short cut shot where you have to move the cue ball a foot or two and bounce off one cushion.
16. Stop shots and stun shots are your friend.
17. Break out clusters early, especially if you are going to try and run out.
18. OK, I just remembered, I did shorten up my bridge and moved my back hand forward just a bit and it did seem to help on some shots.
19. Be more aware of your cue ball speed. These smaller tables require that as you have less distance that you need to travel than on a larger table.
20. THINK, THINK, THINK! Because this is a smaller table and you don't regularly play on them, you have to constantly think about all of the above. Playing on a smaller table requires that you pay more attention, not less.
8-ball
What are some examples of good 8-ball strategy?
The most important strategic decision made in 8-ball is choosing between "solids" and "stripes" after the break. Here are some good examples from Disc III of the Video Encyclopedia of Pool Shots (external web-link) of things to consider:
YouTube video
Another important decision is in selecting "key" balls. Here are some examples from Disc III of the Video Encyclopedia of Pool Shots: (external web-link)
YouTube video
And here are some run-out examples from Disc V of the Video Encyclopedia of Pool Shots (external web-link) (VEPS):
YouTube video
Here are some useful drills from Disc III of the Video Encyclopedia of Pool Practice (VEPP) (Download) to practice patterns common in 8-ball:
YouTube video
For more information, see “VEPP – Part VIII: 8-Ball Pattern Drills” (Download) (BD, November, 2012) and “Billiard University (BU) - Part VII: 8-Ball Drills,” (Download) (BD, February, 2014).
Here's a summary of important 8-ball strategy:
- Choose "solids" or "stripes" wisely after the break (per the info above).
- Choose the key ball carefully (per the info above).
- Choose the key ball for the key ball carefully.
- Plan your run-out from the 8-ball backwards.
- Reevaluate your run-out plan after each shot, especially if you get out of line.
- Walk around the table while evaluating a run-out plan.
- Deal with problem balls as early as possible.
- Break out clusters when there is an insurance ball available.
- Don't bump into or disturb balls (yours or your opponent's) if it is not necessary.
- Pocket or move balls that clear the way for other balls as early as possible.
- If you can't run-out, play a safety early in the game and solve problems in the process if possible.
- On a "bar box," avoid the side pockets when possible.
- If you decide to run out, don't miss.
- Consider playing safe instead of attempting a low-percentage shot.
- Clear balls in the center of the table early in the rack.
from CreeDo (in AZB post): (external forum-link)
• Get the stripes-or-solids group where the problems are all solvable
(meaning a tricky tied-up ball has another ball nearby that naturally breaks it up).
I'd rather have a group with 2 solvable problems than a group with 1 problem and no natural way to deal with it.
• Don't ever risk getting hooked while trying to play aggressive position, unless you have a "plan B" shot available.
"Too long" you can deal with. "Too thin" you can deal with. Even on the rail can be dealt with. Hooked = game over.
Especially on a barbox, don't be afraid to settle a bit on shape, if it means you have the right angle and 0 risk of hook.
• Just because a ball is near the side, doesn't mean you have to play it there. In fact thats where a lot of players
get into trouble. Getting funny on a side pocket shot means moving the cue ball up and down the whole table
weaving through traffic. That's the kind of risky stuff that ends runs. Plan for mostly corner pocket shots.
This goes double on the barbox. Move the cue ball less.
• If you start with ball in hand, solve your biggest problem with it. Don't play position to solve the problem later.
Solve it right now. With your ball in hand. Many runouts are blown by people getting too cute,
trying to sink a ball or two before dealing with their problem.
• Don't miss. 9-ball gets people used to 2-way shots where missing is sometimes safe,
the opponent is left long or even hooked. In 8-ball a miss is much worse. If you're gonna risk a missable shot,
do it early in the rack.
from Cornerman (in AZB post): (external forum-link)
Leaving your balls in the center of the table as your last or nearly last balls isn't a good idea for two reasons:
1) It limits your pathways for your cueball
2) positionally speaking, it is more challenging to get the proper angle on a ball in the center of the table.
It's easy to see why number 2 is true when the table is full of balls; it's tougher to see why it's a challenge when you only have your balls left.
Ways to screw up a ball-in-hand runout in 8-ball (barbox or otherwise):
- The number one way a ball-in-hand out in 8-ball is botched is by leaving the object balls in the center of the table as the last balls. The balls in the center of the table block path routes, and are deceptively challenging when the "proper angle" is needed to get to the 8-ball.
- The number two way to botch a ball-in-hand runout is to leave hanging balls until the last balls. IMO, there's little reason to take hangers out late.
- The number three way to botch a ball-in-hand runout is to leave two balls side-by-side in the same pocket, as opposed to just leaving one ball as the last ball before the 8-ball. If you just take one out earlier, the there is no "which one do you have to get on first" failure mode.
- The number four way to botch up a ball-in-hand runout is stick too tightly to the "clear all balls from one side of the table" misconception. I cant' recall where this idea is ever correct, yet so many people bring it up as if there's some sanity to it.
- The number five way to botch up a ball-in-hand runout is try too hard to set yourself into rules. These are just guidelines.
from 8onthebreak (in AZB post): (external forum-link)
A great 8 ball player is great because he finds the easiest pattern, not because he's a better executor. 8 ball is chess, running out isn't as important as moving the pieces into position. it is a game of patience. Some suggestions...
1. Never break out a cluster if you don't have to. Usually the balls will go into A pocket, you need precision cue ball control to get the position, but breaking them out leads to scratches, and many times, no shot after.
2. Find a pattern that is easy to run out, involving NO draw. Top is much more predictable. Start with the 8 ball, and work your way backwards to find the best pattern...your last shot before the eight should be an easy stop shot, with easy shot on the eight. The shot before that should be an easy stop shot with position for an easy shot on the setup ball...etc. work backwards thru the rack and if you pick the pattern out correctly, a b player should be able to run it out almost every time.
3. Clear your trouble balls early, this includes any balls on the rail or in a cluster.
4. Never shoot your ducks in. They are like soldiers fighting for you. Theres 4 reasons for this. They are an easy shot from anywhere and give you easy position for almost any shot on the table. Also, It will be difficult for anyone to play a safe on you if you have hangers on the table, and they block pockets so your opponent can't use the pocket.
5. Look at clusters as a golden opportunity. A cluster is absolutely THE BEST environment to play a safe into. Always look at the cluster, and determine how u can hit a ball in the cluster, freeing that ball, and stop the cue ball inside the cluster or behind it, acquiring an easy ball in hand. Plan, get position for the safe, and take the safety shot, wait for ball in hand or an easy runout with the cluster now being makeable since u removed the tough ball. Clusters are your friend.
6. Don't move the cue ball, settle for short side shape, nice, easy...there's no long shots on the table, so any shot is an easy shot if you are even remotely in shape.
7. If you are less than 70% sure you'll make the shot...start looking for a safety. If you can't find a safe with significantly better odds of success, take the shot.
8. Gently bump opponents balls to the rail, and especcially away from the side pocket when possible. A hanger in the side pocket can win you a game cuz its guaranteed position to anywhere on the table...however, a ball on the rail next to the side pocket has about a 30% chance of costing a good player the game. If the opportunity presents itself to make one of your hangers in the side pocket, off of his duck, and move his duck to the rail...you've just put the odds in your favor to return to the table if you should make a mistake.
9. Don't shoot hard...it's an unnecessary risk.
10. Don't shoot soft...it's an unnecessary table roll risk.
11 Patience, patience, patience.
from Billy_Bob:
1. Don't pocket ANY of your balls if any are tied up. LEAVE THEM! Instead hit clusters where your balls are tied up and re-arrange the table so every one of your balls can be made into a pocket. THEN run out. You CAN'T win if one of your balls is tied up and can't be made into a pocket. You can't win if the 8-ball is tied up and can't be made into a pocket. Leaving your balls on the table will get in the way of your opponent. What will frequently happen if you do this is your opponent will shoot in most of his balls except two or three (as you are busy unblocking your clusters and turning the table back over to him). Then you wind up with a wide open table, very easy to run-out at this point. You have cleared up your cluster problems first thing and your opponent has been kind enough to get his balls out of your way! RUNOUT!
2. If you can't run-out because you still have one or more trouble balls, and you have a ball blocking a pocket and this is blocking the 8 or one of your opponent's balls, LEAVE IT! Shoot at a cluster and fix trouble balls first. Your opponent can't win if his ball or the 8 is blocked.
3. If you are left with a difficult shot and it is VERY LIKELY you will wind up giving your opponent ball-in-hand, might as well do something constructive instead of missing your shot. Something which will make winning for you easier or will make winning for your opponent more difficult. Shoot an intentional foul! Shoot one of your opponent's balls into a nasty spot. Create a cluster for your opponent by shooting at his balls. Shoot at one of your opponent's balls so it hits one of your balls which is in a cluster and tied up and this frees up your cluster. You were going to give him ball-in-hand anyway, but this way you have given him one more cluster/trouble ball, or given yourself one less cluster/trouble ball. This tips the scale so you will have more of an advantage to win.
4. Who is going to win? Look at clustered balls/trouble balls. How many balls does your opponent have which can't be made into a pocket? How many balls do you have which can't be made into a pocket? THIS is the "score board" as to who is going to win! You want to ALWAYS and FIRST THING adjust this scale so all of your balls can be made into a pocket and many of your opponent's balls can't be made into a pocket. If your opponent has balls tied up, he can't win. If all of your balls can be made into a pocket as well as the 8, then it is possible for you to run-out I feel this is the MOST important thing to winning. Work from the get go toward tipping the scale to your advantage and to the disadvantage of your opponent.
Example: It is your shot and you have 2 balls which can easily be pocketed. Instead you shoot at a cluster and move those balls so they can be pocketed and turn the table over to your opponent. (Your opponent has two clusters.) Your opponent shoots in a few balls, but does nothing with the clusters. Then your turn and you move your last trouble ball to a spot where it can be made into a pocket. Your opponent shoots in a few more balls and is left with his two clusters which he has left for last. He shoots at one and it does not go into a pocket. Now your turn. Wide open table, no trouble balls, your opponent has pocketed most of his balls so they are not blocking your shots, every one of your balls can be made into a pocket, easy run-out and win!
9-ball
What are some examples of good 9-ball strategy?
Besides deciding whether or not to play safe, the next most common strategic decision is deciding when to break out a cluster. Here is a good example from Disc III of the Video Encyclopedia of Pool Shots: (external web-link)
YouTube video
Here are some run-out examples from Disc V of the Video Encyclopedia of Pool Shots (external web-link) (VEPS):
YouTube video
Here are some useful drills from Disc III of the Video Encyclopedia of Pool Practice (VEPP) (Download) to practice patterns common in 9-ball:
YouTube video
For more information, see “VEPP – Part VII: 9-Ball Pattern Drills” (Download) (BD, October, 2012) and “Billiard University (BU) - Part VI: 9-Ball Drills,” (Download) (BD, January, 2014).
from KellyStick:
1. Missing very close to the pocket in 8 ball is good. In 9 ball this is bad. My slow roll preference I have used in 8 ball for years is not a good idea in 9 ball unless I make the ball for sure.
2. In 9 ball it is not good enough to leave your opponent a tough defense like it can be in 8 ball but rather you really need to bury the next numbered ball and/or CB in a defense. Otherwise you just get "defensed" back. Somehow this is more critical it seems it nine ball with only one OB available on each shot.
3. The break is much more critical. With only one OB each shot you gotta get good at leaving the CB in the middle. With multiple OB options in 8 ball this is not as critical.
I have some bad habits and abilities that need work here.
General
What are important strategic decisions that come up in all games?
This is the topic of Disc III of the Video Encyclopedia of Pool Shots. (external web-link)
One-pocket
What are some examples of basic strategy in the game of one-pocket?
Here's a good resource on this topic: here (external web-link)
For more info, visit billiards.colostate.edu
Stroke
Stroke in Pool and Billiards
... how to properly stroke a pool cue.
(external web-link) for more information:
see Section 2.05 in The Illustrated Principles of Pool and Billiards
Acceleration
How does the speed and acceleration of the cue vary during a typical stroke?
See the following video that I worked on with Bob Jewett:
... how to properly stroke a pool cue.
(external web-link) for more information:
see Section 2.05 in The Illustrated Principles of Pool and Billiards
Acceleration
How does the speed and acceleration of the cue vary during a typical stroke?
See the following video that I worked on with Bob Jewett:
Bob Jewett also has an article with a good example plot here (Download) (see page 9).
All stroke types create acceleration during the forward stroke. They just do so different amounts at different times. With a typical pendulum stroke, acceleration occurs during the entire forward stroke, but diminishes to zero as you approach the ball. Acceleration is the rate of change of speed. If there is no (or very little) acceleration just before CB contact, the speed is no longer increasing as the tip hits the ball. Therefore, the cue is not accelerating "into" the ball. This is typical with a pendulum stroke. The speed levels off just before CB contact. This might make it easier to control shot speed because the speed isn't changing as you hit the ball; otherwise, slight changes in stroke "timing" can result in different speeds. So there might be an advantage to not accelerate "into" the ball. People who drop their elbow before CB contact are most likely still accelerating (the speed is still increasing) at CB contact, especially with power shots, so they are accelerating "into" the ball.
What people usually mean when they say "accelerate into the ball" or "finish the stroke" is: "don't decelerate into the ball" (i.e., don't slow the cue before cue ball contact). Decelerating into the ball can result in very poor speed control.
For more info on the effects of speed and acceleration, see: follow through in this section.
See also: TP B.4 - Stroke speed and acceleration vs. distance (Download). Here is the summary from the analysis:
With typical pendulum (p) strokes, the speed is more constant (i.e., leveled-off) at CB impact, possibly making it easier to control shot speed, because the speed is less sensitive to variations in bridge and stroke length. With typical "accelerate into the ball" (a) strokes, the force increases and levels off during the stroke, and force is being applied all of the way up to ball impact. With a classic pendulum stroke, it is natural to coast into the ball with no force at impact. The peak force is typically lower with an "accelerate into the ball" stroke than with a pendulum stroke (for the same shot speed) because force is applied over a larger distance. Therefore, for some people, this type of stroke might seem to require less effort for a given speed, and higher speeds might be possible. A typical "accelerate into the ball" stroke usually involves more of a "piston-like" stroke, with shoulder motion and elbow drop, allowing some people to generate force more easily throughout the stroke. One disadvantage of a piston stroke is that tip-contact-point accuracy might be more difficult to control.
TP A.9 - Cue accelerometer measurements (Download) shows accelerometer measurements and describes cue reactions during strokes and CB impacts. The blue curves in the top three plots (red curves in the bottom two plots) represent forward acceleration. A positive acceleration implies slowing in the backward direction (e.g., at the end of the back swing) and/or speeding up in the forward direction (e.g., during most of the pre-impact portion of the forward stroke). A negative acceleration implies slowing in the forward direction (e.g., in the later part of the forward warm up strokes) and/or speeding up in the backward direction (e.g., at the beginning of the backstroke).
The relatively flat portion of Andreas' curve, before impact, corresponds to the second half of his back-swing. Notice how it is nearly identical to the shapes in the warm-up strokes (which I think are fairly firm). I think the entire forward stroke, before impact, is represented by the tall peak. The final forward stroke is much faster and more forceful than the warm-up strokes. After the peak, and before impact, the acceleration appears to go negative a little, implying he was actually decelerating a little before impact (if you trust the sensor, its calibration, and the data acquisition). At impact, the signals go wild due to shock waves and vibration.
In the first two plots (softer strokes), the acceleration is still positive at impact, implying that the cue stick is speeding up during the entire forward stroke (e.g., he is accelerating into the ball). Both of Pizutto's plots show slight slowing (negative acceleration) just before impact.
Andreas does not appear to have a distinct pause at the transition between the back and forward stroke because the acceleration curve would be flat (at zero) if there were a deliberate pause.
The spike before impact represents the entire forward stroke, not any weird wrist action. Note that the time scales are very different between the two sets of plots. Pizutto's plots are just showing the final forward stroke and the resulting shock and vibration immediately after impact. Andreas' plots show a much large time interval, including warm-up strokes.
If I accelerate into the CB, will I get more "juice" on the ball?
from Jal:
In principle, the cue ball will ... have more speed and spin ... when you apply a force during impact. It's just that since the impact period is so short (mainly), the effect is essentially negligible. If you had a really, really soft tip such that contact lasted, say, a second, that would be a different story. So would being able to apply something like 100 lbs of force, as opposed to what we actually apply, about 15-20 lbs at the peak of a power stroke (much less throughout most of the rest of the stroke).
That aside, "accelerating through" can, in theory, give you noticeably more ["juice"] by generating more cue speed before impact commences. One impact begins, virtually nothing short of a superhuman effort can alter things. And the term "accelerate through" is a misnomer. You can continue to apply force, but the impact will inevitably slow the cue down unless you can muster something on the order of 400 lbs.
[The cue] does sense force, but the force doesn't last long (it takes force acting over time to get things moving). And the entire force that you might be applying with your grip hand is not what the cueball sees; it's only about 1/4'th of that. The force that really gets its attention is the one generated by the impact of the already moving cue, and this can approach 300-500 lbs. That's why cue speed is important, not the relatively meager force generated by our stroking arm.
Best practices
What are considered the "best practices" for stroke mechanics?
See stroke technique advice in this section.
Chin height
What is the advantage of having a low stance with the chin close to the cue?
Having you eyes closer to the cue helps you more easily visualize the alignment of the cue with the desired aiming line. With your head low, it might help to use an open bridge (see Diagram 3 in "Fundamentals - Part IV: bridge length" (Download) - BD, December, 2008) Most snooker players, who require tremendous accuracy, use an open bridge and have there chin just above (or even touching) the cue.
from Spiderman:
I find that my "chin height" varies with the shot. For shots where the CB and OB are a reasonable distance apart, I am fairly low on the cue. For cut shots with the OB close to the CB, my stance raises a little to facilitate visualizing the contact point and the alignment of the balls at contact. For straight-ins, I don't raise as much as for cuts.
Elbow drop
Is it recommended to drop one's elbow during the stroke?
There is a lot of misunderstanding and misrepresentation in the "elbow drop" arena. The general "don't drop the elbow" advice is not as rigid as some people think. Obviously, for an extreme power shot, the elbow will want to drop naturally during the follow through (due to the momentum of the arm and cue). The problem lies with dropping the elbow too much or when it is not intended, especially if the elbow is dropped unintentionally before cue ball contact. For most (almost all) shots, and for most people (especially beginners), accuracy and consistency will be better if the elbow is not dropped before (and maybe after) cue ball contact. A potential problem with dropping the elbow after cue ball contact (e.g., when it is not required based on shot power) is that if one's timing is a little off, the elbow might drop a little before contact, which can affect tip contact point accuracy.
Here's a video demonstration of a non-elbow-drop pendulum stroke: YouTube video
Elbow drop and pendulum vs. piston stroke are also discussed in this YouTube video:
Elbow drop advantages
An advantage of dropping the elbow during the stroke is it can allow more power by involving the shoulder muscles. Having a slightly "choked up" grip, where the forearm is forward of vertical at CB impact, and using a more upright stance can also help add power. Related discussion and demonstrations on how to add power to a break shot can be found here: power break technique advice in "break" section.
Other possible advantages of dropping the elbow during typical (non power) shots include:
Elbow drop disadvantages
Here are some possible disadvantages of dropping the elbow:
For more information, see follow through in this section.
Comments from others:
from Neil:
What is one of the main keys to playing good? Repeatability. So, what do you think the first thing an instructor is going to teach someone? Yes, repeatability. Now, the instructor can stick around for a few years and watch his student shoot thousands of balls until his mind finally gets trained to do it the same way, no matter what way that is, OR, the inst. can teach a simple way to be repeatable and accurate in the stroke. And, do it in a few hours. Which should he do?? (If you really don't know the answer to that, stop reading now, you are too stupid to play pool, or to do much else.)
The pendulum stroke is easily taught, and is extremely repeatable and reliable. When set up properly, you hit the cb with a level stroke at impact, and right where you want to hit it. You are not hitting the cb while on an upswing as some have stated. If you are, you aren't doing it right, go see an instructor.
It has been mentioned numerous times that you seldom see the top pros not dropping their elbow. This is true. You also seldom see them drop BEFORE contact, although some do. It seems to be the consensus on here that that means that you should drop your elbow. Let's think about that for a minute..... when did the pendulum swing really come into play? Not very long ago. When did the top players start playing? A long time ago. This wasn't even an issue when they were learning! So, how did they learn? By shooting thousands and thousands of shots. You can learn the same way too. (not a very time efficient method, though)
They, the top pros, have learned repeatability the hard way, over time. Doing that, they each have little and some have large idiosyncrasies to their stroke that works FOR THEM. To try and repeat their strokes, can easily be a HUGE waste of time. If we should only copy them, why don't more people try and play like McCready or Bustamante, arguably two of the best players?
Many of the top players also jump up in the air when they break. Does anyone really think that is a good thing to do? It has been proven over and over that it is not, and adds NOTHING to the break. (except a lot of problems if you don't have your timing just perfect.) Remember what your mothers taught you? Just because Timmy is jumping off a bridge doesn't mean you have to do it too! There's a lot of wisdom in that if you bother to think about it.
It has been stated that you can't get proper follow through with a pendulum stoke. Again, if you can't follow through for 1/1000 of a sec, (all the time the tip is on the cb) you better quit now. The ONLY reason for any follow through is to not stop the stroke. You want the tip going smoothly until contact. All the pendulum stroke does is alter where your follow through goes AFTER contact. It does not minimize it in the least.
If you drop your elbow BEFORE contact, you are much more prone to not hitting the cb where you intend to. Hence, the up and down swings in play that many players suffer from. If one muscle is a little tight, it changes where you hit the ball. Dropping your elbow before contact introduces the shoulder muscles into play. Just something else that can go wrong. Why not eliminate as much as possible that can go wrong?
What many of the top players have learned over trial and error is that if you extend your cue along the shot line on the follow through, it really helps you keep the stroke straight on the way to the cb. The mind finds it easier to make everything work properly with a longer line to work with than just the few inches to the cb.
NO ONE is saying that method doesn't work, or is bad. If it works for you, great! However, there is an easier way to achieve the same results, yep, the pendulum stroke. The top players are not going to change what took them many years to ingrain into their subconscious to achieve the same results. That would be rather foolhardy. But, when you are learning, or even if you have been playing a long time and DON'T have a repeatable stroke, the pendulum stroke is an easy way to get one. The fewer moving parts you have, the less can go wrong.
It has been wrongly stated that you can't get enough power with a pendulum stroke. And that you can't get anything put a dog-break with it. Baloney. I have make 8 out of 9 balls on the break with a pendulum stroke. When Scott and I played, right after the first break of mine, he started laughing and said "And people say you can't get a good break with a pendulum stroke!" First off, the break is not so much about power, as it is about accuracy and a good rack. Just ask Donnie Mills, or Corey Duel. And, you can get all the power you need for ANY shot that comes up during a game.
Many times, when you have an experienced player, and he/she tries to shift over to a pendulum stroke, they have problems. ANY time you try and learn something you are used to doing a new way, you have to give it time to erase the old way of doing it, and ingrain into your subconscious the new way. How long that takes, varies with the individual. Even after you have the new way ingrained, sometimes the old way still creeps in. It took me the better part of a year to finally let my subconscious go and trust it enough to stroke correctly when I switched over to a pendulum stroke. And, the old way still creeps in now and then and messes me up.
Once you get to the point of NOT thinking about your stroke, but letting your subconscious stroke it, the pendulum stroke is a VERY effective tool! Many players reach a plateau, and can't seem to get any better. I feel there are two main reasons for this- they do not have a repeatable stroke, and/or they really don't pay attention to just what is happening when they shoot a shot. The don't know just where they hit the cb, where the cb hit the ob, and where the cb went after contact with the ob, and what speed was used. Not KNOWING those things, you can't possibly duplicate and expand on them.
Another thing you will see a number of top pros do, is to do their warmup strokes with the tip on the cloth well before the cb. They have the natural talent, and years of experience to bring the tip up precisely to where they want it on the final stroke. If you don't have their natural talent, or years of experience, good luck with that. So, is that also something we should all do just because they do it? Are there better ways to accomplish the same end result? Busty looks like he is using an old water pump when he strokes. Should we copy that move too? Why not? The pros do it. Mainly, because we aren't them.
We don't have the natural talent, or the time to invest as they have done. We have to use whatever methods we can to shorten the time it takes, and to make things as easy as possible. The pendulum stroke really helps the fundamentals and repeatability. Aiming methods can really help in their area. Kicking systems in theirs, etc.
But for some to get on here, and make statements that they have about the pendulum stroke, only shows how little they do know about it, and about the general concepts of pool, what works and why it works.
Nobody is saying that dropping your elbow is bad, or that you can't play good that way. If it works reliably for you, keep doing it your way. But, if you find that you are not reliable, try the pendulum stroke. It is a much easier way to get repeatability. And, that is what this game is all about. There's not much point in learning how to get the cb to do what you want it to do if you can't hit it where you want to. Thinking you hit the cb in one spot, and actually hitting it in another only puts into your subconscious something that is wrong. Then, when you DO hit the cb where you want to, you get a different reaction out of it, and get all confused and lose confidence in yourself.
from Bob_Jewett:
...the vast majority of players drop their elbows some on power shots. When talking "elbow drop" you need to be clear about how much. Many players drop their elbows only about the thickness of their upper arm on most power shots.
Two articles that discuss elbows and the strange things people do with them are: (Downloads)
http://www.sfbilliards.com/articles/2004.pdf (February)
http://www.sfbilliards.com/articles/2004.pdf (March)
For most of the players I've checked, there are some shots for which their elbows do not move.
from pooltchr:
...the vast majority of students who come to me are looking for consistency. The best way to achieve this is SPF and no elbow drop. There are select shots where dropping the elbow may allow more power, but that same majority would be giving up a lot of accuracy to gain the power. In my opinion, accuracy is more critical than power. There are always going to be players at the top of the game who can control a full arm stroke with accuracy and consistency. They would be in the minority.
I have had very good success helping students improve their control by using the pendulum stroke. As an instructor, I have to consider each student as an individual, so I can't say I would ever say that a student MUST not drop their elbow. But so far, whenever I have had a student try the pendulum stroke, they have shown very quick improvement in accuracy. I have one student who uses this stroke on his break! He regularly makes something (often multiple balls) and almost always lands the cue ball in the center of the table. I don't see any reason to introduce a full arm swing to a player who would be better served from an accuracy standpoint by developing a simpler motion. When the student comes to me who can consistently make controlled contact with a full arm stroke, I don't think I would suggest any changes. Until that student appears, I think this is the best method to teach. There are going to be exceptions, but I suspect they are few and far between.
from Mike Page:
If you were to install webcams in a hundred poolrooms throughout the world and view 1000 random elbow drops on pool strokes, those 1000 strokes might be divvied up as follows:
category A elbow drops--
the vast majority of them--are plainly and simply bad mechanics. This person's elbow is moving during the stroke, as perhaps is his or her head, making strokes inconsistent, making strokes rely on carefully choreographed timing of different motions, and encouraging the addition of other compensating motions. These people absolutely will benefit from learning good mechanics like those Randy and Scott and Steve and others advocate so well. These people should heed the advice of instructors like those I just mentioned and practice it until one nipple is as calloused as the bottom of a foot, imo.
category B elbow drops--
These are solid players whose elbow is still at the time of contact. The stroke is a simple pendulum stroke until after the cue ball is gone. The impetus for dropping the elbow in the follow through perhaps comes from the desire to have a long, exaggerated follow through, or perhaps it comes from wanting a level, horizontal follow through (instead of the tip approaching the cloth as in the pendulum stroke). These people don't necessarily need to change anything. The biggest problem they cause is for others. They embolden the category A folk--who don't recognize the difference--thus providing a disincentive for the category A folk learning good mechanics.
Category C elbow drops--
This is, for example Mike Massey. These people are capable of a good pendulum stroke and perhaps employ a pendulum stroke on most of their shots. However, on power strokes, e.g., a break shot or a power draw shot, you will see an elbow drop. These players' elbows are moving at contact because the point is to add some speed by pivoting about the shoulder. In fact focusing on the elbow drop is like focusing on the thunder instead of the lightning. The lightning here is the elbow raise on the backstroke. Then pivoting about both the shoulder and elbow on the forward stroke increases speed. Most players, imo, should never do this for, say, a draw shot. The reason is that while the speed increases a bit, the bigger effect is our precision in where we contact the cue ball goes down by a more significant amount. So I would say if you can't consistently draw one and a half table lengths with a pendulum stroke, then there's no way you should be futzing with this stuff. And if you CAN consistently draw one and a half table lengths with a pendulum stroke, then...well...you're more or less good to go!
Follow-through
Does an extended follow-through add power, draw action, or accuracy to a shot?
This is a question of cause and effect. The follow-through strictly has no influence on the cue ball because the cue ball is gone before the follow through takes place. What the grip and stroke does during cue tip contact is also unimportant because the tip is in contact with the cue ball for only a very short amount of time (approximately 0.001 seconds). However, the follow-through is usually a good indicator of the quality and nature of the stroke into the ball, which does matter quite a bit. For example, if the follow-through is very short, it could indicate a decelerating or over-constrained stroke into the ball, which can adversely affect speed control. Also, if the follow-through involves tip lift (due to elbow drop) or steer (due to a flying "chicken-wing" elbow), these motions might be starting before tip contact, during the stroke into the ball, and this could definitely affect cue-tip-contact-point and aiming accuracy. To summarize, the follow through is not the "cause" of a good stroke, but it is often a strong indicator of a good stroke into the ball.
All the cue ball "cares" about is tip contact point, cue speed, and cue angle and elevation at the moment of impact. Follow-through is just a symptom of your stroke and has no direct affect on the action of the shot. Now, when you follow through, maybe you are doing something different with your stroke to get a different cue speed or a different tip contact point, or maybe your stroke is straighter. To detect this, you can videotape your stroke changes and look at the chalk mark on the CB. It helps to use a ball with markings (e.g., a striped ball or a Jim Rempe ball) when checking the chalk mark. If two shots have the same cue speed and tip contact point, but have different amounts of follow through, the action of the shots should still be the same. If you are getting different action, you are not hitting the CB with the same speed, tip-contact point, or aiming line.With an elbow-drop (long follow-through) stroke, there might be a tendency for the player to drop the elbow slightly before CB contact. If this happens, the tip will hit the CB slightly higher than the player thinks. Likewise, with a shorter follow-through, a player might have a tendency to tighten the grip slightly, which would cause the cue tip to lower some. Also, different cue speeds will result from variations in the stroke. For more information, see stroke "type" and "quality" in this section.
Concerning the break shot, the only thing that significantly affects the power for a given break cue and tip contact point (and cue angle) is cue speed at impact. However, if a powerful stroke does not exhibit a long follow-through, it is either not very powerful, or effort is being made to limit the follow-through. If one tries to constrain the follow-through, one will probably not achieve maximum speed at impact.
Follow-through can also be important in achieving good action on draw shots (although, not always for the reasons people think). For more info, see "Draw Shot Primer - Part V: how to achieve good draw action" (Download) (BD, May, 2006). In particular, see item "b" under "other advice" and item "5" under "suggested best practices." I think these points apply equally well to both a power break and a power draw.
For more information on topics related to follow-through, see:
Forearm perpendicular to cue
Why is it usually recommended to have the forearm perpendicular to the cue at CB impact?
With a non-elbow-drop stroke, and with the forearm perpendicular to the cue, the cue tip will be moving exactly straight in the cue direction. If the grip is forward, the tip will be moving down into the ball; and if the grip is back, the tip will be moving up at impact. Also, there is a natural tendency to reach a constant maximum cue speed when the forearm is perpendicular to the cue at cue ball address. This can make it easier to control your shot speed, because the speed of the cue won't be changing much just before contact. For more info, see: YouTube video
Pendulum vs. piston stroke
What is the difference between a pendulum stroke and a piston stroke?
A "pendulum stroke" is where you keep your upper arm still during the stroke. The only motion is from the elbow down. Some people refer to this as a "pinned elbow" stroke. With a pendulum stroke, the upper arm is considered part of your body, which should remain still during the stroke.
A "piston stroke" is one where you coordinate motion of both the elbow and the shoulder to keep the cue tip moving in a straight line during the entire stroke (just like a piston in the cylinder of an internal-combustion engine).
For more information on the differences and advantages of each type of stroke, see: elbow drop in this section.
Here's a video demonstration of a non-elbow-drop pendulum stroke: YouTube video
A "J" stroke is a combination of a pendulum and piston stroke, where the grip hand follows the pendulum motion on the back swing and forward swing into the ball, and then the grip moves in a straight line (with elbow drop) after CB contact and during follow through. If you trace out the path of the grip hand, it looks like a "J" turned sideways. If done well, this gives the benefits of the pendulum stroke tip contact point accuracy, and the follow through of a piston-stroke, but some people might have trouble with dropping the elbow at the right time and right amount consistently.
Many pros seem to be close to a "J" stroke, but some pros drop their elbow before CB contact, on some shots more than others. Also, some lift the tip after CB contact, especially with follow shots, and some finish with the tip down (with an almost-pendulum-like stroke finish). Some even swoop their stroke on some shots (usually only shots with English), moving the tip sideways during the stroke (before and after CB contact). Some drop their elbow just a little after CB contact on many shots, and some drop their elbow a lot (mostly after CB contact) on most shots. The one thing that can said for sure is that most pros drop their elbow after CB contact, especially with firmer shots. Some seem to do this purposefully; and for others, it just seems like a natural side-effect of the forward momentum of the cue and arm after CB contact.
For more info and advice, see stroke technique advice, elbow drop, and follow through in this section.
Set-pause-finish
What is SPF or SPFF?
SPF = set, pause, finish
SPFF = set, pause, finish, freeze
from Mike Page:
SPF
Many pool instructors refer to the simple pendulum stroke as an “SPF” stroke, where the letters refer to SET (solid red line in the figure above) , PAUSE (dashed purple line), and FINISH (dashed yellow line) positions. The drills you do in the Foundations courses are designed to help burn the SPF sequence into your muscle memory. These drills pay particular attention to the SET and FINISH positions.
THE SET POSITION
As in many sports, the set position is key. It is from here that the fuse is lit for the final stroke. The player’s body is held completely still in the set position for at least three seconds. During the Foundations courses, students should hold every set position for at least five seconds. Here are some characteristics of the set position:
• Forearm is vertical.
• Tip is close to the cue ball.
• Eyes switch focus from cue ball to target location, with at least two seconds on target location.
From the set position, the player draws the cue back slowly to the PAUSE position. It is not necessary to actually pause at the PAUSE position. Some top players do; others don’t. What is necessary is the cue be drawn back slowly (not jerked back) and the transition from backward to forward motion be slow and smooth. The cue is accelerated forward from the PAUSE position. When the forearm becomes vertical again, the tip will be at the ball. At the tip-ball impact on the forward stroke, the player is passing again through the SET position.
THE FINISH POSITION
-going home-
Instructors in many sports, including pool, stress the importance of follow through. We disagree. Follow through focuses on what happens to the front of the cue, i.e., the tip. When a player decides in advance where he or she would like the tip of the cue to finish, there is no guarantee a pendulum stroke can comply. So a player attempting to get the tip to a particular location likely will call upon the shoulder joint. Pivoting about the shoulder joint drops the elbow and raises the tip.
We prefer instead to focus on FINISHING THE STROKE. The stroke is finished when the grip hand reaches its natural finish position—the natural end of the pendulum stroke. Depending upon the player’s body type and stance, this could be where the forearm hits the biceps, or it could be where the grip hand hits the side of the chest. So instead of focusing on follow through, we focus on finishing the stroke, on the grip hand going home.
A consequence of finishing the stroke is the tip of the cue will reach a particular finish location—for many people this is four or five inches beyond the cue ball with the tip touching the cloth. So have no fear, others will think you are dutifully following through.
Unless doing so would disrupt the balls in play, freeze for at least two seconds in the finish position. Note that you’ve gone home.
from Scott_Lee:
The "set" position occurs at the CB, after your warm-up cycle is finished. It's the last conscious thought about, "Well? Are you ready or not?" With the tip at the CB, the "set" position is used to verify earlier decisions on angle, speed and spin. If it is a go, there are no more warm-ups, and the final back swing begins. The "pause" happens as we come to the end of the natural backward motion of the cue, so we can make a smooth transition to the forward swing. All strokes start from zero, and accelerate to whatever speed you're hitting the shot with. The "finish" ... The grip hand ends up in the armpit area, close to the chest; and the tip is on or close to the cloth, some distance past where the CB was sitting. The "freeze" is an opportunity for self-evaluation, that happens after the stroke is over, and you have remained motionless, except for your forearm. The freeze allows you to check components of your stroke, including the grip finish, tip finish, and speed control.
When do muscle transitions occur during the stroke?
from Spiderman:
if the real reason for a "pause" is to allow the "back swing" muscles to stop working before the "forward swing" muscles take over, then there is absolutely no need for a pause in MOTION, only a pause in acceleration.
When the "back swing" muscles relax, the stick is still moving backwards. There can be a finite period of relaxation before the "forward swing" muscles contract and apply force. AT THIS POINT, AND FOR A FINITE TIME AFTERWARD, THE STICK IS STILL MOVING BACKWARDS. It takes some finite time for the "forward swing" muscles to accelerate the stick to zero velocity. There will then be no finite time at zero velocity because the acceleration is continuous, so the stick progresses smoothly (semi-sinusoidal) from backward to forward velocity.
For this example, the "pause" was in acceleration, not velocity. This relaxation of back swing muscles and subsequent resumption of opposite force occurred entirely before the backwards motion ended.
Definition of a pause
What is the definition of "pause"?
Strictly, the word "pause" implies stopping for more than an "instant." When a player has an obvious "pause" between the end of their back-swing and the beginning of their forward-swing, I like to refer to it as a "deliberate pause" or a "distinct pause." Here, the implication is clear: the cue is held stationary (stopped) for more than an instant.
Strictly speaking, if the cue stops only for an "instant," there is no "pause." An "instant" does not involve any passage of time. A "pause" does imply a "stop" (zero speed) for a distinct amount of time. For example, when a free-swinging pendulum changes direction at is highest point, it does "stop" for an "instant," but it does not "pause." The speed gradually and smoothly changes from negative (in the backward direction) to positive (in the forward direction), through zero. The speed does not stay at zero for any amount of time. At the tiniest fraction of a second before the speed is zero, the pendulum is moving slowly in one direction (negative speed); and at the tiniest fraction of a second after the speed is zero, the pendulum is moving slowly in the other direction (positive speed). The speed is zero only for an "instant." Not even the smallest fraction of time passes during that instant.
This explanation applies to any speed (i.e., there is nothing special about zero). For example, consider the cue speeding up gradually between 1 mph and 5 mph. The speed hits 3 mph for only an instant during the acceleration, but there is no "pause" at 3 mph. Now, if you stop accelerating at 3 mph, and hold the speed constant at 3 mph for a period of time, then you could say there is a "pause" in the acceleration. Again, the smooth transition through a speed of zero is no different. If you don't hold the speed at zero for a distinct period of time, then, strictly speaking, there is no "pause."
People will interpret the word "pause" in different ways; but as long as one is clear and consistent with the meaning, and people know what you mean, that's all that matters. Again, I like to use the phrase "deliberate pause" when there is a distinct "pause" in the action (i.e., the stop occurs for more than just an "instant"). For example, both Allison Fisher and Buddy Hall (and others) obviously have a "deliberate pause" before their final forward stroke. The phrase "pause for only an instant" is also OK when there is no "deliberate pause"; although, it is strictly not proper. When somebody rushes or jerks the transition between back and forward motion, there still is a "stop for an instant" (because the cue still changes direction and has zero speed for an instant). I would call this a "pause-less and rushed" transition.
Why pause...
Why should I "pause"?
The pause at the set position allows your eyes to focus and verify both the tip contact point on the cue ball and the target aiming line. For the "pause" at the end of the backstroke, see item 4 in the stroke "best practices" document (Download). Adding a "distinct pause" helps some people prevent themselves from rushing the final back stroke and from rushing the transition to the final forward stroke. Jerking this transition can cause stroking errors.
from mikepage:
If you watch a hundred top players and also watch a hundred ball bangers, here is what I think you will notice:
set position: On average, the top players are stopped like an oak tree in the set position for a notably longer time. The bangers have variable set pauses that are often short and sometimes they don't pause at all.
final backstroke The top players--nearly all of them-- will bring the cue back slowly following the longish set pause. The bangers will bring the cue back faster.
backstroke pause Some of the top players pause; others don't. Some of the bangers pause; others don't. The differences you will note are not so much whether the players pause but rather how smooth and fluid the transition is. Part of the bangers problem with smooth transition is not really a problem with the backstroke pause/no-pause. Rather it is collateral damage from the final backstroke problem. Bringing the cue back too fast encourages a jerky transition. IMO, add a backstroke pause if it floats your boat. But if you're adding it to fix a jerky transition, then you may just be enabling the real (too fast backstroke) problem.
from Stretch:
Because when there is a mechanical error in the stroke it usually happens in the transition from back stroke to forward stroke. Simply put, the end of your backstroke is the start of your forward stroke. So if the backstroke does not come back right, the forward stroke is adversely affected. A slow drawback, and slight pause eliminates this problem. Also the pause is when you re-focus on the ob's contact point. Yes "re-focus". During the practice strokes your eyes are scanning back and forth. When you are ready a back stroke and transition can for a split second distract your focus, even if you don't take your eye off the ball! A slight pause allows you to re-focus, or burn with intensity that vital little bit. It makes one simply react to the target from the trigger position without the distraction of having any moving parts going on at the same time.
from Rod:
Players with less experience get in a hurry to shoot a shot. Doing so they snatch the cue back. I have a phrase I like to use. "Finish Your Back swing".
"Gradually" bring the cue tip to the C/B and pause, let your focus go from tip placement to the O/B during this pause, "Gradually" start the cue back, (this is important because a snatch will make your back swing short) slight pause, then slowly start forward, no matter the power needed. This is the transition area. If you start forward fast, you just wasted the preparation needed to make a smooth stroke.
What you'll find, once you learn to slow down your stroke, you'll hit the cue ball exactly where intended. The reason pool players never excel is they don't grasp the importance of these fundamental movements. You have to be accurate and quick movements will surely make you loose your focus.
Shooting over a ball
What technique advice do you have when having to jack up to shoot over a ball?
from softshot:
when jacked up you have a smaller margin for error...
so make smaller errors...
I shorten my stroke... shorten my bridge.. shrink it all up...
in the most extreme case I'll begin with my back hand in my finish position and bridge as close to the shot as possible... and bridge as stable as possible...
the entire forward stroke may only result in 2 or 3 inches of tip movement total...
sight the shot and line it up level...
and then shrink your stroke more and more as you are forced to jack up higher and higher...
smaller movements make smaller errors...
staying center ball axis is critical.. masse is a huge problem here... the higher you jack up.
from 12squared:
to help relieve tension, I bend my elbow on my bridge arm. This also brings your body a little closer to the ball so you can choke up a little more comfortably on the butt w/ your stroking arm.
Slip stroke
What is a slip stroke and why is it used?
from AtLarge:
Slip stroke -- The grip hand slips back on the butt just prior to the forward stroke at the cue ball.
Stroke slip -- As the forward stroke at the cue ball is executed, the cue slips through the grip hand to some degree (a "throw" or "release and catch").
from Bob_Jewett:
Here is an article from Billiards Digest that describes several kinds of stroke including the slip stroke:
http://www.sfbilliards.com/articles/2005.pdf (October) (Download)
And here is one that describes some other strokes:
http://www.sfbilliards.com/articles/2005.pdf (November) (Download)
Staying down on the shot
Why should I bother "staying down" after a shot?
from Andrew Manning:
Staying still helps for a few reasons.
1) If you're freezing at the finish of the shot, then you're certainly not jumping or moving during the final stroke, which I think everyone agrees is a bad thing to do.
2) When you freeze at the end of the shot, you can see where your cue finished. If you didn't stroke straight through the ball, this will be evident in your finish position, and you'll be able to observe it and use that feedback to improve your stroke.
3) Staying down and continuing to sight down your cue will keep a consistent frame of reference to observe the results of your shot. Your brain can record what the CB and OB do, versus what you wanted them to do, in great detail from this perspective. If you stand up before the shot is done, you have to adjust to looking at the shot from a different angle, and your brain will not be able to calculate what went right/wrong nearly as effectively. Getting the best possible visual feedback is crucial, since this feedback is drawn upon heavily by your subconscious the next time you're lining up a similar shot.
There may be other benefits as well, but I think those are the most important.
Swoop
What is stroke swoop, and should I use it to apply English?
Stroke "swoop" is the practice of pivoting the cue during the forward stroke and follow through. Some people swoop by moving the entire arm during the stroke, and others do it simply by flicking or twisting the wrist. The purpose for the swoop is to move the cue tip sideways during the stroke to apply English, or to lift the tip up or down during the stroke to create follow or draw.
Alternatives to using stroke swoop to apply English include:
1.) Align the cue in the required direction (compensating for squirt, swerve, and throw intuitively) with the tip off center to apply the exact amount of English desired, and then use a straight stroke.
2.) Align the cue at the center of the cue ball along the desired aiming line (with the aim corrected for throw, where appropriate), and then use BHE or FHE or some other method to pivot the cue before the stroke to compensate for squirt and swerve (AKA "net cue ball deflection"), and then stroke straight along this new alignment.
Most (but not all) top players use technique "1." Technique "2" is good for people who don't yet have enough experience-based intuition to adjust for squirt and swerve intuitively. Stroke swoop is also an option for people who prefer a center-ball alignment before the final stroke.
Tom Ross was a great player and an excellent stroke swooper (before his medical "stroke"). He swooped his stroke on almost every shot with English. If you watch our VEPS DVDs or online clips (external web-link), you will see this. He didn't do this because he thought it was better ... it was just the way he learned to apply English, probably from watching some great old-school players who did it that way. One day, we did a fairly long experiment trying to get more spin with a swooping stroke (with Tom doing all of the shooting) and we did not find a significant difference between straight and swooping strokes. Some of the highlights are in the following video: YouTube video
Now, if you twist the cue with your wrist while you swoop the stroke, you can do amazing things with the cue ball. I haven't mastered this technique yet, but I am still able to get tremendous curving action on the cue ball. For demonstrations, see: YouTube video
One possible advantage of the stroke-swoop method is that the initial center-ball alignment might be more comfortable for some people. With the alternative approaches above (1 and 2), the off-center and off-aiming-line alignment can be disconcerting, because to compensate for squirt, the cue will generally not be pointing in the desired direction of the shot. However, it can be difficult to be consistent with a swooping stroke (e.g., with the exact amount of English applied, or with avoiding a miscue when attempting to apply maximum English). Most people will be more consistent and accurate (with actual tip contact point) with a straight stroke as compared to a swooping stroke; although, with enough consistent practice, any technique can be mastered. Some people (including some top players) can be quite effective with a swooping stroke.
A straight stroke (with appropriate aiming corrections for squirt, swerve, and throw, done either intuitively or using methods like FHE/BHE) is much more accurate and consistent (with the same spin-generating capability) than a swooping stroke, but some people will play better with a swooping stroke, especially if that's the way they've always done it.
from Bob Jewett AZB post: (external forum-link)
So far as I know, no one has ever demonstrated that you can get more side spin by swooping. I think it is just a different -- and to me, a far less consistent -- way to do backhand English. Look at the players who really spin the cue ball, like Massey, Sayginer and Trump. No goofy swooping.
Some players fear hitting off-center because of miscues. They barely spin the ball because their arms force them to hit near the center. If someone shows them this "new swoop-spin" technique to get side spin, they may actually rev up the ball for the first time in their lives. They will be true believers. They will also be layering on a mechanical monstrosity to fix a deeper problem in their mechanics.
Even though the tip is on the ball for only a very short time, it does not follow directly that the player could not possibly and under any circumstance affect the result of the shot by swooping the cue stick. Swoop can in fact be useful for shots when the cue ball is very close to the object ball; you swoop to avoid the second hit. However, think about how fast the tip will need to move to the side to have any significant effect. It should be moving to the side at a speed comparable to the forward motion of the cue stick. That's a 45-degree angle relative to straight ahead. Try very slow strokes in which the tip moves at a 45 relative to its normal path. I bet you can't.
Can you get more spin on the ball with stroke swoop?
Some people might be able to get an larger effective tip offset from center (and therefore more spin) by using a swooping stroke. For example, they might be uncomfortable aligning the tip as off-center as is possible with a straight stroke (maybe because they can't prevent themselves from swooping, which would cause a miscue with a large initial tip offset). If this is the case, a person might be able to get more spin with a swooping stroke.
from Jal AZB post: (external forum-link)
You can't get any more spin by swiping across the ball than with a straight stroke. Whatever stroke you employ, the maximum spin/speed ratio is limited by the coefficient of friction between the tip and the ball. This is a function of the materials involved, and not of the type of stroke.
It's true that if you swipe across the cue ball and, say, make contact at center ball, you're going to put a little bit of spin on the cue ball. This is, sure enough, spin you wouldn't have produced with a center ball hit and a straight stroke. But that doesn't mean that if you make contact near the miscue limit (~ 1/2 ball radius) while swiping, you're going to get some extra spin. You'll either miscue or end up with the same amount of spin as you would have obtained by cue-ing right at the miscue limit with a straight stroke.
You can test this by plopping the cue ball down on the head spot and driving it straight to the foot rail while attempting to impart maximum side spin using both techniques. I think you'll find that the only thing the swiping does is to increase the difficulty of accurate tip placement.
from Jal AZB post (external forum-link), concerning how the the same thing can be done with a straight stroke as with a swooping stroke:
An advantage of dropping the elbow during the stroke is it can allow more power by involving the shoulder muscles. Having a slightly "choked up" grip, where the forearm is forward of vertical at CB impact, and using a more upright stance can also help add power. Related discussion and demonstrations on how to add power to a break shot can be found here: power break technique advice in "break" section.
Other possible advantages of dropping the elbow during typical (non power) shots include:
- If the elbow is dropped before tip contact, it might make it easier to get more cue speed with less overall effort, and more smoothly.
- If the timing and coordination of the elbow and shoulder are good, the cue tip can be made to move in a straight line over the entire stroke. This could help some people maintain truer aim and sighting and hit the desired point on the CB more consistently.
- Since the elbow doesn't approach maximum elbow flex (as it can with a pendulum stroke), elbow drop might result in less strain and discomfort for some people.
- It helps encourage a more complete, more level (piston-like), and unobstructed follow-through, especially with shots requiring more cue speed.
- It doesn't result in the grip hand or forearm hitting a firm stop (e.g., on the chest).
- It looks smoother, and many people think it looks better.
- Many of the pros do it, and people like emulating the pros.
- Many people find the elbow-drop stroke more natural.
Elbow drop disadvantages
Here are some possible disadvantages of dropping the elbow:
- It can be difficult to control the coordinated motion of the shoulder and elbow required to achieve the desired tip contact point.
- If the elbow is dropped before tip contact by accident (or by too much), the tip will hit the CB higher than intended (and the cue might bang into the rail).
- With elbow motion, it can be more difficult for some people to keep the cue moving along the desired line (e.g., if the elbow also tends to move sideways as it is moving down).
- It can take a much longer time to master and be consistent with an elbow-drop stroke.
For more information, see follow through in this section.
Comments from others:
from Neil:
What is one of the main keys to playing good? Repeatability. So, what do you think the first thing an instructor is going to teach someone? Yes, repeatability. Now, the instructor can stick around for a few years and watch his student shoot thousands of balls until his mind finally gets trained to do it the same way, no matter what way that is, OR, the inst. can teach a simple way to be repeatable and accurate in the stroke. And, do it in a few hours. Which should he do?? (If you really don't know the answer to that, stop reading now, you are too stupid to play pool, or to do much else.)
The pendulum stroke is easily taught, and is extremely repeatable and reliable. When set up properly, you hit the cb with a level stroke at impact, and right where you want to hit it. You are not hitting the cb while on an upswing as some have stated. If you are, you aren't doing it right, go see an instructor.
It has been mentioned numerous times that you seldom see the top pros not dropping their elbow. This is true. You also seldom see them drop BEFORE contact, although some do. It seems to be the consensus on here that that means that you should drop your elbow. Let's think about that for a minute..... when did the pendulum swing really come into play? Not very long ago. When did the top players start playing? A long time ago. This wasn't even an issue when they were learning! So, how did they learn? By shooting thousands and thousands of shots. You can learn the same way too. (not a very time efficient method, though)
They, the top pros, have learned repeatability the hard way, over time. Doing that, they each have little and some have large idiosyncrasies to their stroke that works FOR THEM. To try and repeat their strokes, can easily be a HUGE waste of time. If we should only copy them, why don't more people try and play like McCready or Bustamante, arguably two of the best players?
Many of the top players also jump up in the air when they break. Does anyone really think that is a good thing to do? It has been proven over and over that it is not, and adds NOTHING to the break. (except a lot of problems if you don't have your timing just perfect.) Remember what your mothers taught you? Just because Timmy is jumping off a bridge doesn't mean you have to do it too! There's a lot of wisdom in that if you bother to think about it.
It has been stated that you can't get proper follow through with a pendulum stoke. Again, if you can't follow through for 1/1000 of a sec, (all the time the tip is on the cb) you better quit now. The ONLY reason for any follow through is to not stop the stroke. You want the tip going smoothly until contact. All the pendulum stroke does is alter where your follow through goes AFTER contact. It does not minimize it in the least.
If you drop your elbow BEFORE contact, you are much more prone to not hitting the cb where you intend to. Hence, the up and down swings in play that many players suffer from. If one muscle is a little tight, it changes where you hit the ball. Dropping your elbow before contact introduces the shoulder muscles into play. Just something else that can go wrong. Why not eliminate as much as possible that can go wrong?
What many of the top players have learned over trial and error is that if you extend your cue along the shot line on the follow through, it really helps you keep the stroke straight on the way to the cb. The mind finds it easier to make everything work properly with a longer line to work with than just the few inches to the cb.
NO ONE is saying that method doesn't work, or is bad. If it works for you, great! However, there is an easier way to achieve the same results, yep, the pendulum stroke. The top players are not going to change what took them many years to ingrain into their subconscious to achieve the same results. That would be rather foolhardy. But, when you are learning, or even if you have been playing a long time and DON'T have a repeatable stroke, the pendulum stroke is an easy way to get one. The fewer moving parts you have, the less can go wrong.
It has been wrongly stated that you can't get enough power with a pendulum stroke. And that you can't get anything put a dog-break with it. Baloney. I have make 8 out of 9 balls on the break with a pendulum stroke. When Scott and I played, right after the first break of mine, he started laughing and said "And people say you can't get a good break with a pendulum stroke!" First off, the break is not so much about power, as it is about accuracy and a good rack. Just ask Donnie Mills, or Corey Duel. And, you can get all the power you need for ANY shot that comes up during a game.
Many times, when you have an experienced player, and he/she tries to shift over to a pendulum stroke, they have problems. ANY time you try and learn something you are used to doing a new way, you have to give it time to erase the old way of doing it, and ingrain into your subconscious the new way. How long that takes, varies with the individual. Even after you have the new way ingrained, sometimes the old way still creeps in. It took me the better part of a year to finally let my subconscious go and trust it enough to stroke correctly when I switched over to a pendulum stroke. And, the old way still creeps in now and then and messes me up.
Once you get to the point of NOT thinking about your stroke, but letting your subconscious stroke it, the pendulum stroke is a VERY effective tool! Many players reach a plateau, and can't seem to get any better. I feel there are two main reasons for this- they do not have a repeatable stroke, and/or they really don't pay attention to just what is happening when they shoot a shot. The don't know just where they hit the cb, where the cb hit the ob, and where the cb went after contact with the ob, and what speed was used. Not KNOWING those things, you can't possibly duplicate and expand on them.
Another thing you will see a number of top pros do, is to do their warmup strokes with the tip on the cloth well before the cb. They have the natural talent, and years of experience to bring the tip up precisely to where they want it on the final stroke. If you don't have their natural talent, or years of experience, good luck with that. So, is that also something we should all do just because they do it? Are there better ways to accomplish the same end result? Busty looks like he is using an old water pump when he strokes. Should we copy that move too? Why not? The pros do it. Mainly, because we aren't them.
We don't have the natural talent, or the time to invest as they have done. We have to use whatever methods we can to shorten the time it takes, and to make things as easy as possible. The pendulum stroke really helps the fundamentals and repeatability. Aiming methods can really help in their area. Kicking systems in theirs, etc.
But for some to get on here, and make statements that they have about the pendulum stroke, only shows how little they do know about it, and about the general concepts of pool, what works and why it works.
Nobody is saying that dropping your elbow is bad, or that you can't play good that way. If it works reliably for you, keep doing it your way. But, if you find that you are not reliable, try the pendulum stroke. It is a much easier way to get repeatability. And, that is what this game is all about. There's not much point in learning how to get the cb to do what you want it to do if you can't hit it where you want to. Thinking you hit the cb in one spot, and actually hitting it in another only puts into your subconscious something that is wrong. Then, when you DO hit the cb where you want to, you get a different reaction out of it, and get all confused and lose confidence in yourself.
from Bob_Jewett:
...the vast majority of players drop their elbows some on power shots. When talking "elbow drop" you need to be clear about how much. Many players drop their elbows only about the thickness of their upper arm on most power shots.
Two articles that discuss elbows and the strange things people do with them are: (Downloads)
http://www.sfbilliards.com/articles/2004.pdf (February)
http://www.sfbilliards.com/articles/2004.pdf (March)
For most of the players I've checked, there are some shots for which their elbows do not move.
from pooltchr:
...the vast majority of students who come to me are looking for consistency. The best way to achieve this is SPF and no elbow drop. There are select shots where dropping the elbow may allow more power, but that same majority would be giving up a lot of accuracy to gain the power. In my opinion, accuracy is more critical than power. There are always going to be players at the top of the game who can control a full arm stroke with accuracy and consistency. They would be in the minority.
I have had very good success helping students improve their control by using the pendulum stroke. As an instructor, I have to consider each student as an individual, so I can't say I would ever say that a student MUST not drop their elbow. But so far, whenever I have had a student try the pendulum stroke, they have shown very quick improvement in accuracy. I have one student who uses this stroke on his break! He regularly makes something (often multiple balls) and almost always lands the cue ball in the center of the table. I don't see any reason to introduce a full arm swing to a player who would be better served from an accuracy standpoint by developing a simpler motion. When the student comes to me who can consistently make controlled contact with a full arm stroke, I don't think I would suggest any changes. Until that student appears, I think this is the best method to teach. There are going to be exceptions, but I suspect they are few and far between.
from Mike Page:
If you were to install webcams in a hundred poolrooms throughout the world and view 1000 random elbow drops on pool strokes, those 1000 strokes might be divvied up as follows:
- 990 strokes: category A elbow drops
- 9 strokes: category B elbow drops
- 1 stroke: category C elbow drop
category A elbow drops--
the vast majority of them--are plainly and simply bad mechanics. This person's elbow is moving during the stroke, as perhaps is his or her head, making strokes inconsistent, making strokes rely on carefully choreographed timing of different motions, and encouraging the addition of other compensating motions. These people absolutely will benefit from learning good mechanics like those Randy and Scott and Steve and others advocate so well. These people should heed the advice of instructors like those I just mentioned and practice it until one nipple is as calloused as the bottom of a foot, imo.
category B elbow drops--
These are solid players whose elbow is still at the time of contact. The stroke is a simple pendulum stroke until after the cue ball is gone. The impetus for dropping the elbow in the follow through perhaps comes from the desire to have a long, exaggerated follow through, or perhaps it comes from wanting a level, horizontal follow through (instead of the tip approaching the cloth as in the pendulum stroke). These people don't necessarily need to change anything. The biggest problem they cause is for others. They embolden the category A folk--who don't recognize the difference--thus providing a disincentive for the category A folk learning good mechanics.
Category C elbow drops--
This is, for example Mike Massey. These people are capable of a good pendulum stroke and perhaps employ a pendulum stroke on most of their shots. However, on power strokes, e.g., a break shot or a power draw shot, you will see an elbow drop. These players' elbows are moving at contact because the point is to add some speed by pivoting about the shoulder. In fact focusing on the elbow drop is like focusing on the thunder instead of the lightning. The lightning here is the elbow raise on the backstroke. Then pivoting about both the shoulder and elbow on the forward stroke increases speed. Most players, imo, should never do this for, say, a draw shot. The reason is that while the speed increases a bit, the bigger effect is our precision in where we contact the cue ball goes down by a more significant amount. So I would say if you can't consistently draw one and a half table lengths with a pendulum stroke, then there's no way you should be futzing with this stuff. And if you CAN consistently draw one and a half table lengths with a pendulum stroke, then...well...you're more or less good to go!
Follow-through
Does an extended follow-through add power, draw action, or accuracy to a shot?
This is a question of cause and effect. The follow-through strictly has no influence on the cue ball because the cue ball is gone before the follow through takes place. What the grip and stroke does during cue tip contact is also unimportant because the tip is in contact with the cue ball for only a very short amount of time (approximately 0.001 seconds). However, the follow-through is usually a good indicator of the quality and nature of the stroke into the ball, which does matter quite a bit. For example, if the follow-through is very short, it could indicate a decelerating or over-constrained stroke into the ball, which can adversely affect speed control. Also, if the follow-through involves tip lift (due to elbow drop) or steer (due to a flying "chicken-wing" elbow), these motions might be starting before tip contact, during the stroke into the ball, and this could definitely affect cue-tip-contact-point and aiming accuracy. To summarize, the follow through is not the "cause" of a good stroke, but it is often a strong indicator of a good stroke into the ball.
All the cue ball "cares" about is tip contact point, cue speed, and cue angle and elevation at the moment of impact. Follow-through is just a symptom of your stroke and has no direct affect on the action of the shot. Now, when you follow through, maybe you are doing something different with your stroke to get a different cue speed or a different tip contact point, or maybe your stroke is straighter. To detect this, you can videotape your stroke changes and look at the chalk mark on the CB. It helps to use a ball with markings (e.g., a striped ball or a Jim Rempe ball) when checking the chalk mark. If two shots have the same cue speed and tip contact point, but have different amounts of follow through, the action of the shots should still be the same. If you are getting different action, you are not hitting the CB with the same speed, tip-contact point, or aiming line.With an elbow-drop (long follow-through) stroke, there might be a tendency for the player to drop the elbow slightly before CB contact. If this happens, the tip will hit the CB slightly higher than the player thinks. Likewise, with a shorter follow-through, a player might have a tendency to tighten the grip slightly, which would cause the cue tip to lower some. Also, different cue speeds will result from variations in the stroke. For more information, see stroke "type" and "quality" in this section.
Concerning the break shot, the only thing that significantly affects the power for a given break cue and tip contact point (and cue angle) is cue speed at impact. However, if a powerful stroke does not exhibit a long follow-through, it is either not very powerful, or effort is being made to limit the follow-through. If one tries to constrain the follow-through, one will probably not achieve maximum speed at impact.
Follow-through can also be important in achieving good action on draw shots (although, not always for the reasons people think). For more info, see "Draw Shot Primer - Part V: how to achieve good draw action" (Download) (BD, May, 2006). In particular, see item "b" under "other advice" and item "5" under "suggested best practices." I think these points apply equally well to both a power break and a power draw.
For more information on topics related to follow-through, see:
- pendulum vs. piston stroke in this section
- elbow drop in this section
- stroke acceleration in this section
- cue tip contact time in "cue" section
Forearm perpendicular to cue
Why is it usually recommended to have the forearm perpendicular to the cue at CB impact?
With a non-elbow-drop stroke, and with the forearm perpendicular to the cue, the cue tip will be moving exactly straight in the cue direction. If the grip is forward, the tip will be moving down into the ball; and if the grip is back, the tip will be moving up at impact. Also, there is a natural tendency to reach a constant maximum cue speed when the forearm is perpendicular to the cue at cue ball address. This can make it easier to control your shot speed, because the speed of the cue won't be changing much just before contact. For more info, see: YouTube video
Pendulum vs. piston stroke
What is the difference between a pendulum stroke and a piston stroke?
A "pendulum stroke" is where you keep your upper arm still during the stroke. The only motion is from the elbow down. Some people refer to this as a "pinned elbow" stroke. With a pendulum stroke, the upper arm is considered part of your body, which should remain still during the stroke.
A "piston stroke" is one where you coordinate motion of both the elbow and the shoulder to keep the cue tip moving in a straight line during the entire stroke (just like a piston in the cylinder of an internal-combustion engine).
For more information on the differences and advantages of each type of stroke, see: elbow drop in this section.
Here's a video demonstration of a non-elbow-drop pendulum stroke: YouTube video
A "J" stroke is a combination of a pendulum and piston stroke, where the grip hand follows the pendulum motion on the back swing and forward swing into the ball, and then the grip moves in a straight line (with elbow drop) after CB contact and during follow through. If you trace out the path of the grip hand, it looks like a "J" turned sideways. If done well, this gives the benefits of the pendulum stroke tip contact point accuracy, and the follow through of a piston-stroke, but some people might have trouble with dropping the elbow at the right time and right amount consistently.
Many pros seem to be close to a "J" stroke, but some pros drop their elbow before CB contact, on some shots more than others. Also, some lift the tip after CB contact, especially with follow shots, and some finish with the tip down (with an almost-pendulum-like stroke finish). Some even swoop their stroke on some shots (usually only shots with English), moving the tip sideways during the stroke (before and after CB contact). Some drop their elbow just a little after CB contact on many shots, and some drop their elbow a lot (mostly after CB contact) on most shots. The one thing that can said for sure is that most pros drop their elbow after CB contact, especially with firmer shots. Some seem to do this purposefully; and for others, it just seems like a natural side-effect of the forward momentum of the cue and arm after CB contact.
For more info and advice, see stroke technique advice, elbow drop, and follow through in this section.
Set-pause-finish
What is SPF or SPFF?
SPF = set, pause, finish
SPFF = set, pause, finish, freeze
from Mike Page:
SPF
Many pool instructors refer to the simple pendulum stroke as an “SPF” stroke, where the letters refer to SET (solid red line in the figure above) , PAUSE (dashed purple line), and FINISH (dashed yellow line) positions. The drills you do in the Foundations courses are designed to help burn the SPF sequence into your muscle memory. These drills pay particular attention to the SET and FINISH positions.
THE SET POSITION
As in many sports, the set position is key. It is from here that the fuse is lit for the final stroke. The player’s body is held completely still in the set position for at least three seconds. During the Foundations courses, students should hold every set position for at least five seconds. Here are some characteristics of the set position:
• Forearm is vertical.
• Tip is close to the cue ball.
• Eyes switch focus from cue ball to target location, with at least two seconds on target location.
From the set position, the player draws the cue back slowly to the PAUSE position. It is not necessary to actually pause at the PAUSE position. Some top players do; others don’t. What is necessary is the cue be drawn back slowly (not jerked back) and the transition from backward to forward motion be slow and smooth. The cue is accelerated forward from the PAUSE position. When the forearm becomes vertical again, the tip will be at the ball. At the tip-ball impact on the forward stroke, the player is passing again through the SET position.
THE FINISH POSITION
-going home-
Instructors in many sports, including pool, stress the importance of follow through. We disagree. Follow through focuses on what happens to the front of the cue, i.e., the tip. When a player decides in advance where he or she would like the tip of the cue to finish, there is no guarantee a pendulum stroke can comply. So a player attempting to get the tip to a particular location likely will call upon the shoulder joint. Pivoting about the shoulder joint drops the elbow and raises the tip.
We prefer instead to focus on FINISHING THE STROKE. The stroke is finished when the grip hand reaches its natural finish position—the natural end of the pendulum stroke. Depending upon the player’s body type and stance, this could be where the forearm hits the biceps, or it could be where the grip hand hits the side of the chest. So instead of focusing on follow through, we focus on finishing the stroke, on the grip hand going home.
A consequence of finishing the stroke is the tip of the cue will reach a particular finish location—for many people this is four or five inches beyond the cue ball with the tip touching the cloth. So have no fear, others will think you are dutifully following through.
Unless doing so would disrupt the balls in play, freeze for at least two seconds in the finish position. Note that you’ve gone home.
from Scott_Lee:
The "set" position occurs at the CB, after your warm-up cycle is finished. It's the last conscious thought about, "Well? Are you ready or not?" With the tip at the CB, the "set" position is used to verify earlier decisions on angle, speed and spin. If it is a go, there are no more warm-ups, and the final back swing begins. The "pause" happens as we come to the end of the natural backward motion of the cue, so we can make a smooth transition to the forward swing. All strokes start from zero, and accelerate to whatever speed you're hitting the shot with. The "finish" ... The grip hand ends up in the armpit area, close to the chest; and the tip is on or close to the cloth, some distance past where the CB was sitting. The "freeze" is an opportunity for self-evaluation, that happens after the stroke is over, and you have remained motionless, except for your forearm. The freeze allows you to check components of your stroke, including the grip finish, tip finish, and speed control.
When do muscle transitions occur during the stroke?
from Spiderman:
if the real reason for a "pause" is to allow the "back swing" muscles to stop working before the "forward swing" muscles take over, then there is absolutely no need for a pause in MOTION, only a pause in acceleration.
When the "back swing" muscles relax, the stick is still moving backwards. There can be a finite period of relaxation before the "forward swing" muscles contract and apply force. AT THIS POINT, AND FOR A FINITE TIME AFTERWARD, THE STICK IS STILL MOVING BACKWARDS. It takes some finite time for the "forward swing" muscles to accelerate the stick to zero velocity. There will then be no finite time at zero velocity because the acceleration is continuous, so the stick progresses smoothly (semi-sinusoidal) from backward to forward velocity.
For this example, the "pause" was in acceleration, not velocity. This relaxation of back swing muscles and subsequent resumption of opposite force occurred entirely before the backwards motion ended.
Definition of a pause
What is the definition of "pause"?
Strictly, the word "pause" implies stopping for more than an "instant." When a player has an obvious "pause" between the end of their back-swing and the beginning of their forward-swing, I like to refer to it as a "deliberate pause" or a "distinct pause." Here, the implication is clear: the cue is held stationary (stopped) for more than an instant.
Strictly speaking, if the cue stops only for an "instant," there is no "pause." An "instant" does not involve any passage of time. A "pause" does imply a "stop" (zero speed) for a distinct amount of time. For example, when a free-swinging pendulum changes direction at is highest point, it does "stop" for an "instant," but it does not "pause." The speed gradually and smoothly changes from negative (in the backward direction) to positive (in the forward direction), through zero. The speed does not stay at zero for any amount of time. At the tiniest fraction of a second before the speed is zero, the pendulum is moving slowly in one direction (negative speed); and at the tiniest fraction of a second after the speed is zero, the pendulum is moving slowly in the other direction (positive speed). The speed is zero only for an "instant." Not even the smallest fraction of time passes during that instant.
This explanation applies to any speed (i.e., there is nothing special about zero). For example, consider the cue speeding up gradually between 1 mph and 5 mph. The speed hits 3 mph for only an instant during the acceleration, but there is no "pause" at 3 mph. Now, if you stop accelerating at 3 mph, and hold the speed constant at 3 mph for a period of time, then you could say there is a "pause" in the acceleration. Again, the smooth transition through a speed of zero is no different. If you don't hold the speed at zero for a distinct period of time, then, strictly speaking, there is no "pause."
People will interpret the word "pause" in different ways; but as long as one is clear and consistent with the meaning, and people know what you mean, that's all that matters. Again, I like to use the phrase "deliberate pause" when there is a distinct "pause" in the action (i.e., the stop occurs for more than just an "instant"). For example, both Allison Fisher and Buddy Hall (and others) obviously have a "deliberate pause" before their final forward stroke. The phrase "pause for only an instant" is also OK when there is no "deliberate pause"; although, it is strictly not proper. When somebody rushes or jerks the transition between back and forward motion, there still is a "stop for an instant" (because the cue still changes direction and has zero speed for an instant). I would call this a "pause-less and rushed" transition.
Why pause...
Why should I "pause"?
The pause at the set position allows your eyes to focus and verify both the tip contact point on the cue ball and the target aiming line. For the "pause" at the end of the backstroke, see item 4 in the stroke "best practices" document (Download). Adding a "distinct pause" helps some people prevent themselves from rushing the final back stroke and from rushing the transition to the final forward stroke. Jerking this transition can cause stroking errors.
from mikepage:
If you watch a hundred top players and also watch a hundred ball bangers, here is what I think you will notice:
set position: On average, the top players are stopped like an oak tree in the set position for a notably longer time. The bangers have variable set pauses that are often short and sometimes they don't pause at all.
final backstroke The top players--nearly all of them-- will bring the cue back slowly following the longish set pause. The bangers will bring the cue back faster.
backstroke pause Some of the top players pause; others don't. Some of the bangers pause; others don't. The differences you will note are not so much whether the players pause but rather how smooth and fluid the transition is. Part of the bangers problem with smooth transition is not really a problem with the backstroke pause/no-pause. Rather it is collateral damage from the final backstroke problem. Bringing the cue back too fast encourages a jerky transition. IMO, add a backstroke pause if it floats your boat. But if you're adding it to fix a jerky transition, then you may just be enabling the real (too fast backstroke) problem.
from Stretch:
Because when there is a mechanical error in the stroke it usually happens in the transition from back stroke to forward stroke. Simply put, the end of your backstroke is the start of your forward stroke. So if the backstroke does not come back right, the forward stroke is adversely affected. A slow drawback, and slight pause eliminates this problem. Also the pause is when you re-focus on the ob's contact point. Yes "re-focus". During the practice strokes your eyes are scanning back and forth. When you are ready a back stroke and transition can for a split second distract your focus, even if you don't take your eye off the ball! A slight pause allows you to re-focus, or burn with intensity that vital little bit. It makes one simply react to the target from the trigger position without the distraction of having any moving parts going on at the same time.
from Rod:
Players with less experience get in a hurry to shoot a shot. Doing so they snatch the cue back. I have a phrase I like to use. "Finish Your Back swing".
"Gradually" bring the cue tip to the C/B and pause, let your focus go from tip placement to the O/B during this pause, "Gradually" start the cue back, (this is important because a snatch will make your back swing short) slight pause, then slowly start forward, no matter the power needed. This is the transition area. If you start forward fast, you just wasted the preparation needed to make a smooth stroke.
What you'll find, once you learn to slow down your stroke, you'll hit the cue ball exactly where intended. The reason pool players never excel is they don't grasp the importance of these fundamental movements. You have to be accurate and quick movements will surely make you loose your focus.
Shooting over a ball
What technique advice do you have when having to jack up to shoot over a ball?
from softshot:
when jacked up you have a smaller margin for error...
so make smaller errors...
I shorten my stroke... shorten my bridge.. shrink it all up...
in the most extreme case I'll begin with my back hand in my finish position and bridge as close to the shot as possible... and bridge as stable as possible...
the entire forward stroke may only result in 2 or 3 inches of tip movement total...
sight the shot and line it up level...
and then shrink your stroke more and more as you are forced to jack up higher and higher...
smaller movements make smaller errors...
staying center ball axis is critical.. masse is a huge problem here... the higher you jack up.
from 12squared:
to help relieve tension, I bend my elbow on my bridge arm. This also brings your body a little closer to the ball so you can choke up a little more comfortably on the butt w/ your stroking arm.
Slip stroke
What is a slip stroke and why is it used?
from AtLarge:
Slip stroke -- The grip hand slips back on the butt just prior to the forward stroke at the cue ball.
Stroke slip -- As the forward stroke at the cue ball is executed, the cue slips through the grip hand to some degree (a "throw" or "release and catch").
from Bob_Jewett:
Here is an article from Billiards Digest that describes several kinds of stroke including the slip stroke:
http://www.sfbilliards.com/articles/2005.pdf (October) (Download)
And here is one that describes some other strokes:
http://www.sfbilliards.com/articles/2005.pdf (November) (Download)
Staying down on the shot
Why should I bother "staying down" after a shot?
from Andrew Manning:
Staying still helps for a few reasons.
1) If you're freezing at the finish of the shot, then you're certainly not jumping or moving during the final stroke, which I think everyone agrees is a bad thing to do.
2) When you freeze at the end of the shot, you can see where your cue finished. If you didn't stroke straight through the ball, this will be evident in your finish position, and you'll be able to observe it and use that feedback to improve your stroke.
3) Staying down and continuing to sight down your cue will keep a consistent frame of reference to observe the results of your shot. Your brain can record what the CB and OB do, versus what you wanted them to do, in great detail from this perspective. If you stand up before the shot is done, you have to adjust to looking at the shot from a different angle, and your brain will not be able to calculate what went right/wrong nearly as effectively. Getting the best possible visual feedback is crucial, since this feedback is drawn upon heavily by your subconscious the next time you're lining up a similar shot.
There may be other benefits as well, but I think those are the most important.
Swoop
What is stroke swoop, and should I use it to apply English?
Stroke "swoop" is the practice of pivoting the cue during the forward stroke and follow through. Some people swoop by moving the entire arm during the stroke, and others do it simply by flicking or twisting the wrist. The purpose for the swoop is to move the cue tip sideways during the stroke to apply English, or to lift the tip up or down during the stroke to create follow or draw.
Alternatives to using stroke swoop to apply English include:
1.) Align the cue in the required direction (compensating for squirt, swerve, and throw intuitively) with the tip off center to apply the exact amount of English desired, and then use a straight stroke.
2.) Align the cue at the center of the cue ball along the desired aiming line (with the aim corrected for throw, where appropriate), and then use BHE or FHE or some other method to pivot the cue before the stroke to compensate for squirt and swerve (AKA "net cue ball deflection"), and then stroke straight along this new alignment.
Most (but not all) top players use technique "1." Technique "2" is good for people who don't yet have enough experience-based intuition to adjust for squirt and swerve intuitively. Stroke swoop is also an option for people who prefer a center-ball alignment before the final stroke.
Tom Ross was a great player and an excellent stroke swooper (before his medical "stroke"). He swooped his stroke on almost every shot with English. If you watch our VEPS DVDs or online clips (external web-link), you will see this. He didn't do this because he thought it was better ... it was just the way he learned to apply English, probably from watching some great old-school players who did it that way. One day, we did a fairly long experiment trying to get more spin with a swooping stroke (with Tom doing all of the shooting) and we did not find a significant difference between straight and swooping strokes. Some of the highlights are in the following video: YouTube video
Now, if you twist the cue with your wrist while you swoop the stroke, you can do amazing things with the cue ball. I haven't mastered this technique yet, but I am still able to get tremendous curving action on the cue ball. For demonstrations, see: YouTube video
One possible advantage of the stroke-swoop method is that the initial center-ball alignment might be more comfortable for some people. With the alternative approaches above (1 and 2), the off-center and off-aiming-line alignment can be disconcerting, because to compensate for squirt, the cue will generally not be pointing in the desired direction of the shot. However, it can be difficult to be consistent with a swooping stroke (e.g., with the exact amount of English applied, or with avoiding a miscue when attempting to apply maximum English). Most people will be more consistent and accurate (with actual tip contact point) with a straight stroke as compared to a swooping stroke; although, with enough consistent practice, any technique can be mastered. Some people (including some top players) can be quite effective with a swooping stroke.
A straight stroke (with appropriate aiming corrections for squirt, swerve, and throw, done either intuitively or using methods like FHE/BHE) is much more accurate and consistent (with the same spin-generating capability) than a swooping stroke, but some people will play better with a swooping stroke, especially if that's the way they've always done it.
from Bob Jewett AZB post: (external forum-link)
So far as I know, no one has ever demonstrated that you can get more side spin by swooping. I think it is just a different -- and to me, a far less consistent -- way to do backhand English. Look at the players who really spin the cue ball, like Massey, Sayginer and Trump. No goofy swooping.
Some players fear hitting off-center because of miscues. They barely spin the ball because their arms force them to hit near the center. If someone shows them this "new swoop-spin" technique to get side spin, they may actually rev up the ball for the first time in their lives. They will be true believers. They will also be layering on a mechanical monstrosity to fix a deeper problem in their mechanics.
Even though the tip is on the ball for only a very short time, it does not follow directly that the player could not possibly and under any circumstance affect the result of the shot by swooping the cue stick. Swoop can in fact be useful for shots when the cue ball is very close to the object ball; you swoop to avoid the second hit. However, think about how fast the tip will need to move to the side to have any significant effect. It should be moving to the side at a speed comparable to the forward motion of the cue stick. That's a 45-degree angle relative to straight ahead. Try very slow strokes in which the tip moves at a 45 relative to its normal path. I bet you can't.
Can you get more spin on the ball with stroke swoop?
Some people might be able to get an larger effective tip offset from center (and therefore more spin) by using a swooping stroke. For example, they might be uncomfortable aligning the tip as off-center as is possible with a straight stroke (maybe because they can't prevent themselves from swooping, which would cause a miscue with a large initial tip offset). If this is the case, a person might be able to get more spin with a swooping stroke.
from Jal AZB post: (external forum-link)
You can't get any more spin by swiping across the ball than with a straight stroke. Whatever stroke you employ, the maximum spin/speed ratio is limited by the coefficient of friction between the tip and the ball. This is a function of the materials involved, and not of the type of stroke.
It's true that if you swipe across the cue ball and, say, make contact at center ball, you're going to put a little bit of spin on the cue ball. This is, sure enough, spin you wouldn't have produced with a center ball hit and a straight stroke. But that doesn't mean that if you make contact near the miscue limit (~ 1/2 ball radius) while swiping, you're going to get some extra spin. You'll either miscue or end up with the same amount of spin as you would have obtained by cue-ing right at the miscue limit with a straight stroke.
You can test this by plopping the cue ball down on the head spot and driving it straight to the foot rail while attempting to impart maximum side spin using both techniques. I think you'll find that the only thing the swiping does is to increase the difficulty of accurate tip placement.
from Jal AZB post (external forum-link), concerning how the the same thing can be done with a straight stroke as with a swooping stroke:
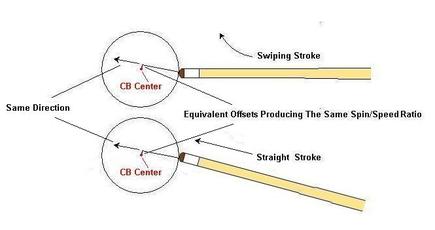
Technique advice
What are considered "best practices" for stroke technique?
Here is a good video demonstration of what is generally considered "best practices" stroke technique: YouTube video
The stroke "best practices" document (Download) provides a good summary of general recommendations for stroke preparation and execution. The pre-shot routine is also an important component of technqiue.
For more info, here are some good resources:
"Type" or "quality" of stroke
Can two strokes of different "type" or "quality" create a different outcome on a shot,
assuming the tip contact point, cue direction, and cue speed are the same with both strokes?
No. All the cue ball "cares" about is the hit, not what creates the hit. The important variables of the "hit" are cue speed, tip contact point, and the angle of the cue (left/right and up/down). Now, stroke technique obviously has a lot to do with how the cue is actually delivered to the ball. You might think you are delivery the cue the same way with different stroke "types" or "qualities," but this might not be the case.
Tom Ross, my partner on the VEPS (external web-link) project, and I had a big argument on this topic years ago. He thought the "type of stroke" made a difference on a particular shot he was demonstrating to me. He was totally convinced he was using the same speed and tip position with both stroke types, and yet he was getting two totally different results (which he could replicate consistently with his two "stroke types"). After using a Jim Rempe ball (with chalk mark evidence) and my high-speed video camera, I finally convinced him that the two stroke "types" were creating different "hits" on the CB. On one of the strokes, he was dropping his elbow a little more creating a higher tip position even though we was sure he was not. For more info, see Tom Ross' April 08 (Download) and August '08 (Download) BD articles.
Technique is important to create the desired cue speed, tip contact point, and cue angle; and if you change your technique, it will affect the outcome of the shot, but only if the cue speed, tip contact point, and/or cue angle are different as a result of the technique changes.
FYI, for more information on why grip, stroke acceleration, and follow through have no direct effect on the action of the CB, see the following:
effects of light vs. tight grip in "grip" section
stroke acceleration in this section
follow through in this section
What are considered "best practices" for stroke technique?
Here is a good video demonstration of what is generally considered "best practices" stroke technique: YouTube video
The stroke "best practices" document (Download) provides a good summary of general recommendations for stroke preparation and execution. The pre-shot routine is also an important component of technqiue.
For more info, here are some good resources:
- "Stroke Tuneup - BD Coaching Bonus" (Download) (Billiards Digest; May, 2008).
- fundamentals "best-practices" check-list (Download)
- pendulum vs. piston stroke in this section
- elbow drop in this section
- follow through in this section
- grip technique advice in "grip" section
- bridge technique advice in "bridge" section
"Type" or "quality" of stroke
Can two strokes of different "type" or "quality" create a different outcome on a shot,
assuming the tip contact point, cue direction, and cue speed are the same with both strokes?
No. All the cue ball "cares" about is the hit, not what creates the hit. The important variables of the "hit" are cue speed, tip contact point, and the angle of the cue (left/right and up/down). Now, stroke technique obviously has a lot to do with how the cue is actually delivered to the ball. You might think you are delivery the cue the same way with different stroke "types" or "qualities," but this might not be the case.
Tom Ross, my partner on the VEPS (external web-link) project, and I had a big argument on this topic years ago. He thought the "type of stroke" made a difference on a particular shot he was demonstrating to me. He was totally convinced he was using the same speed and tip position with both stroke types, and yet he was getting two totally different results (which he could replicate consistently with his two "stroke types"). After using a Jim Rempe ball (with chalk mark evidence) and my high-speed video camera, I finally convinced him that the two stroke "types" were creating different "hits" on the CB. On one of the strokes, he was dropping his elbow a little more creating a higher tip position even though we was sure he was not. For more info, see Tom Ross' April 08 (Download) and August '08 (Download) BD articles.
Technique is important to create the desired cue speed, tip contact point, and cue angle; and if you change your technique, it will affect the outcome of the shot, but only if the cue speed, tip contact point, and/or cue angle are different as a result of the technique changes.
FYI, for more information on why grip, stroke acceleration, and follow through have no direct effect on the action of the CB, see the following:
effects of light vs. tight grip in "grip" section
stroke acceleration in this section
follow through in this section
For more info, visit billiards.colostate.edu
Stun
Stun Shots in Pool and Billiards
... how and when to hit stun shots (stop shots at an angle) in pool.
(external web-links) for more information:
see Sections 3.03 and 4.02 in The Illustrated Principles of Pool and Billiards
and Disc I of the Video Encyclopedia of Pool Shots
definitions
What does stun mean?
Stun means pure sliding, where there is no topspin or bottom spin. With a stun shot, the CB has no top or bottom spin when it hits the OB. For a straight in stun shot, the CB stops in place and transfers all of its energy to the OB. This is called a stop shot. With any other stun shot, with a cut angle, the CB heads in the tangent-line direction, regardless of the cut angle (see the 90-degree rule in this section). A stun shot is sometimes called a "stop shot at an angle."
With a stun shot, the CB must be struck below center. The bottom spin will wear off (this is called drag) on the way to the OB. The farther the CB is from the OB, the lower and/or faster you need to strike the CB to prevent the CB from losing the bottom spin and starting to developing forward roll before hitting the OB. If the CB has any topspin when it hits the OB, the CB will follow forward. Here's a slow motion video showing how drag works with a stop shot and the loss of bottom spin over distance:
Here's an example stun shot:
Here's a good drill for practicing stun shots from Disc II of the Billiard University (BU) Instructional DVD series:
For more information, see “Billiard University (BU) - Part V: Stun Shots” (Download) (BD, December, 2013).
from Patrick Johnson:
from Patrick Johnson:
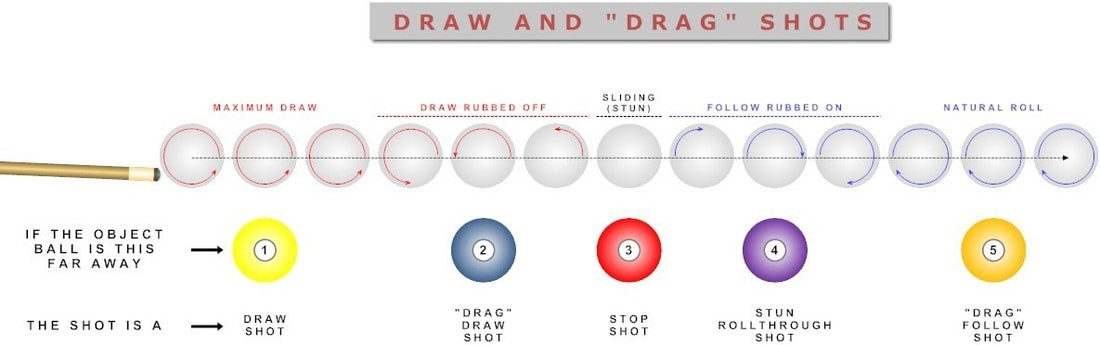
90-degree rule
What is the 90-degree rule ?
The 90-degree rule states that for a stun shot, the CB and OB separate at 90 degrees, regardless of the cut angle (except for a straight-in shot, in which case the CB stops in place). In other words, with a stun shot the CB heads and persists along the tangent line direction, which is perpendicular to the line of centers (the line between the center of the ghost ball and OB). Here are some relevant video demonstrations: (videos)
Here's a convenient 1-page summary resource page (Download) summarizing all of the important points of the 90-degree rule.
Here's a good drill for practicing stun shots: stop/follow/draw drill. (Download)
For more info, see "The 90° rule: Part I - the basics" (Download) (BD, January, 2004) and where the CB goes for different cases in "position" section.
Concerning friction and English effects, see the following instructional articles:
What is the 90-degree rule ?
The 90-degree rule states that for a stun shot, the CB and OB separate at 90 degrees, regardless of the cut angle (except for a straight-in shot, in which case the CB stops in place). In other words, with a stun shot the CB heads and persists along the tangent line direction, which is perpendicular to the line of centers (the line between the center of the ghost ball and OB). Here are some relevant video demonstrations: (videos)
- NV 3.4 - 90° rule with various cut angles
- NV 3.5 - Using your hand to visualize the 90° rule impact and tangent lines
- NV 3.7 - Using the 90° rule to check for and prevent a scratch
Here's a convenient 1-page summary resource page (Download) summarizing all of the important points of the 90-degree rule.
Here's a good drill for practicing stun shots: stop/follow/draw drill. (Download)
For more info, see "The 90° rule: Part I - the basics" (Download) (BD, January, 2004) and where the CB goes for different cases in "position" section.
Concerning friction and English effects, see the following instructional articles:
- "90° and 30° Rule Follow-up - Part II: speed effects" (Download) (BD, March, 2005)
- "90° and 30° Rule Follow-up - Part III: inelasticity and friction effects" (Download) (BD, April, 2005).
- "90° and 30° Rule Follow-up - Part IV: English effects" ((Download) BD, May, 2005).
- "90° and 30° Rule Follow-up - Part V: the final chapter" (Download) (BD, June, 2005).
For more info, visit billiards.colostate.edu
Swerve
Swerve in Pool and Billiards
... how to judge and compensate for cue ball cue (swerve) in pool shots with English.
(external web-links) for more information:
see Section 4.04 in The Illustrated Principles of Pool and Billiards
and Disc II of the Video Encyclopedia of Pool Shots
Contributing factors
What factors affect how much the cue ball swerves?
See "Squirt - Part VIII: squerve effects" (Download) (BD, March, 2008). It summarizes and illustrates all of the important factors and effects. A complete summary of all squirt, swerve, and throw effects can be found in "aiming" section.
OB "swerve" and "turn"
Can an object ball swerve or turn due to side spin?
First of all, OB "swerve" or "turn" should not be confused with throw, which is an entirely different effect.
Here are some videos that demonstrate the lack of significant turn:
YouTube video
and
YouTube video
A slight amount of "OB swerve" is possible with masse spin transferred to the OB from follow or draw on the CB (see the end of TP A.24 (Download)), but the effect is much too small to be of practical importance. With the videos above, I am just looking at the effect of pure side spin as a ball is rolling. I call this effect "OB turn."
There is a special cue twisting and stroke swooping technique that can be used to swerve or turn an object ball, but it is quite controversial. Here's a demonstration:
TP B.2 (Download) provides a physics and math-based approach to the question of whether or not a ball rolling with side spin can turn. Here are the conclusions: A ball rolling with side spin goes straight for all practical purposes, and cloth irregularities can create a much bigger effect, especially at slow speeds. Sometimes the ball will go straight as it slows with right spin, sometimes it will curve right as it slows with right spin, and sometimes it will curve left as it slows with right spin. Having said that, the physics does seem to suggest that there might be a small tendency for the ball to curve in the spin direction (e.g., right curve for right spin), but due to the assumptions in the analysis and the results of the video demonstrations, the value of this information is questionable.
Bob Jewett's June '92 BD article (Download) has an experiment you can use to test ball bending (or lack there of). Here's the test from the article:
Bob Jewett's June '92 BD article (Download) has an experiment you can use to test ball bending (or lack there of). Here's the test from the article:
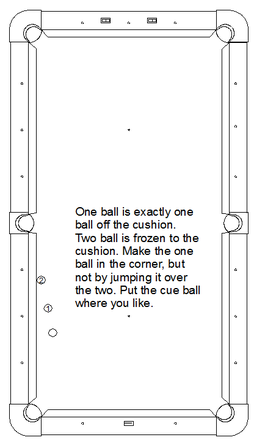
from Jal:
A ball with a masse spin component will change direction by the same amount regardless of how slick or "grabby" the cloth. But a more grabby cloth will cause that change of direction to happen sooner, so the curve will be tighter. In your example, a slicker cloth might be of some help since you want the 1-ball to execute a more open curve in order to clear the 2-ball.
However, an OB will not curve to any significant extent without being struck by an airborne cue ball. That is, in order to induce a masse spin component, the cue ball has to contact it above the horizontal equator. ... this will also cause it to jump. The combination of jump and subsequent curve might be enough to clear the 2-ball and then "straighten out" after landing/bouncing and head for the pocket.
In principle, you can get the OB to curve just be using draw or follow at any non-zero cut angle. But calculations indicate that, at most, the change in direction is minuscule (in fact, very hard to measure and probably overridden by random buffeting by the cloth's weave pattern).
dr_dave reply to Jal:
I agree 100%. OB swerve is not a significant-enough effect to be of any practical use. The effect is larger in clingy conditions, but still not significant enough to be useful or even noticeable, IMO.
IMO, the best chance to seemingly make an OB curve around an obstacle is by jumping the CB into the OB, creating OB hop(jump) over the obstacle ball, or by relying on table roll-off, a lopsided (non-round OB), or well-placed dirt or irregularities on the cloth. The rail groove can also influence an OB close to the cushion. Even the magical cue twist and swoop technique (YouTube) won't work (without a weighted ball).
Reducing swerve
Can swerve be eliminated with an above-center hit?
The closer the cue is to level, the less a shot with English will swerve. Unfortunately, because of the height of the rails, the diameter of the cue (above the rail), and clearance between the cue and rail, the cue will not be level on most pool shots. Also, if you hit above center with English, the squirt direction is down a little; so even with a level cue, an above-center hit still results in slight swerve action (because the effective impact direction is still down a little).
Having said all of this, an above center hit can reduce cue elevation and reduce the effects of shot speed and ball/cloth conditions (i.e., there will be less swerve).
Squerve
What is squerve?
Squerve, sometimes called "effective squirt" or "net cue ball deflection," is the combined effect of squirt and swerve. For more information, see "Squirt - Part VIII: squerve effects" (Download) (BD, March, 2008). For a summary of all of the factors affecting squerve, see: squirt, swerve, and throw effects in "aiming" section. Also, here's a video excerpt from Disc II of the Video Encyclopedia of Pool Shots (external web-links) that explains and demonstrates things:
For more info, visit billiards.colostate.edu