
For more info, visit BilliardsPress.com
This section is put together courtesy of Mr. Phil Capelle.
Just some of the drills from his books! Enjoy!
Categories:
Perfecting your stroke
5 Donuts in a Row - 9-Ball
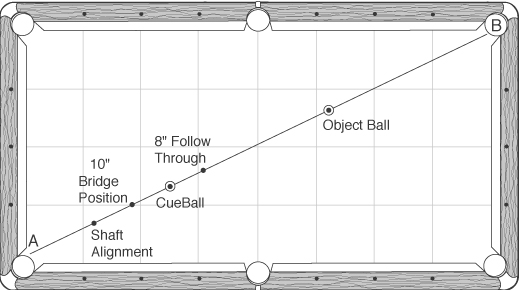
You can attain a perfect set up for a very useful stroke drill by stretching a piece of string or dental floss from Points A to B as shown in the illustration. Place a donut underneath the string opposite the third diamond up from Point B as shown. The second donut goes underneath the string at a point 2.5 diamonds up from Point A. So far you have prepared the positions for the cue ball and object ball. Now comes the part of the set up for you to exercise some freedom in positioning the donuts in accordance with your unique fundamentals. If your goal, for example, is to follow through eight inches with a full, medium to medium hard stroke, place the third donut underneath the floss eight inches past the cue ball’s position. Now let’s assume you wish to use a 10 inches bridge. Place the next donut 10” from the donut for the cue ball as shown. The final donut goes underneath the string about 10 inches from the donut for your bridge. Now remove the string, place the cue ball and object ball on the appropriate donuts and you’re ready to go.
• Check Your Bridge
There are several valuable aspects to the drill. For starters, assume your stance and check your bridge to see if the distance you’ve set up is the length you really like to use. If not, make the adjustment in the position of the donut for the bridge and proceed to the next step.
• Check Your Alignment
Assume your stance once again and look down at the first donut. Your cue’s shaft should completely obscure the donut from view. If not, your stick alignment needs to be corrected.
• Straighten Your Backstroke
Now lets assume your bridge is the length you desire and your set up is straight. Take several warm-up strokes while looking down through your cue at the first donut. It should remain out of view throughout your warm-up strokes. If not, then your stroke is wavering sideways on the backstroke. Keep stroking until you can make it track above the donut. If you do this drill repeatedly (20 or more warm-up strokes) you will begin to get the feel of a perfectly straight stroke. One of the beauties of this drill is that it gives you instantaneous feedback on the quality of your stroke.
• Play the Shot
The final step to the drill is to shoot the ball as a stop shot. Be sure to stay down and hold your follow through as if posing for a picture. There are three things to look for:
• The length of the follow through. Does the tip go to or beyond the final donut?
• The straightness of your stroke. Does the tip rest directly over the last donut?
• Is your cue level?
Just some of the drills from his books! Enjoy!
Categories:
- Perfecting your stroke
- Shot-making
- Basic position routes
- Speed control
- Precision position play
- Multi rail position routes
- Pattern play
- Safety play
- Kicking practices
- Break shots
Perfecting your stroke
5 Donuts in a Row - 9-Ball
You can attain a perfect set up for a very useful stroke drill by stretching a piece of string or dental floss from Points A to B as shown in the illustration. Place a donut underneath the string opposite the third diamond up from Point B as shown. The second donut goes underneath the string at a point 2.5 diamonds up from Point A. So far you have prepared the positions for the cue ball and object ball. Now comes the part of the set up for you to exercise some freedom in positioning the donuts in accordance with your unique fundamentals. If your goal, for example, is to follow through eight inches with a full, medium to medium hard stroke, place the third donut underneath the floss eight inches past the cue ball’s position. Now let’s assume you wish to use a 10 inches bridge. Place the next donut 10” from the donut for the cue ball as shown. The final donut goes underneath the string about 10 inches from the donut for your bridge. Now remove the string, place the cue ball and object ball on the appropriate donuts and you’re ready to go.
• Check Your Bridge
There are several valuable aspects to the drill. For starters, assume your stance and check your bridge to see if the distance you’ve set up is the length you really like to use. If not, make the adjustment in the position of the donut for the bridge and proceed to the next step.
• Check Your Alignment
Assume your stance once again and look down at the first donut. Your cue’s shaft should completely obscure the donut from view. If not, your stick alignment needs to be corrected.
• Straighten Your Backstroke
Now lets assume your bridge is the length you desire and your set up is straight. Take several warm-up strokes while looking down through your cue at the first donut. It should remain out of view throughout your warm-up strokes. If not, then your stroke is wavering sideways on the backstroke. Keep stroking until you can make it track above the donut. If you do this drill repeatedly (20 or more warm-up strokes) you will begin to get the feel of a perfectly straight stroke. One of the beauties of this drill is that it gives you instantaneous feedback on the quality of your stroke.
• Play the Shot
The final step to the drill is to shoot the ball as a stop shot. Be sure to stay down and hold your follow through as if posing for a picture. There are three things to look for:
• The length of the follow through. Does the tip go to or beyond the final donut?
• The straightness of your stroke. Does the tip rest directly over the last donut?
• Is your cue level?
Cue Over the Diamond Drill 8-Ball
A valuable part of the 5 Donuts Drill can be practiced without even going to the trouble of setting up the donuts. Stand at the head of the table and take your stance. Your tip should cover the foot spot and the shaft should be directly over the middle diamond on the end rail. Take numerous practice strokes while looking down at the diamonds position. The diamond should remain out of view. If not, your cue is veering off line. Keep stroking back and forth while watching your cue. Use a slow stroke if necessary, but make sure that the diamond eventually disappears from sight. Once it does, your stroke has become much straighter.
A Refinement
A small refinement can add greater precision to this drill. Draw a thick line the width of your shaft and about three inches long on a “post-it” note. Place the paper directly over the middle diamond in line with your cue. While you are stroking back and forth, even the slightest deviation from a perfect stroke will be readily apparent. The line on the paper should remain totally covered from set-up to follow-through. After practicing this routine for ten minutes, alternate between this and shooting at object balls. About four-to-five shots each works well. You could play a variety of shots, or shot the shot in the 5 Donuts Drill.
Perfecting Your Stroke
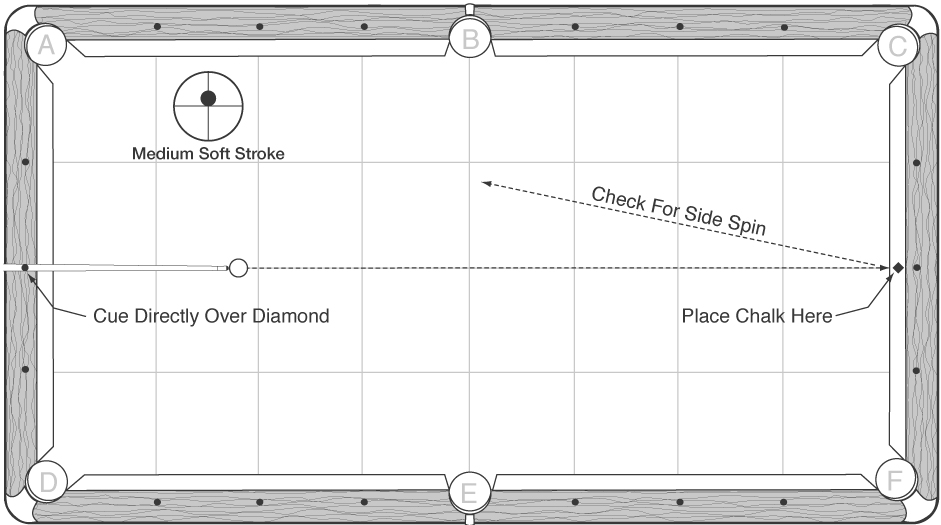
This drill will help smooth out and perfect your stroke. The first step is to place a piece of chalk at a 45-degree angle on the edge of the rail opposite the middle diamond. Now place the cue ball next to the spot exactly in line with the middle diamonds on each end rail as diagrammed. You may also want to check the rail next to the chalk just to make sure that it’s in good condition.
As you prepare to shoot, make sure that your cue is directly over the middle diamond. Take dead aim on the middle of the chalk. Use a medium soft stroke with your cue a half tip above center. Hold your cue in position on the follow through. The objective is to have the cue ball rebound back into the middle of your tip. Nothing less than a perfect stroke will achieve the desired result.
If you apply side spin on the cue ball, it will miss your cue tip when it returns back down the table. If the side of the cue ball hits your cue, that’s a pretty good result. However, if the cue ball is striking the rail on either side of your cue a quarter to a half diamond or more off target, then you have some serious flaws to correct.
This drill gives you immediate, unbiased feedback on the accuracy and quality of your setup and stroke. If you are missing the mark, check your follow through. Your cue tip should be pointing directly at the center of the chalk. If it’s pointing to the left, and the cue ball’s returning down the left side of the table, then you’re putting unwanted left English on the cue ball. The opposite holds true if the cue ball is returning down the right side of the table. Your problem may lie in your stroke. You could also be setting up to the cue ball slightly off center. Worst of all, you might be setting up incorrectly and have a flaw in your stroke.
Examine your setup and follow through. You may need to adjust your address position slightly to the left or right. You could also be twisting your arm and/or wrist through impact. Continue the corrective process until the cue ball contacts the tip when it returns back down the table.
Down the Rail Straight-In Shot Drill
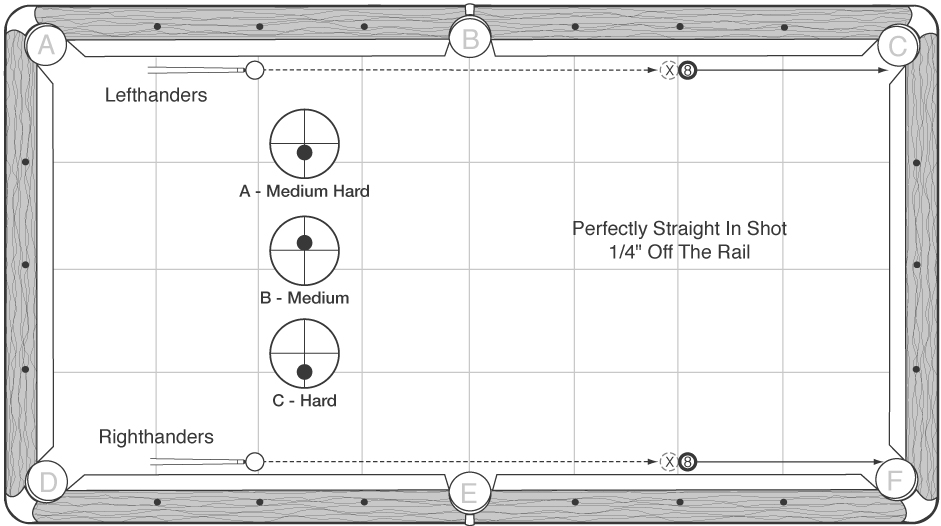
This drill will detect sideways movement in your stroke. It will also help you groove your stroke. The cue ball and object ball are placed 1/4” off the rail. Right-handers and left-handers should shoot this shot on opposite sides of the table so that each can make a bridge that’s unobstructed by the rail.
Once you’ve settled into your stance, check your alignment by looking down at your cue. It should be lined up parallel to the rail. Make any necessary adjustments to straighten out your alignment.
For Part A, address the cue ball a half tip below center. Start out by shooting with a medium hard stroke. Try to make the cue ball stop dead. Stay down on your follow through and check the position of your cue. The tip should be pointing straight at the pocket. Your cue should be parallel to the rail. If it’s not, then you have a flaw to correct. The cue ball’s position will also provide valuable feedback. It should come to rest exactly 1/4” off the rail at the point of contact.
Once you’ve mastered the first phase of this drill, it’s time to move on to Part B. Use a medium stroke and strike the cue ball a half tip above the center. When the shot is hit perfectly, the cue ball will follow the object ball into the corner pocket!
Part C is the toughest of the three exercises. Use a hard draw stroke and cue a tip below center. Try to bring the cue ball back further and further. The ultimate result is to pocket the ball and draw the cue ball all the way back into the opposite corner pocket! Give yourself a perfect “10” if you can pull off this shot. (You can increase the degree of difficulty factor by practicing this shot on tables with tight pockets.)
The Field Goal Drill
The field goal drill can improve your stroke and sharpen your sense of aim. Place two object balls on the rail about 2 3/4” apart. You can approximate this distance by placing a third ball between the two balls. As you’ll recall, a ball is 2 1/4” in diameter. For starters, move the outside balls so the gap between them is 2 3/4”. Finally, remove the middle ball and position the cue ball as shown. Beginning players should first try this drill shooting across the width of the table. Experienced players should shoot this down the length of the table.
Your objective is to shoot the cue ball between the two balls without touching either one. Use enough stroke speed so the cue ball returns to its original position or beyond. This will help with your accuracy. After you’ve made a few successful passes at 2 3/4” (which gave you a 1/2” margin for error), move the two balls closer together and test your skill with the “goal posts” only 2 1/2” apart.
Look for tendencies with your unsuccessful attempts. Are you consistently missing to the left or right? You may discover that you are habitually aiming slightly to the left or right of the target. This could help to explain why you may be constantly missing balls to the same side of the pocket over and over again.
Beyond discovering any flaws in your aim and/or stroke, you can expect to reap a couple of additional benefits from this drill. Your ability to roll the cue ball long distances down an exact line will help you to feather in thin cut shots and to play safeties where you must clip only a very small part of the object ball. In addition, the drill helps promote a smooth stroke as you are rolling the cue ball, not hitting it forcefully, at the object ball.

Shot-making
Progressive Cut Shot Drill
In each drill below, start out with a straight-in shot and then progress to a series of increasingly difficult cut shots. Progressive drills allow you to raise the bar in manageable increments. Before you know it, you’ll be cutting in shots that might have appeared beyond your capabilities. You can make a game with these drills by going back one step each time you miss. Keep score of how many shots that it takes you to complete the drill by making the thinnest cut.
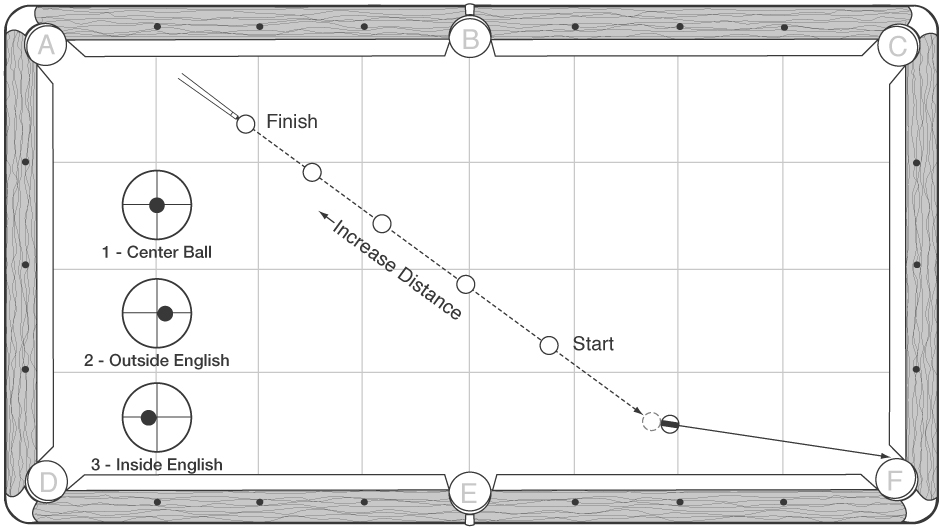
Progressive Distance on Cut Shots
Choose a cut shot such as the one in the diagram and begin to shoot it using center ball. Keep moving the cue ball further away in increments of about one foot. Now repeat the drill, only this time use outside English. Complete the drill by using inside English, which is by far the toughest part of the drill. Concentrate on the adjustments necessary to pocket the balls.
Progressive Cut Shot Drill
In each drill below, start out with a straight-in shot and then progress to a series of increasingly difficult cut shots. Progressive drills allow you to raise the bar in manageable increments. Before you know it, you’ll be cutting in shots that might have appeared beyond your capabilities. You can make a game with these drills by going back one step each time you miss. Keep score of how many shots that it takes you to complete the drill by making the thinnest cut.
Progressive Distance on Cut Shots
Choose a cut shot such as the one in the diagram and begin to shoot it using center ball. Keep moving the cue ball further away in increments of about one foot. Now repeat the drill, only this time use outside English. Complete the drill by using inside English, which is by far the toughest part of the drill. Concentrate on the adjustments necessary to pocket the balls.
Test Your Cut Shots - 9-Ball
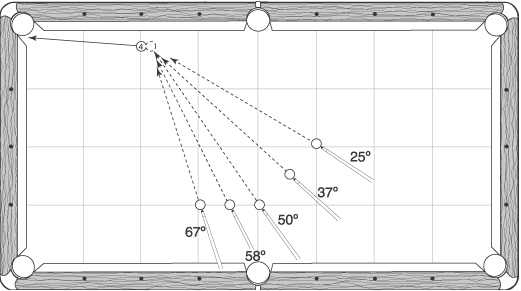
The diagram shows a practice exercise involving cut shots from 25- degrees to 67-degrees. Shoot each shot five or 10 times in each session, recording your results as you go. You may also try starting with either the thin cuts or the thicker cut shots. I suggest you use your imagination and knowledge of your game to set up the shots you want to work on for several sessions until you feel you have them mastered. Then pick out a new group of shots and go to work on them in the next series of practices.
The diagram shows a practice exercise involving cut shots from 25- degrees to 67-degrees. Shoot each shot five or 10 times in each session, recording your results as you go. You may also try starting with either the thin cuts or the thicker cut shots. I suggest you use your imagination and knowledge of your game to set up the shots you want to work on for several sessions until you feel you have them mastered. Then pick out a new group of shots and go to work on them in the next series of practices.
The Long Green Practice Drill - 9-Ball
When all is said and done, proficiency at long green shots may be the single most important deciding factor in who wins at Nine-Ball. To play your best Nine Ball, you’ve simply got to approach these shots with total confidence in your ability to put the ball in the pocket.
The cue balls and object balls in the diagram are easy to set up as they are on the intersections of the diamonds, with the exception of the 1-ball and 6-ball, which are a half of a ball’s width from the rail. When you first practice these shots, use the cueing and speed of stroke that are presented in the table below. Then try other speeds and other cueing options. Each shot has a mirror version so you can gain proficiency in pocketing in both directions.
Mirror shots are also useful in discovering flaws in your technique. You may consistently pocket a ball in one direction, but not in the other. Since the same shot (distance and cut angle) is not really the same because of the direction, you may feel comfortable cutting one way but not the other. A slight loss in confidence could cause you to jerk your stroke just enough to miss.
The cut angles of these shots range from 0 to 62-degrees.The number in parentheses indicates the pocket for each shot.
Zen Master Distraction Drill - 8-Ball
This drill is excellent for learning to make shots in the congested quarters of a bar table. It will improve your shot making and help you to develop Zen like powers of concentration. Start with a near straight in shot like in Part A. Place the cue ball and object ball on donuts. Now place several balls along the channel from the cue ball to the pocket as close to the edge as you dare. Look down the channel to make certain the balls aren’t in the way. Your cue can be used for this purpose. Shoot the shot at least 5-10 times. After several attempts, you should be able to ignore the balls. Once you’ve mastered the basic version, move one or more distracters slightly into the channel. This will reduce the effective pocket opening and improve your shot making and powers of concentration.
The version in Part B is a cut shot. The distracters seriously encroach on your field of vision, cluttering the shot picture. Once again, set up the shot as in the previous drill. Once you’ve mastered it, move one or more balls to the edge of the channel.
Blocking Part of the Pocket
You can improve your accuracy by reducing the effective pocket opening using other balls. In Part A, you have a total clearance of 2 3/4”, or 1/2” more than the width of the 2-ball. Part B demonstrates a couple of rail shots that are partially blocked by the stripe ball. Part C shows you a shot to a partially blocked pocket that comes up over and over again.
You can improve your accuracy by reducing the effective pocket opening using other balls. In Part A, you have a total clearance of 2 3/4”, or 1/2” more than the width of the 2-ball. Part B demonstrates a couple of rail shots that are partially blocked by the stripe ball. Part C shows you a shot to a partially blocked pocket that comes up over and over again.
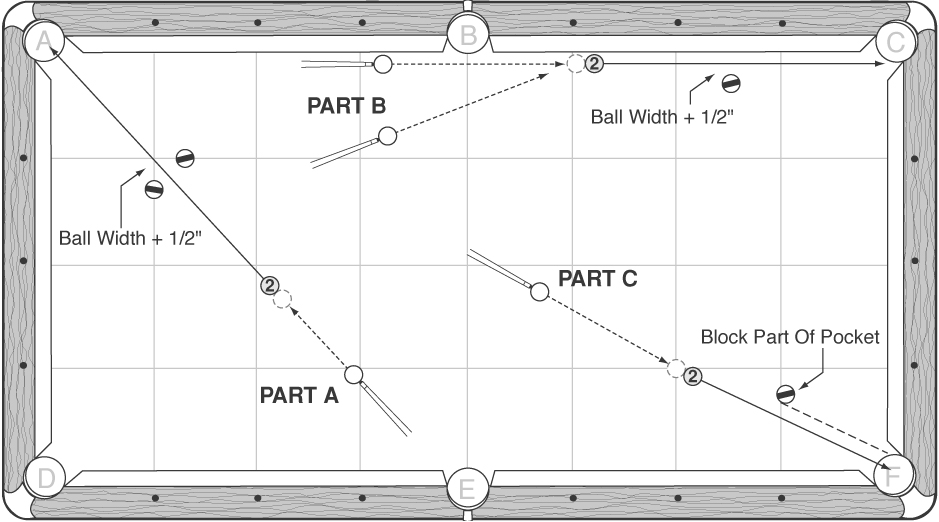
Three Tough Shots to Master - 8-Ball
If you can make tough off-the-rail shots consistently, that’s a sign that your stroke is pure. When you can make these shots with accuracy, shorter versions and shots where you can bridge on the table will look like ducks in a pond.
The far end rail is considered to be a safe haven when there are no other attractive defensive measures. Your smirking opponent probably figures your odds are no better than 30-40% to make the shots in the illustration, and perhaps rightly so. You can wipe away his smile by coolly pocketing any of these and then running out.

Side Pocket Shot making
Far too many players ignore the side pockets. This gives you the opportunity to own another shot that others fear. Spend some time practicing shots into the side pockets from various distances and angles of approach. As you’ll recall from Chapter 4, the effective opening of the side pockets gets ever smaller as the approach angle decreases. Take advantage of the side pockets’ naturally small targets to improve your accuracy.
Far too many players ignore the side pockets. This gives you the opportunity to own another shot that others fear. Spend some time practicing shots into the side pockets from various distances and angles of approach. As you’ll recall from Chapter 4, the effective opening of the side pockets gets ever smaller as the approach angle decreases. Take advantage of the side pockets’ naturally small targets to improve your accuracy.
Basic position routes
Draw shots
Draw shots
Follow Shots - 9-Ball
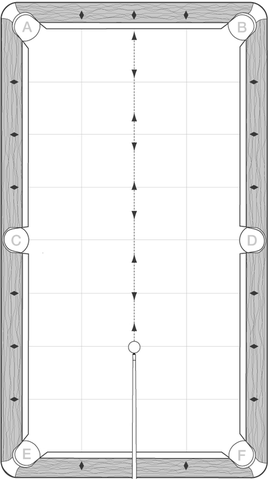
Soft follow shots are especially useful for developing your speed control. With the cue ball and object ball lined up nearly straight-in at a 5-degree angle, practice getting shape at Position A, then Positions B, C, D, E and F. Stick with each ending location until you can consistently stop the cue ball near or on the target. The 5-degree angle was chosen because most soft follow shots (or any shot for that matter) are seldom lined up directly at the pocket. It is useful to become familiar with how much the cue ball veers to the opposite side of the line to the pocket after contact. A long shot forces you to shoot with both accuracy and touch.
Soft follow shots are especially useful for developing your speed control. With the cue ball and object ball lined up nearly straight-in at a 5-degree angle, practice getting shape at Position A, then Positions B, C, D, E and F. Stick with each ending location until you can consistently stop the cue ball near or on the target. The 5-degree angle was chosen because most soft follow shots (or any shot for that matter) are seldom lined up directly at the pocket. It is useful to become familiar with how much the cue ball veers to the opposite side of the line to the pocket after contact. A long shot forces you to shoot with both accuracy and touch.
Progressive Draw - 9-Ball
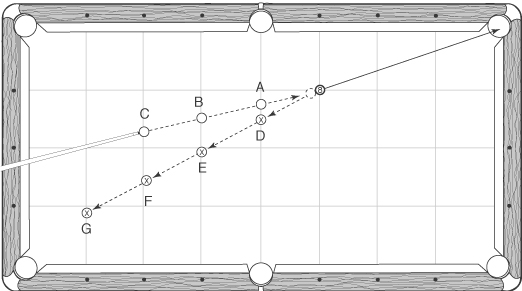
Progressive drills are especially useful for developing your draw stroke. The object ball is placed in the same position for each shot. Start with the cue ball in Position A. After drawing to Position D, the goal is to draw the cue ball a foot farther back on each successive shot to Positions E, F and G. This takes expert technique and speed control. To generate decisive draw spin, be sure to strike the cue ball at least one tip below center. Use a smooth stroke and follow through completely. Avoid the temptation to overpower the cue ball, as that will produce excessive cue ball speed and minimal backspin. Once you have completed phase one, repeat the drill with the cue ball at Position B, and finally at Position C. A small cut angle of 5 degrees is recommended because it will teach you the widening path of the cue ball on draw shots.
Progressive drills are especially useful for developing your draw stroke. The object ball is placed in the same position for each shot. Start with the cue ball in Position A. After drawing to Position D, the goal is to draw the cue ball a foot farther back on each successive shot to Positions E, F and G. This takes expert technique and speed control. To generate decisive draw spin, be sure to strike the cue ball at least one tip below center. Use a smooth stroke and follow through completely. Avoid the temptation to overpower the cue ball, as that will produce excessive cue ball speed and minimal backspin. Once you have completed phase one, repeat the drill with the cue ball at Position B, and finally at Position C. A small cut angle of 5 degrees is recommended because it will teach you the widening path of the cue ball on draw shots.
Pogressive Position Drill – 8-Ball
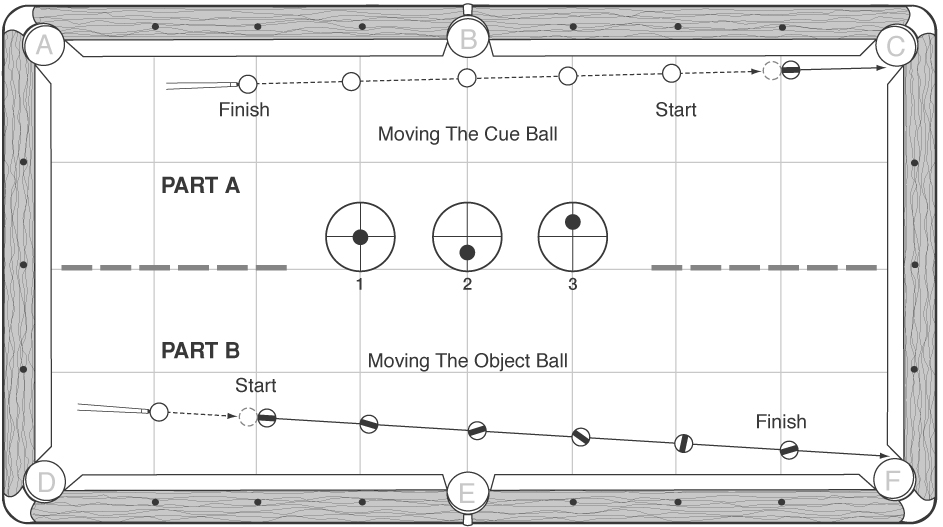
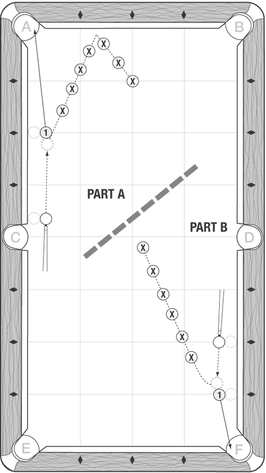
Superb speed control on very soft to medium soft follow shots is the number one skill for playing the kind of precision shape that can enable you to access the most tightly guarded position zones. The drill in Part A will help you ingrain the touch of champions. Place the cue ball and object ball a ball’s width from the rail. In one version of the drill, start with the shortest follow shot and work your way up as shown. It helps to put a small coin next to each of the cue ball’s ending positions. The goal is to increase the distance on each shot by a few inches. As your touch improves, the increments should begin to more closely resemble the evenly spaced ones in the diagram. In the second version, start with the more distant version and work you way back to the softest one.
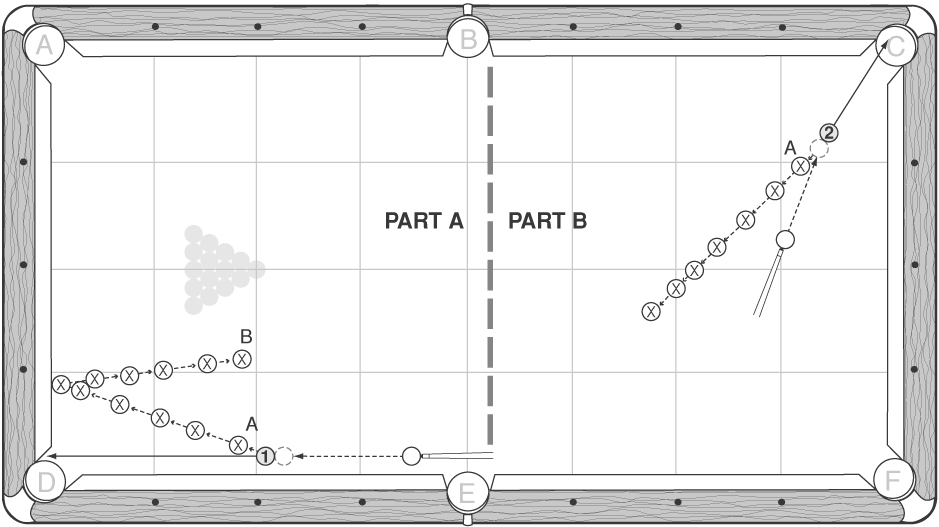
Part B shows a progressive drill with a draw shot. To generate decisive draw spin, be sure to strike the cue ball at least one tip below center. Use a smooth stroke and follow through completely. Start with the shortest version and work your way up. If you can nearly match the intervals shown in the diagram, your draw shot position play on a bar table will rival the pros.
Superb speed control on very soft to medium soft follow shots is the number one skill for playing the kind of precision shape that can enable you to access the most tightly guarded position zones. The drill in Part A will help you ingrain the touch of champions. Place the cue ball and object ball a ball’s width from the rail. In one version of the drill, start with the shortest follow shot and work your way up as shown. It helps to put a small coin next to each of the cue ball’s ending positions. The goal is to increase the distance on each shot by a few inches. As your touch improves, the increments should begin to more closely resemble the evenly spaced ones in the diagram. In the second version, start with the more distant version and work you way back to the softest one.
Part B shows a progressive drill with a draw shot. To generate decisive draw spin, be sure to strike the cue ball at least one tip below center. Use a smooth stroke and follow through completely. Start with the shortest version and work your way up. If you can nearly match the intervals shown in the diagram, your draw shot position play on a bar table will rival the pros.
One-Rail Rebound Pathways - 9-Ball
One-rail position is played on about 49% of all position plays by leading professionals, so that should be enough to convince you these position routes must be mastered. The drill above will increase your awareness of the cue ball’s rebound path off one cushion and improve your speed control as well.
The 1-ball is placed two ball widths off the rail with a 40-degree cut angle. The other recommended positions for this drill are one ball’s width and a half-ball’s width from the rail as shown. You should use cut angles of 20, 30, and 50 degrees. The goal is to learn to control both the distance and direction of cue ball. There are five basic directions as shown. Practice each variation until you can send the cue ball within a few inches of the directional line. This will teach you to use the correct English and cue-ing for each shot. You can learn speed control by setting up donuts a diamond apart along each route. Try to stop the cue ball as close as possible to each donut.

Soft Follow One-Rail - 9-Ball
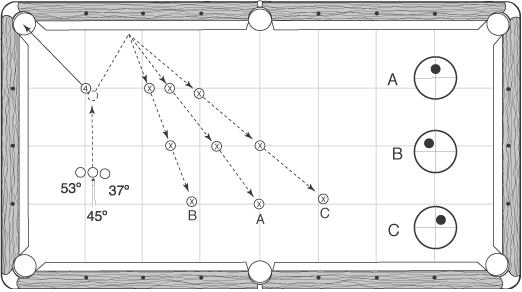
This one-rail position drill will improve your touch and speed control on soft follow shots. Play the shot at 45 degrees with straight follow, then follow with outside English, and using follow with inside English. Try to stop the cue ball at the three positions shown on each path. After playing it at a 45-degree cut angle, repeat the drill with cuts of 37 and 53 degrees. Notice the difference in the cue balls route and traveling distance.
This one-rail position drill will improve your touch and speed control on soft follow shots. Play the shot at 45 degrees with straight follow, then follow with outside English, and using follow with inside English. Try to stop the cue ball at the three positions shown on each path. After playing it at a 45-degree cut angle, repeat the drill with cuts of 37 and 53 degrees. Notice the difference in the cue balls route and traveling distance.
Speed Control
In the chapter on position play I presented the spectrum of speed. The scale is a handy means of visualizing the wide variety of speeds required in Straight Pool. A soft stroke is a #3 while a medium soft stroke is a #4. In between these ranges are several additional grades of speed. You should not be thinking about the scale when playing. Your sense of speed is something you feel based on your experience playing thousands of similar shots. Speed control can be developed by using progressive drills. In the next few diagrams, I’ll cover 6 of the most common position routes in Straight Pool. When practicing progressive drills, try to increase or decrease your speed of stroke in small increments.
Part A is a drill for developing your touch on follow shots. A very soft follow stroke (a #2) will send the cue ball to Position A. A medium speed stroke (a #5) will send the cue ball to Position B. In between are 9 additional positions that lie between #2 and #5 on the scale. Try practicing the drill in both directions. Work your way from A to B with a progressively firmer stroke, then reduce the power as your go from B back to A. If you are able to land within a couple of inches of each X, you have an excellent feel for distance. Imagine what that can do for your game.
Part B shows a progressive drill for developing a fine touch on draw shots. If you can send the cue ball to within a few inches of each position as you work your way back from A to B and beyond, you have the feel for draw of a world class player. Drawing the cue ball precise distances is perhaps the most challenging position play in pool, so don’t become too discouraged if it takes hours of practice (not all at once, of course) to master this drill.
Precision position play
Zig Zag Drill
Place two balls an inch or so off the rail on opposite sides of the table. After pocketing the first ball, replace it in its original position. Now pocket the second ball while playing shape on the first ball. Replace the second ball in its original position and continue to cross the table from side to side replacing the balls as you go. This drill teaches you speed control and how to avoid side pocket scratches.
Hitting a Target Ball - 9-Ball
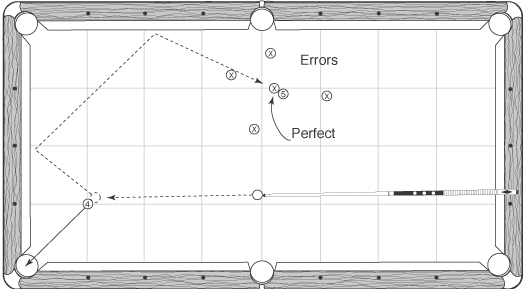
This drill will quickly illuminate any errors with your speed control or directional control. Set up a series of the most commonly used position plays, such as the two-rail route in the illustration above. Place an object ball in the exact spot where you would like to send the cue ball. The objective is to have the cue ball stop as close to the target ball as possible. A bull’s eye would be a direct hit on the target ball just as the cue ball is about to stop. The diagram shows several possible errors to look for. These include poor direction, hitting the shot too easy, or using excessive force. Try playing each shot at least 8-10 times.
On almost every position play, there is a tendency to make the same kind of error over and over again. To cure this problem, place a donut where the cue ball stops after each shot. Your dispersion pattern will reveal your error tendencies. For example, if you are overrunning a shot consistently, you will need to remind yourself to use a softer stroke until you develop the right touch for the shot.
Avoid Obstructers - 9-Ball
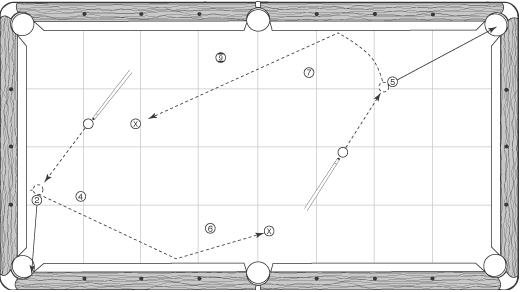
Your skill at position play largely depends on your ability to avoid obstructing balls on the cue ball’s journey from point A to point B. When practicing a specific position route, try placing one or more object bails within two-to-three inches of the cue ball’s pathway. This will teach you to route the cue ball like a pro! The illustration shows two of the many commonly used position routes where you must avoid crashing into another ball. The position of the obstructers in each case makes avoiding contact a challenge.
Your skill at position play largely depends on your ability to avoid obstructing balls on the cue ball’s journey from point A to point B. When practicing a specific position route, try placing one or more object bails within two-to-three inches of the cue ball’s pathway. This will teach you to route the cue ball like a pro! The illustration shows two of the many commonly used position routes where you must avoid crashing into another ball. The position of the obstructers in each case makes avoiding contact a challenge.
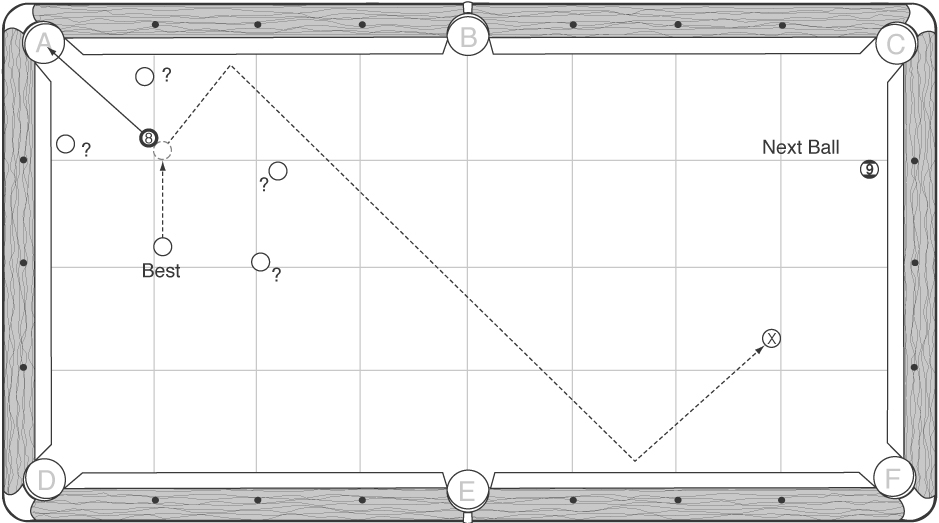
Ball in Hand - Choose the Best Route
Place two balls on the table at random and give yourself ball in hand. Your objective is to discover the best possible route from Point A to Point B. This is an excellent drill for teaching newer players basic position play.
Place two balls on the table at random and give yourself ball in hand. Your objective is to discover the best possible route from Point A to Point B. This is an excellent drill for teaching newer players basic position play.
Multi rail position routes
Two rail position - 9-Ball
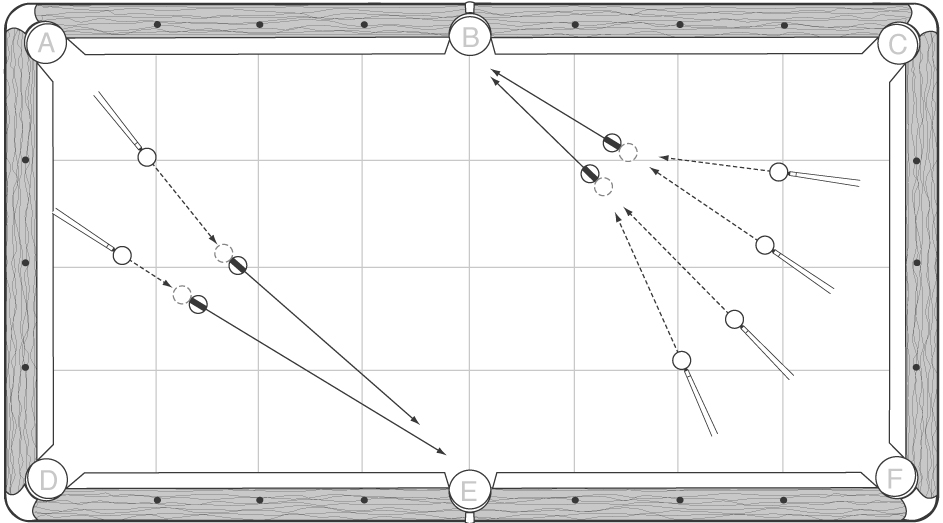
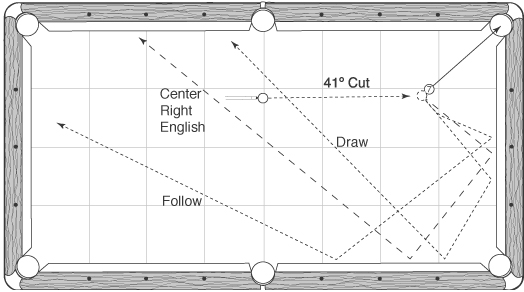
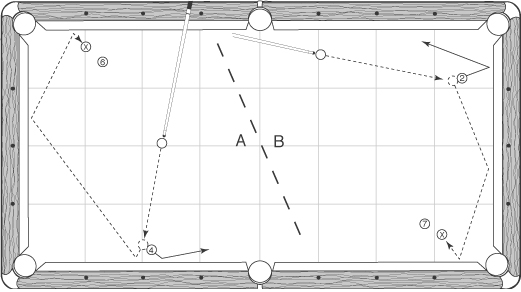
Professional players use two-rail position on 22% of all position plays, so skill at these routes is a must. In the illustration, the arrows after contact indicate various two-rail routes. In each case the route would technically turn into a three-rail route if the cue ball continued to the third rail. Most three-rail routes are basically extensions of two-rail position routes.
The 41-degree cut shot and slight variations of it are among the most commonly played two-rail position plays in Nine Ball. Notice the path taken by the cue ball when a tip of draw or a tip of follow were used. The wide gap between these two can be filled by a variety of speeds and cue-ing. The diagram shows another route using a center axis hit and right English that fills part of the gap. Set up the shot exactly as in the example and practice using different speeds and cue-ing. An hour or so practicing these routes should have a noticeable impact on your position play.
Two rail position - 9-Ball
Professional players use two-rail position on 22% of all position plays, so skill at these routes is a must. In the illustration, the arrows after contact indicate various two-rail routes. In each case the route would technically turn into a three-rail route if the cue ball continued to the third rail. Most three-rail routes are basically extensions of two-rail position routes.
The 41-degree cut shot and slight variations of it are among the most commonly played two-rail position plays in Nine Ball. Notice the path taken by the cue ball when a tip of draw or a tip of follow were used. The wide gap between these two can be filled by a variety of speeds and cue-ing. The diagram shows another route using a center axis hit and right English that fills part of the gap. Set up the shot exactly as in the example and practice using different speeds and cue-ing. An hour or so practicing these routes should have a noticeable impact on your position play.
Pattern play
Ball in Hand Runouts - Nine Ball
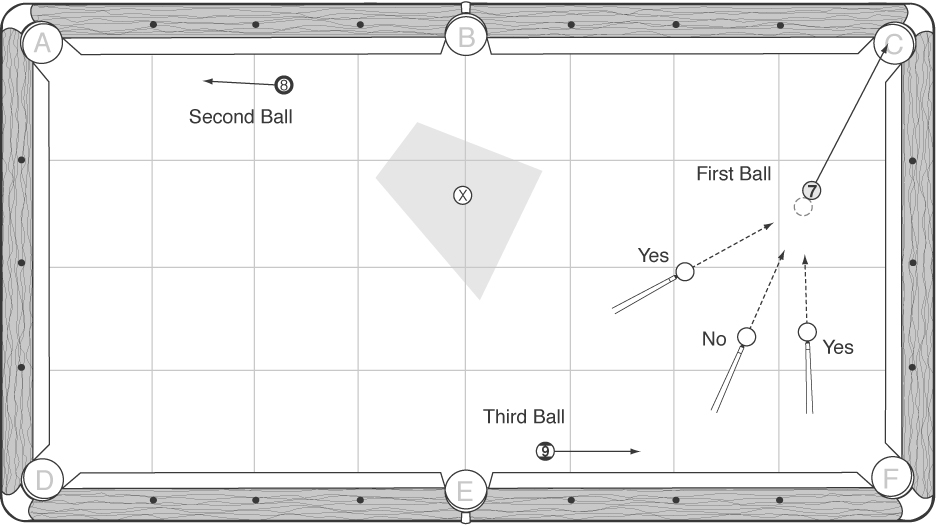
3 to 9 Run out Spread the last three balls from a Nine Ball rack, give yourself ball in hand, and try to run out. Take time to plan your strategy. The diagram shows one possible three ball sequence. The two positions labeled “yes” will enable you to easily send the cue ball into the position zone for the 8-ball. Like the drill above, add additional balls as your skill rises.
Ball in Hand Runouts - Nine Ball
3 to 9 Run out Spread the last three balls from a Nine Ball rack, give yourself ball in hand, and try to run out. Take time to plan your strategy. The diagram shows one possible three ball sequence. The two positions labeled “yes” will enable you to easily send the cue ball into the position zone for the 8-ball. Like the drill above, add additional balls as your skill rises.
Remove Some Balls Drill (Tests Your Knowledge & Skill) 8-Ball
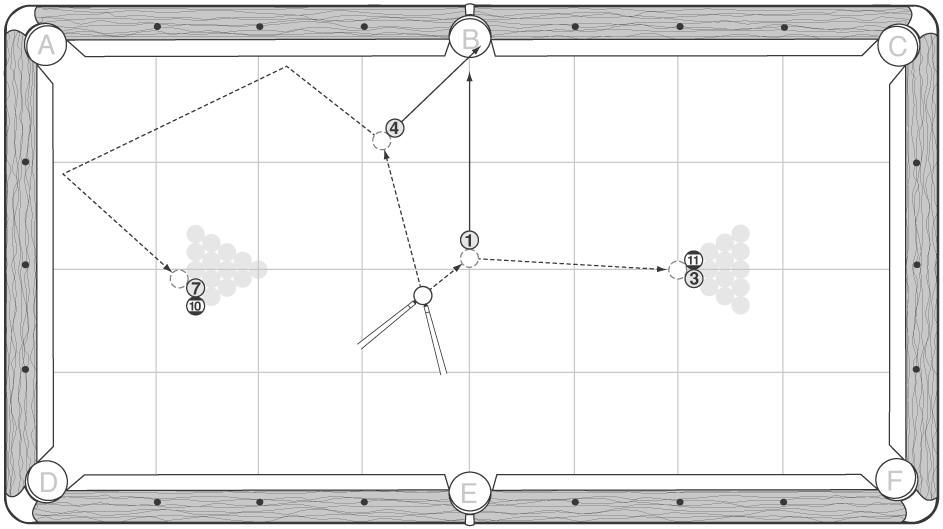
You’ve got to learn to gradually build up your runout power in competition while avoiding the dreaded Failed Runout as much as possible. To avoid stalling out, you’ve first got to know the racks you can run, and those you can’t. This involves identifying the problems that could keep you from completing a run, which is part of what this drill can do for you.
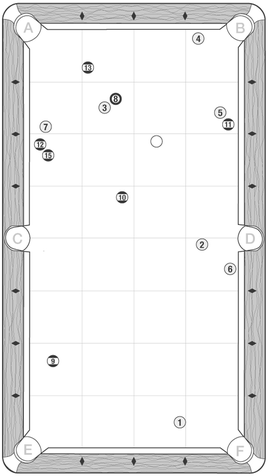
First, rack the balls as you would for a game and break them wide open. Study the layout and then choose a group. Now remove every ball that you think could stop your run. Take off as many as needed until you get to the point where you feel your odds at least 70% that you will runout. Now, see if you can runout. Try this for at least 20 racks and keep your runout percentage. If you’ve only runout 40% of the time, you are overestimating your runout power and/or underestimating the difficulty of the layouts. On the other hand, if you ran out 90% of the time, then you are underestimating your skill. In this case, you need to up the challenge by leaving more balls on the table.
In the illustration, three players at the A, B, and C levels all took the solids. My best guess is that each player should have at least a 70% chance of running out by doing the following:
C Player – removes the 11, 12, 13, and 15-balls.
B Player – removes the 12 and 13-balls
A Player – removes the 12-ball, or possibly nothing.
Tip: If you are practicing on a bar table, take the balls you’ve removed and place them where the balls come out. Once you are done running the table, scatter these balls across the table and pretend that the highest numbered ball is the 8-ball.
You’ve got to learn to gradually build up your runout power in competition while avoiding the dreaded Failed Runout as much as possible. To avoid stalling out, you’ve first got to know the racks you can run, and those you can’t. This involves identifying the problems that could keep you from completing a run, which is part of what this drill can do for you.
First, rack the balls as you would for a game and break them wide open. Study the layout and then choose a group. Now remove every ball that you think could stop your run. Take off as many as needed until you get to the point where you feel your odds at least 70% that you will runout. Now, see if you can runout. Try this for at least 20 racks and keep your runout percentage. If you’ve only runout 40% of the time, you are overestimating your runout power and/or underestimating the difficulty of the layouts. On the other hand, if you ran out 90% of the time, then you are underestimating your skill. In this case, you need to up the challenge by leaving more balls on the table.
In the illustration, three players at the A, B, and C levels all took the solids. My best guess is that each player should have at least a 70% chance of running out by doing the following:
C Player – removes the 11, 12, 13, and 15-balls.
B Player – removes the 12 and 13-balls
A Player – removes the 12-ball, or possibly nothing.
Tip: If you are practicing on a bar table, take the balls you’ve removed and place them where the balls come out. Once you are done running the table, scatter these balls across the table and pretend that the highest numbered ball is the 8-ball.
Safety play
Safety Play – NINE BALL
Smart safety play often leads to ball-in-hand or an easy shot, either of which can translate into victory. Safeties can also demoralize your opponent, which also increases your chances of success. This should provide you with enough incentive to develop this critical facet of the game, which so many neglect to practice.
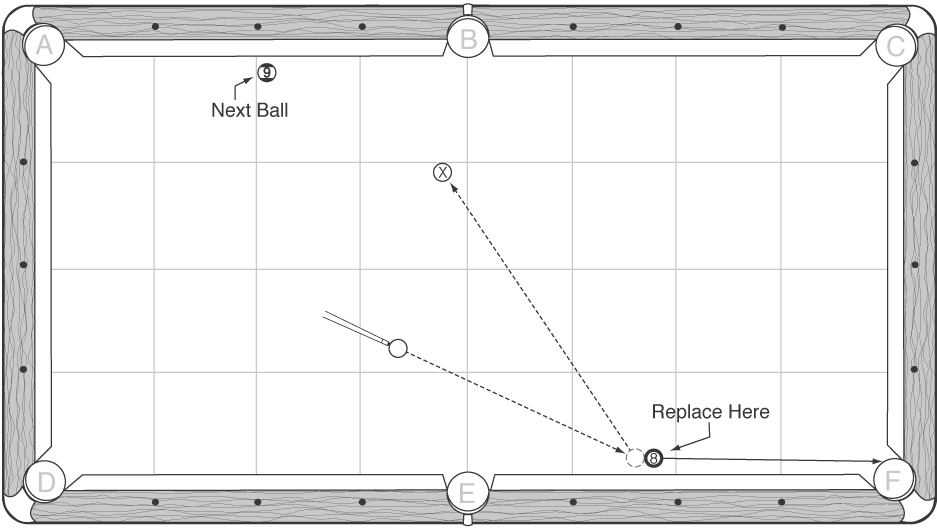
The Cue Ball’s Route After Contact (1) 9-Ball
Playing safe is a lot like position play, only your target is a hook zone instead of a shape zone. Hook zones come in all sizes and shapes, but they tend to be quite a bit smaller than shape zones. You will need to perfect your routing skills if you intend to consistently hit the hook zones.
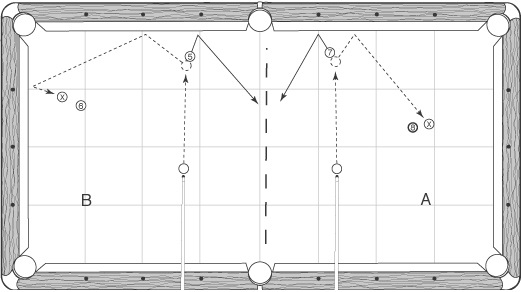
The drills in this section require expert cue ball control. You don’t need to worry about the object ball as long as you take care of whitey. The cue ball and object ball are in the same relative positions in Parts A and B. In Part A, the goal is to cut the 7-ball just the right amount using follow so the cue ball bounces off the rail and rolls behind the 8-ball. Set up several variations of this drill by changing the hit on the object ball and the location of the hook ball.
In Part B, a soft draw shot with just the right speed and contact on the 5-ball will send the cue ball two rails in back of the 6-ball. Again, I suggest you set up several variations of this shot so you can master a variety of safety routes.
Safety Play – NINE BALL
Smart safety play often leads to ball-in-hand or an easy shot, either of which can translate into victory. Safeties can also demoralize your opponent, which also increases your chances of success. This should provide you with enough incentive to develop this critical facet of the game, which so many neglect to practice.
The Cue Ball’s Route After Contact (1) 9-Ball
Playing safe is a lot like position play, only your target is a hook zone instead of a shape zone. Hook zones come in all sizes and shapes, but they tend to be quite a bit smaller than shape zones. You will need to perfect your routing skills if you intend to consistently hit the hook zones.
The drills in this section require expert cue ball control. You don’t need to worry about the object ball as long as you take care of whitey. The cue ball and object ball are in the same relative positions in Parts A and B. In Part A, the goal is to cut the 7-ball just the right amount using follow so the cue ball bounces off the rail and rolls behind the 8-ball. Set up several variations of this drill by changing the hit on the object ball and the location of the hook ball.
In Part B, a soft draw shot with just the right speed and contact on the 5-ball will send the cue ball two rails in back of the 6-ball. Again, I suggest you set up several variations of this shot so you can master a variety of safety routes.
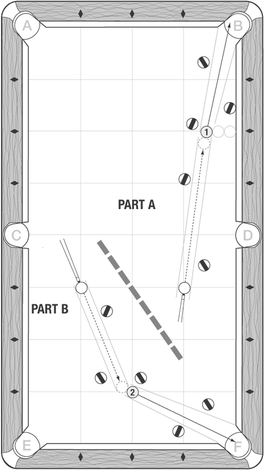
Long Distance Hook Safeties 9-Ball
When the blocker is a long distance from the object ball, you must exercise exquisite control over both the direction and speed of the cue ball. Part A shows a typical three-rail route to a blocker using follow, outside english and superb speed control. Part B presents a tricky two-rail safe that requires draw, proper contact on the 2-ball, and great touch. These are the kind of safeties that appear in games over and over again in competition, which makes them of great value to your game. They are also the types that are misplayed simply because few players are willing to take the time and trouble to practice them.
When the blocker is a long distance from the object ball, you must exercise exquisite control over both the direction and speed of the cue ball. Part A shows a typical three-rail route to a blocker using follow, outside english and superb speed control. Part B presents a tricky two-rail safe that requires draw, proper contact on the 2-ball, and great touch. These are the kind of safeties that appear in games over and over again in competition, which makes them of great value to your game. They are also the types that are misplayed simply because few players are willing to take the time and trouble to practice them.
Kicking practices
Kicking Practice 9-Ball
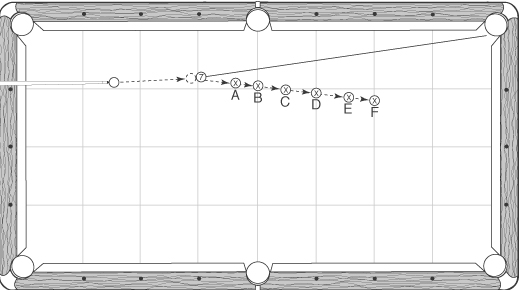
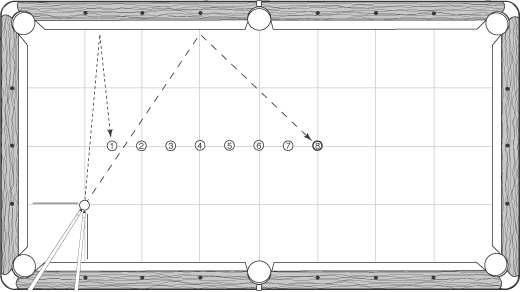
You can develop an eye for kick shots, much as you have done for aiming regular shots. It just takes practice. I suggest that you pick out several of the shots in the chapter on kicking as practice exercises. Another method to develop your skills is with a series of progressive drills. The drill in the illustration somewhat resembles one that players have used for practicing bank shots.
Place the cue ball and 1-ball where shown and kick for the 1-ball off the side rail. When you can hit it three times in a row, place a ball a half diamond farther up the table in the position of the 2-ball. Once, again, when you have hit it three times in succession, proceed to the next ball. The kick shot to the 8-ball is one of the most troublesome in pool. If you can hit this on three consecutive shots, your kicking practice is really starting to pay off.
If you make this routine a regular part of your practice sessions, try keeping score to measure your progress. One way is to keep shooting each ball until you hit it. A perfect score would be an eight. Advanced players should keep shooting each one until they hit it three straight times. A perfect score would be 24 (3 x 8). You can add variety to the exercise by using different speeds of stroke and by aiming for different sides of the ball.
ADVANCED VERSION
Watch the cue ball – does it go up table or down table? Can you control the side it hits?
Kicking practices
Kicking Practice 9-Ball
You can develop an eye for kick shots, much as you have done for aiming regular shots. It just takes practice. I suggest that you pick out several of the shots in the chapter on kicking as practice exercises. Another method to develop your skills is with a series of progressive drills. The drill in the illustration somewhat resembles one that players have used for practicing bank shots.
Place the cue ball and 1-ball where shown and kick for the 1-ball off the side rail. When you can hit it three times in a row, place a ball a half diamond farther up the table in the position of the 2-ball. Once, again, when you have hit it three times in succession, proceed to the next ball. The kick shot to the 8-ball is one of the most troublesome in pool. If you can hit this on three consecutive shots, your kicking practice is really starting to pay off.
If you make this routine a regular part of your practice sessions, try keeping score to measure your progress. One way is to keep shooting each ball until you hit it. A perfect score would be an eight. Advanced players should keep shooting each one until they hit it three straight times. A perfect score would be 24 (3 x 8). You can add variety to the exercise by using different speeds of stroke and by aiming for different sides of the ball.
ADVANCED VERSION
Watch the cue ball – does it go up table or down table? Can you control the side it hits?
Kicking practices
Kicking Practice 9-Ball
You can develop an eye for kick shots, much as you have done for aiming regular shots. It just takes practice. I suggest that you pick out several of the shots in the chapter on kicking as practice exercises. Another method to develop your skills is with a series of progressive drills. The drill in the illustration somewhat resembles one that players have used for practicing bank shots.
Place the cue ball and 1-ball where shown and kick for the 1-ball off the side rail. When you can hit it three times in a row, place a ball a half diamond farther up the table in the position of the 2-ball. Once, again, when you have hit it three times in succession, proceed to the next ball. The kick shot to the 8-ball is one of the most troublesome in pool. If you can hit this on three consecutive shots, your kicking practice is really starting to pay off.
If you make this routine a regular part of your practice sessions, try keeping score to measure your progress. One way is to keep shooting each ball until you hit it. A perfect score would be an eight. Advanced players should keep shooting each one until they hit it three straight times. A perfect score would be 24 (3 x 8). You can add variety to the exercise by using different speeds of stroke and by aiming for different sides of the ball.
ADVANCED VERSION
Watch the cue ball – does it go up table or down table? Can you control the side it hits?
Break Shots
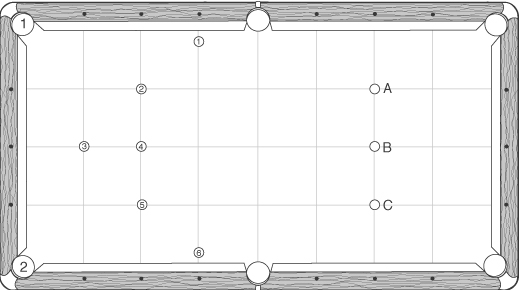
Set up a break ball in a position where the cue ball will be contacting the outside edge of a ball in the side of the rack. Use the donuts to mark the position of the balls. Shoot the break shot from Position A first. Then move the cue ball over about 4” to Position B. Finally, move the cue ball 4” to the left of Position A and play the shot from Position C. Try using half a tip of draw and a medium firm stroke on each shot. Notice how the cue ball reacts in each instance.
Set up a break ball in a position where the cue ball will be contacting the outside edge of a ball in the side of the rack. Use the donuts to mark the position of the balls. Shoot the break shot from Position A first. Then move the cue ball over about 4” to Position B. Finally, move the cue ball 4” to the left of Position A and play the shot from Position C. Try using half a tip of draw and a medium firm stroke on each shot. Notice how the cue ball reacts in each instance.
For more info, visit BilliardsPress.com
>>> Back to Drills