Basic Billiards
About
This website was started in 2016 to give beginner players a place where they can learn how to play pool via premade courses. Basic Billiards is built and tested in the Boston area and some of the instructional videos are filmed at a local poolhall in the Boston area as well.
Basic Billiards’s aim is to help educate beginner to intermediate pool players to become better at the game of pool. We try to create the best videos, images, and articles that we can to make it easy for our users to learn.
One of our main goals is to make sure all of this content is able to be accessed for free and without ads. We think this information should be available to anyone who wants to learn pool. We also hate ads… a lot, so you’ll never see any ads on this site for other websites independent products.
We are continually trying to improve upon what we have to offer you the best instruction possible. If there is something that you think can be improved or if there is a question that we haven't answered, please let us know and we will do our best to change that for you!
Links
Blog link(external)
Website link(external)
Types of bridges
There are several types of bridges you can use to play the game of pool. The most popular bridges are the open and closed bridge. Those aren’t the only two bridges in pool though. There are plenty of variations based off these two bridge types which are needed to play pool. The keys to any bridge variation are stability and comfortability on the shot, so always keep that in mind when trying out different bridges.
Over a Ball
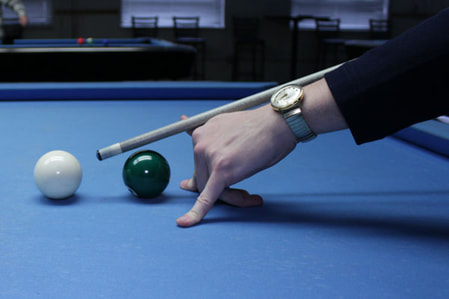
Bridging over a ball is the most difficult shot to perform in pool because you need to raise the back end of your cue stick to shoot. This decreases your accuracy because of swerve and it’s uncomfortable to cue at that angle. To avoid hitting the ball your bridging over, use a tripod open bridge to get over the ball and stroke the cue ball safely.
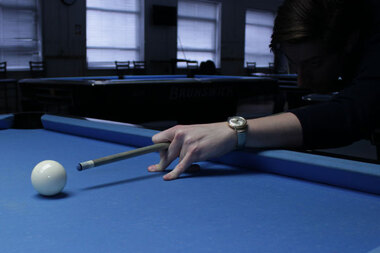
The way to set up your hand is to put your pinky and index finger out on the table with your middle and ring finger behind. This will give you a stable tripod to be able to change elevation the way you need to over the ball. Your thumb should come against the first knuckle of your bridge hand like an open bridge so you can move your cue back and forth smoothly.
Close to the Rail
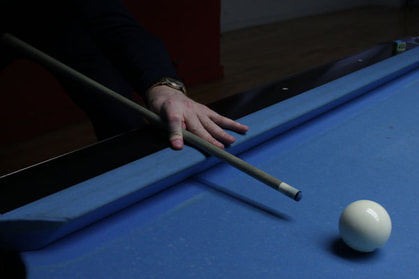
This bridge is for shots where the cue ball is close to the rail (around 6-12 inches), depending on your comfort level with bridge length. What’s different about this bridge is that the cue doesn’t rest on your hand, it rests on the rail of the table with your hand over it.
To set this bridge up, rest the cue on the rail of the table, directly on the aiming line you will be shooting at. From here you want to touch your thumb to the bottom of your middle finger which will create a groove and then you need to place your middle finger and index finger over the cue stick. It is worth noting that it might feel awkward at the beginning to use this bridge because the cue is resting on the table not your hand. But with marginal practice it should feel like second nature.
On the rail
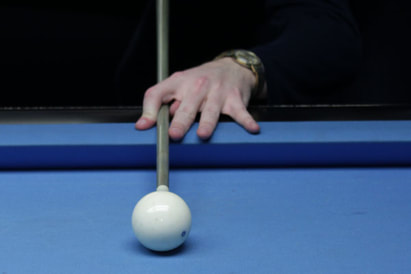
The cue ball on the rail is one of the most disliked shots in pool because you can only see part of the cue ball which hampers your cueing. On top of that it’s difficult to get the bridge length you want because the cue ball is so close to your bridge hand. However, the basics of setting up this bridge are like any other.
To start, place your finger tips on the edge of the rail of the table. This should give you enough distance to have a good stroke without feeling too compressed. The disadvantage of this, is that your palm isn’t on the table and it’s simply supporting your hand in mid-air with your finger tips being the only thing contacting that table. This sacrifices stability for your bridge, but there really isn’t any way around that for these shots. The best you can do to increase the stability of this bridge is to spread your fingers out on the rail wide so you have as much control as possible. This is an open bridge variation, so you want to touch your thumb to the first knuckle on your index finger to create a groove for your cue stick.
Next to the rail
When the cue ball is next to the rail, but you need to shoot diagonally off of it, this is one of the only times when it’s most appropriate to use a closed bridge on the rail of the table. This is a bridge Efren Reyes uses frequently, since it’s a good way to keep your cue steady at this awkward angle. The set up is exactly the same as using a closed bridge, the difference is that this is on the rail of the table and not the bed of it. The challenge for this bridge is to avoid hitting the rail with your cue tip as you cue back and forth in addition to getting comfortable with your bridge on the rail. Sometimes you have to manage if all of your fingers are on the wood of the table or if a couple are hanging off of it depending on the location of the cue ball.
When the cue ball is next to the rail, but you need to shoot diagonally off of it, this is one of the only times when it’s most appropriate to use a closed bridge on the rail of the table. This is a bridge Efren Reyes uses frequently, since it’s a good way to keep your cue steady at this awkward angle. The set up is exactly the same as using a closed bridge, the difference is that this is on the rail of the table and not the bed of it. The challenge for this bridge is to avoid hitting the rail with your cue tip as you cue back and forth in addition to getting comfortable with your bridge on the rail. Sometimes you have to manage if all of your fingers are on the wood of the table or if a couple are hanging off of it depending on the location of the cue ball.
Cue Ball ~12-16 inches Off the Rail
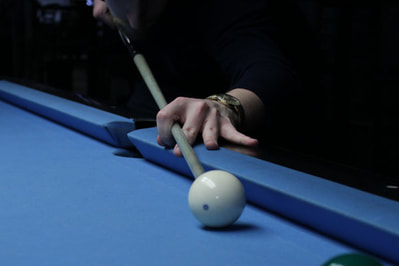
When the cue ball is off the rail, but still close enough that it’s difficult to fit your hand in between the ball and the rail, you can try this bridge to help alleviate that discomfort. This bridge is a closed bridge, and the setup for this that’s unique is that your palm is in the air not in contact with the table. This means that this bridge is less stable than a normal closed bridge where your palm is on the table. To fix this lack of stability, you can do two things. Move your index finger back with your middle and pinky finger standing up on the table to create a tripod. Next, make sure your forearm is resting on the rail of the table as an extra point of contact. This will help minimize movement from your body to create a stable bridge.
When the cue ball is off the rail, but still close enough that it’s difficult to fit your hand in between the ball and the rail, you can try this bridge to help alleviate that discomfort. This bridge is a closed bridge, and the setup for this that’s unique is that your palm is in the air not in contact with the table. This means that this bridge is less stable than a normal closed bridge where your palm is on the table. To fix this lack of stability, you can do two things. Move your index finger back with your middle and pinky finger standing up on the table to create a tripod. Next, make sure your forearm is resting on the rail of the table as an extra point of contact. This will help minimize movement from your body to create a stable bridge.
Stroke Check
A straight stroke is the envy of all billiards players whether you’re playing American Pool, Snooker, or 3 Cushion Billiards. Everyone wants to deliver the cue in a perfectly straight line so they’re as accurate as they can be. No matter who you are you can always look to improve your fundamentals, and the only way to do that is to practice. Here are a few drills you can try to improve your stroke:
Stroke in a bottle
This drill works on getting down basic accuracy for your stroke. It’s great for beginners because it’s easy to tell visually if you’re stroking straight or not. This drill can drastically improve your game with little practice, and you don’t need a table to try this exercise, all you need is a flat surface and a water bottle. So, find an empty plastic bottle with a narrow opening. Then take your cue stick and try to stroke your cue stick through the neck of the bottle back and forth without touching the sides. Start off stroking back and forth slowly and then pick up the pace to see if you can still stroke accurately without contacting the bottle.
Up and Down the Table
Sometimes when players miss shots they think their aim is off, but they missed because of unwanted spin on the cue ball. A good way to find out if you’re accidentally spinning the cue ball is to, place the cue ball on the spot and a piece of chalk on the center diamond at the opposite side of the table. Aim the cue ball directly at that piece of chalk so the cue ball hits the rail and rebounds all the way back to the tip of your stick. If the ball comes back to your tip without moving it, you stroked the ball completely straight and didn’t apply any accidental english. However, if the cue ball comes back and doesn’t hit the tip of your cue stick, this means you either applied english or your aim wasn’t accurate towards the end rail.
Sometimes when players miss shots they think their aim is off, but they missed because of unwanted spin on the cue ball. A good way to find out if you’re accidentally spinning the cue ball is to, place the cue ball on the spot and a piece of chalk on the center diamond at the opposite side of the table. Aim the cue ball directly at that piece of chalk so the cue ball hits the rail and rebounds all the way back to the tip of your stick. If the ball comes back to your tip without moving it, you stroked the ball completely straight and didn’t apply any accidental english. However, if the cue ball comes back and doesn’t hit the tip of your cue stick, this means you either applied english or your aim wasn’t accurate towards the end rail.
To increase the challenge, apply top or bottom spin on the cue ball and see if you can get the same results. Many players have a hard time stroking completely straight when hitting anywhere but center ball, so practicing hitting the cue ball straight this way is a good way to tell if you have that problem.
On the other hand, to decrease difficulty, you can try the same drill, but across the short side of the table instead of up and down it. For this, place the cue ball 6 inches off the center diamond on the long rail and then aim for the center diamond on the opposite side rail. Your goal is the same as above, but just over a shorter distance which makes it easier to achieve.
In Between Two Golf Tees
This drill is one invented by Joe Tucker, a professional pool instructor from Rhode Island. This drill tests the smoothness of your stroke and how well you keep your cue in line all the way through a shot.
To set it up, place an object ball on the table and the cue ball straight in with that ball into the corner pocket. Behind the cue ball place two golf tees about an inch and a half apart. The goal is to pocket the object ball without sidespin and without knocking over one of the golf tees.
If you do hit over a tee, this means that your cue moved either to the right or left of the line on the shot which means you didn’t stroke the cue ball straight all the way through. The interesting part about this drill is its possible to make the cue ball without spin and still hit over a golf tee. That means you can make a ball and still have a bad stroke. So, if you want to be consistent at the pool table you want to make sure that you’re both making the object ball without spin and not hitting over the golf tees to have a totally straight stroke.
Straight in Shots
The ultimate stroke training drill is to hit balls at distance. This is always the best way to work on your stroke because if you made the shot, there’s a fairly good chance you hit it well. Practicing straight ins also translates well to real game situations. The easiest place for your stroke to break down is during a straight in shot. This is partially because players think these shots are easy so they mentally let up which leads to them missing. So practicing them is always a benefit.
When you practice these shots, make a goal to hit 5 or 10 in a row before moving on. Or see how many you can make out of 20 shots total and record that number to beat it next time.
Video Camera
It’s tough to see what you’re doing while you’re doing it which makes it difficult to self correct when it comes to your stroke. If you can, try to record yourself shooting shots from different angles. You’d be amazed at what you might discover through this process. You might notice that you actually only take one or two practice strokes when you think you take more. Or you could find you jump up on shots or adjust your aim while you’re down on the ball. Try taking your phone or using a video camera to record yourself playing to see what you can discover about your game.

